Using DPDK and RDMA
The containerized Data Plane Development Kit (DPDK) application is supported on OpenShift Container Platform. You can use Single Root I/O Virtualization (SR-IOV) network hardware with the Data Plane Development Kit (DPDK) and with remote direct memory access (RDMA).
Before you perform any tasks in the following documentation, ensure that you installed the SR-IOV Network Operator.
Example use of a virtual function in a pod
You can run a remote direct memory access (RDMA) or a Data Plane Development Kit (DPDK) application in a pod with SR-IOV VF attached.
This example shows a pod using a virtual function (VF) in RDMA mode:
apiVersion: v1
kind: Pod
metadata:
  name: rdma-app
  annotations:
    k8s.v1.cni.cncf.io/networks: sriov-rdma-mlnx
spec:
  containers:
  - name: testpmd
    image: <RDMA_image>
    imagePullPolicy: IfNotPresent
    securityContext:
      runAsUser: 0
      capabilities:
        add: ["IPC_LOCK","SYS_RESOURCE","NET_RAW"]
    command: ["sleep", "infinity"]
The following example shows a pod with a VF in DPDK mode:
apiVersion: v1
kind: Pod
metadata:
  name: dpdk-app
  annotations:
    k8s.v1.cni.cncf.io/networks: sriov-dpdk-net
spec:
  containers:
  - name: testpmd
    image: <DPDK_image>
    securityContext:
      runAsUser: 0
      capabilities:
        add: ["IPC_LOCK","SYS_RESOURCE","NET_RAW"]
    volumeMounts:
    - mountPath: /dev/hugepages
      name: hugepage
    resources:
      limits:
        memory: "1Gi"
        cpu: "2"
        hugepages-1Gi: "4Gi"
      requests:
        memory: "1Gi"
        cpu: "2"
        hugepages-1Gi: "4Gi"
    command: ["sleep", "infinity"]
  volumes:
  - name: hugepage
    emptyDir:
      medium: HugePages
Use a virtual function in DPDK mode with an Intel NIC
You can use a virtual function (VF) in Data Plane Development Kit (DPDK) mode with an Intel NIC by creating a SriovNetworkNodePolicy object and then deploying a pod.
Prerequisites
- Install the OpenShift CLI (
oc). - Install the SR-IOV Network Operator.
- Log in as a user with
cluster-adminprivileges.
Procedure
-
Create the following
SriovNetworkNodePolicyobject, and then save the YAML in theintel-dpdk-node-policy.yamlfile.apiVersion: sriovnetwork.openshift.io/v1kind: SriovNetworkNodePolicymetadata:name: intel-dpdk-node-policynamespace: openshift-sriov-network-operatorspec:resourceName: intelnicsnodeSelector:feature.node.kubernetes.io/network-sriov.capable: "true"priority: <priority>numVfs: <num>nicSelector:vendor: "8086"deviceID: "158b"pfNames: ["<pf_name>", ...]rootDevices: ["<pci_bus_id>", "..."]deviceType: vfio-pciwhere:
spec.deviceType- Specifies the driver type for the virtual functions. Set to
vfio-pci.
noteSee the
Configuring SR-IOV network devicessection for a detailed explanation on each option inSriovNetworkNodePolicy.When applying the configuration specified in a
SriovNetworkNodePolicyobject, the SR-IOV Operator might drain the nodes, and in some cases, reboot nodes. It might take several minutes for a configuration change to apply. Ensure that there are enough available nodes in your cluster to handle the evicted workload beforehand.After the configuration update is applied, all the pods in
openshift-sriov-network-operatornamespace will change to aRunningstatus. -
Create the
SriovNetworkNodePolicyobject by running the following command:$ oc create -f intel-dpdk-node-policy.yaml -
Create the following
SriovNetworkobject, and then save the YAML in theintel-dpdk-network.yamlfile.apiVersion: sriovnetwork.openshift.io/v1kind: SriovNetworkmetadata:name: intel-dpdk-networknamespace: openshift-sriov-network-operatorspec:networkNamespace: <target_namespace>ipam: |-# ...vlan: <vlan>resourceName: intelnicswhere:
spec.ipam- Specifies a configuration object for the IPAM CNI plugin as a YAML block scalar. The plugin manages IP address assignment for the attachment definition.
noteSee the "Configuring SR-IOV additional network" section for a detailed explanation on each option in
SriovNetwork.An optional library, app-netutil, provides several API methods for gathering network information about a container’s parent pod.
-
Create the
SriovNetworkobject by running the following command:$ oc create -f intel-dpdk-network.yaml -
Create the following
Podspec, and then save the YAML in theintel-dpdk-pod.yamlfile.apiVersion: v1kind: Podmetadata:name: dpdk-appnamespace: <target_namespace>annotations:k8s.v1.cni.cncf.io/networks: intel-dpdk-networkspec:containers:- name: testpmdimage: <DPDK_image>securityContext:runAsUser: 0capabilities:add: ["IPC_LOCK","SYS_RESOURCE","NET_RAW"]volumeMounts:- mountPath: /mnt/hugename: hugepageresources:limits:openshift.io/intelnics: "1"memory: "1Gi"cpu: "4"hugepages-1Gi: "4Gi"requests:openshift.io/intelnics: "1"memory: "1Gi"cpu: "4"hugepages-1Gi: "4Gi"command: ["sleep", "infinity"]volumes:- name: hugepageemptyDir:medium: HugePageswhere:
metadata.namespace- Specifies the same namespace where the
SriovNetworkobjectintel-dpdk-networkis created. If you want to create the pod in a different namespace, changetarget_namespacein both thePodspec and theSriovNetworkobject. spec.containers.image- Specifies the DPDK image which includes your application and the DPDK library used by application.
spec.containers.securityContext.capabilities.add- Specifies additional capabilities required by the application inside the container for hugepage allocation, system resource allocation, and network interface access.
spec.containers.volumeMounts.mountPath- Specifies the path where a hugepage volume is mounted in the DPDK pod. The hugepage volume is backed by the
emptyDirvolume type with the medium beingHugepages. spec.containers.resources.limits.openshift.io/intelnics- Optional: Specifies the number of DPDK devices allocated to DPDK pod. If not explicitly specified, this resource request and limit is automatically added by the SR-IOV network resource injector. The SR-IOV network resource injector is an admission controller component managed by the SR-IOV Operator. It is enabled by default and can be disabled by setting
enableInjectoroption tofalsein the defaultSriovOperatorConfigCR. spec.containers.resources.limits.cpu- Specifies the number of CPUs. The DPDK pod usually requires exclusive CPUs to be allocated from the kubelet. This is achieved by setting CPU Manager policy to
staticand creating a pod withGuaranteedQoS. spec.containers.resources.limits.hugepages-1Gi- Specifies the hugepage size
hugepages-1Giorhugepages-2Miand the quantity of hugepages that will be allocated to the DPDK pod. Configure2Miand1Gihugepages separately. Configuring1Gihugepage requires adding kernel arguments to Nodes. For example, adding kernel argumentsdefault_hugepagesz=1GB,hugepagesz=1Gandhugepages=16will result in16*1Gihugepages be allocated during system boot.
-
Create the DPDK pod by running the following command:
$ oc create -f intel-dpdk-pod.yaml
Use a virtual function in DPDK mode with a Mellanox NIC
You can create a network node policy and create a Data Plane Development Kit (DPDK) pod by using a virtual function in DPDK mode with a Mellanox NIC.
Prerequisites
- You have installed the OpenShift CLI (
oc). - You have installed the Single Root I/O Virtualization (SR-IOV) Network Operator.
- You have logged in as a user with
cluster-adminprivileges.
Procedure
-
Save the following
SriovNetworkNodePolicyYAML configuration to anmlx-dpdk-node-policy.yamlfile:apiVersion: sriovnetwork.openshift.io/v1kind: SriovNetworkNodePolicymetadata:name: mlx-dpdk-node-policynamespace: openshift-sriov-network-operatorspec:resourceName: mlxnicsnodeSelector:feature.node.kubernetes.io/network-sriov.capable: "true"priority: <priority>numVfs: <num>nicSelector:vendor: "15b3"deviceID: "1015"pfNames: ["<pf_name>", ...]rootDevices: ["<pci_bus_id>", "..."]deviceType: netdeviceisRdma: truewhere:
spec.nicSelector.deviceID- Specifies the device hex code of the SR-IOV network device. The value
"1015"is associated with a Mellanox NIC. spec.deviceType- Specifies the driver type for the virtual functions. A Mellanox SR-IOV Virtual Function (VF) can work in DPDK mode without using the
vfio-pcidevice type. Set tonetdevice. The VF device is displayed as a kernel network interface inside a container. spec.isRdma- Setting to
trueenables Remote Direct Memory Access (RDMA) mode. This is required for Mellanox cards to work in DPDK mode.
noteSee Configuring an SR-IOV network device for a detailed explanation of each option in the
SriovNetworkNodePolicyobject.When applying the configuration specified in an
SriovNetworkNodePolicyobject, the SR-IOV Operator might drain the nodes, and in some cases, reboot nodes. It might take several minutes for a configuration change to apply. Ensure that there are enough available nodes in your cluster to handle the evicted workload beforehand.After the configuration update is applied, all the pods in the
openshift-sriov-network-operatornamespace will change to aRunningstatus. -
Create the
SriovNetworkNodePolicyobject by running the following command:$ oc create -f mlx-dpdk-node-policy.yaml -
Save the following
SriovNetworkYAML configuration to anmlx-dpdk-network.yamlfile:apiVersion: sriovnetwork.openshift.io/v1kind: SriovNetworkmetadata:name: mlx-dpdk-networknamespace: openshift-sriov-network-operatorspec:networkNamespace: <target_namespace>ipam: |-...vlan: <vlan>resourceName: mlxnicswhere:
spec.ipam- Specifies a configuration object for the IP Address Management (IPAM) Container Network Interface (CNI) plugin as a YAML block scalar. The plugin manages IP address assignment for the attachment definition.
noteSee Configuring an SR-IOV network device for a detailed explanation on each option in the
SriovNetworkobject.The
app-netutiloption library provides several API methods for gathering network information about the parent pod of a container. -
Create the
SriovNetworkobject by running the following command:$ oc create -f mlx-dpdk-network.yaml -
Save the following
PodYAML configuration to anmlx-dpdk-pod.yamlfile:apiVersion: v1kind: Podmetadata:name: dpdk-appnamespace: <target_namespace>annotations:k8s.v1.cni.cncf.io/networks: mlx-dpdk-networkspec:containers:- name: testpmdimage: <DPDK_image>securityContext:runAsUser: 0capabilities:add: ["IPC_LOCK","SYS_RESOURCE","NET_RAW"]volumeMounts:- mountPath: /mnt/hugename: hugepageresources:limits:openshift.io/mlxnics: "1"memory: "1Gi"cpu: "4"hugepages-1Gi: "4Gi"requests:openshift.io/mlxnics: "1"memory: "1Gi"cpu: "4"hugepages-1Gi: "4Gi"command: ["sleep", "infinity"]volumes:- name: hugepageemptyDir:medium: HugePageswhere:
metadata.namespace- Specifies the same namespace where
SriovNetworkobjectmlx-dpdk-networkis created. To create the pod in a different namespace, changetarget_namespacein both thePodspec andSriovNetworkobject. spec.containers.image- Specifies the DPDK image which includes your application and the DPDK library used by the application.
spec.containers.securityContext.capabilities.add- Specifies additional capabilities required by the application inside the container for hugepage allocation, system resource allocation, and network interface access.
spec.containers.volumeMounts.mountPath- Specifies the path where the hugepage volume is mounted in the DPDK pod. The hugepage volume is backed by the
emptyDirvolume type with the medium beingHugepages. spec.containers.resources.limits.openshift.io/mlxnics- Optional: Specifies the number of DPDK devices allocated for the DPDK pod. If not explicitly specified, this resource request and limit is automatically added by the SR-IOV network resource injector. The SR-IOV network resource injector is an admission controller component managed by SR-IOV Operator. It is enabled by default and can be disabled by setting the
enableInjectoroption tofalsein the defaultSriovOperatorConfigCR. spec.containers.resources.limits.cpu- Specifies the number of CPUs. The DPDK pod usually requires that exclusive CPUs be allocated from the kubelet. To do this, set the CPU Manager policy to
staticand create a pod withGuaranteedQuality of Service (QoS). spec.containers.resources.limits.hugepages-1Gi- Specifies the hugepage size
hugepages-1Giorhugepages-2Miand the quantity of hugepages that will be allocated to the DPDK pod. Configure2Miand1Gihugepages separately. Configuring1Gihugepages requires adding kernel arguments to Nodes.
-
Create the DPDK pod by running the following command:
$ oc create -f mlx-dpdk-pod.yaml
Use the TAP CNI to run a rootless DPDK workload with kernel access
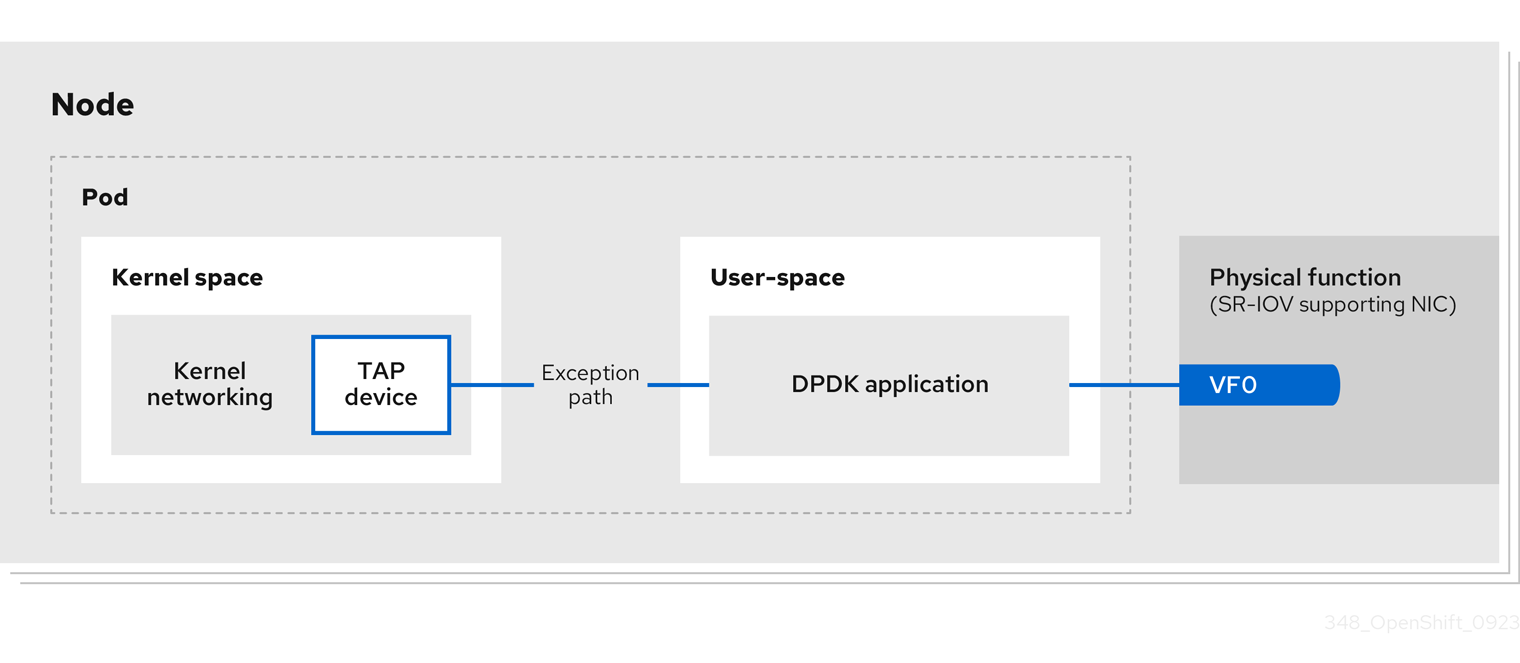
DPDK applications can use virtio-user as an exception path to inject certain types of packets, such as log messages, into the kernel for processing.
In OpenShift Container Platform version 4.14 and later, you can use non-privileged pods to run DPDK applications alongside the tap CNI plugin. To enable this functionality, you need to mount the vhost-net device by setting the needVhostNet parameter to true within the SriovNetworkNodePolicy object.
Figure 1. DPDK and TAP example configuration
Prerequisites
-
You have installed the OpenShift CLI (
oc). -
You have installed the SR-IOV Network Operator.
-
You are logged in as a user with
cluster-adminprivileges. -
Ensure that
setsebools container_use_devices=onis set as root on all nodes.noteUse the Machine Config Operator to set this SELinux boolean.
Procedure
-
Create a file, such as
test-namespace.yaml, with content such as the following example:apiVersion: v1kind: Namespacemetadata:name: test-namespacelabels:pod-security.kubernetes.io/enforce: privilegedpod-security.kubernetes.io/audit: privilegedpod-security.kubernetes.io/warn: privilegedsecurity.openshift.io/scc.podSecurityLabelSync: "false" -
Create the new
Namespaceobject by running the following command:$ oc apply -f test-namespace.yaml -
Create a file, such as
sriov-node-network-policy.yaml, with content such as the following example:apiVersion: sriovnetwork.openshift.io/v1kind: SriovNetworkNodePolicymetadata:name: sriovnicnamespace: openshift-sriov-network-operatorspec:deviceType: netdeviceisRdma: trueneedVhostNet: truenicSelector:vendor: "15b3"deviceID: "101b"rootDevices: ["00:05.0"]numVfs: 10priority: 99resourceName: sriovnicnodeSelector:feature.node.kubernetes.io/network-sriov.capable: "true"where:
spec.deviceType- Specifies that the profile is tailored specifically for Mellanox Network Interface Controllers (NICs). Set to
netdevice. spec.isRdma- Setting to
trueis only required for a Mellanox NIC. spec.needVhostNet- Setting to
truemounts the/dev/net/tunand/dev/vhost-netdevices into the container so the application can create a tap device and connect the tap device to the DPDK workload. spec.nicSelector.vendor- Specifies the vendor hexadecimal code of the SR-IOV network device. The value
"15b3"is associated with a Mellanox NIC. spec.nicSelector.deviceID- Specifies the device hexadecimal code of the SR-IOV network device.
-
Create the
SriovNetworkNodePolicyobject by running the following command:$ oc create -f sriov-node-network-policy.yaml -
Create the following
SriovNetworkobject, and then save the YAML in thesriov-network-attachment.yamlfile:apiVersion: sriovnetwork.openshift.io/v1kind: SriovNetworkmetadata:name: sriov-networknamespace: openshift-sriov-network-operatorspec:networkNamespace: test-namespaceresourceName: sriovnicspoofChk: "off"trust: "on"noteSee the "Configuring SR-IOV additional network" section for a detailed explanation on each option in
SriovNetwork.An optional library,
app-netutil, provides several API methods for gathering network information about a container’s parent pod. -
Create the
SriovNetworkobject by running the following command:$ oc create -f sriov-network-attachment.yaml -
Create a file, such as
tap-example.yaml, that defines a network attachment definition, with content such as the following example:apiVersion: "k8s.cni.cncf.io/v1"kind: NetworkAttachmentDefinitionmetadata:name: tap-onenamespace: test-namespacespec:config: '{"cniVersion": "0.4.0","name": "tap","plugins": [{"type": "tap","multiQueue": true,"selinuxcontext": "system_u:system_r:container_t:s0"},{"type":"tuning","capabilities":{"mac":true}}]}'where:
metadata.namespace- Specifies the same
target_namespacewhere theSriovNetworkobject is created.
-
Create the
NetworkAttachmentDefinitionobject by running the following command:$ oc apply -f tap-example.yaml -
Create a file, such as
dpdk-pod-rootless.yaml, with content such as the following example:apiVersion: v1kind: Podmetadata:name: dpdk-appnamespace: test-namespaceannotations:k8s.v1.cni.cncf.io/networks: '[{"name": "sriov-network", "namespace": "test-namespace"},{"name": "tap-one", "interface": "ext0", "namespace": "test-namespace"}]'spec:nodeSelector:kubernetes.io/hostname: "worker-0"securityContext:fsGroup: 1001runAsGroup: 1001seccompProfile:type: RuntimeDefaultcontainers:- name: testpmdimage: <DPDK_image>securityContext:capabilities:drop: ["ALL"]add:- IPC_LOCK- NET_RAW #for mlx onlyrunAsUser: 1001privileged: falseallowPrivilegeEscalation: truerunAsNonRoot: truevolumeMounts:- mountPath: /mnt/hugename: hugepagesresources:limits:openshift.io/sriovnic: "1"memory: "1Gi"cpu: "4"hugepages-1Gi: "4Gi"requests:openshift.io/sriovnic: "1"memory: "1Gi"cpu: "4"hugepages-1Gi: "4Gi"command: ["sleep", "infinity"]runtimeClassName: performance-cnf-performanceprofilevolumes:- name: hugepagesemptyDir:medium: HugePageswhere:
metadata.namespace- Specifies the same
target_namespacein which theSriovNetworkobject is created. If you want to create the pod in a different namespace, changetarget_namespacein both thePodspec and theSriovNetworkobject. spec.securityContext.fsGroup- Sets the group ownership of volume-mounted directories and files created in those volumes.
spec.securityContext.runAsGroup- Specifies the primary group ID used for running the container.
spec.containers.image- Specifies the DPDK image that contains your application and the DPDK library used by application.
spec.containers.securityContext.capabilities.drop- Removing all capabilities (
ALL) from the container’ssecurityContextmeans that the container has no special privileges beyond what is necessary for normal operation. spec.containers.securityContext.capabilities.add- Specifies additional capabilities required by the application inside the container for hugepage allocation, system resource allocation, and network interface access. These capabilities must also be set in the binary file by using the
setcapcommand. Mellanox network interface controller (NIC) requires theNET_RAWcapability. spec.containers.securityContext.runAsUser- Specifies the user ID used for running the container.
spec.containers.securityContext.privileged- Setting to
falseindicates that the container or containers within the pod should not be granted privileged access to the host system. spec.containers.securityContext.allowPrivilegeEscalation- Setting to
trueallows a container to escalate its privileges beyond the initial non-root privileges it might have been assigned. spec.containers.securityContext.runAsNonRoot- Setting to
trueensures that the container runs with a non-root user. This helps enforce the principle of least privilege, limiting the potential impact of compromising the container and reducing the attack surface. spec.containers.volumeMounts.mountPath- Specifies the path where a hugepage volume is mounted in the DPDK pod. The hugepage volume is backed by the
emptyDirvolume type with the medium beingHugepages. spec.containers.resources.limits.openshift.io/sriovnic- Optional: Specifies the number of DPDK devices allocated for the DPDK pod. If not explicitly specified, this resource request and limit is automatically added by the SR-IOV network resource injector. The SR-IOV network resource injector is an admission controller component managed by SR-IOV Operator. It is enabled by default and can be disabled by setting the
enableInjectoroption tofalsein the defaultSriovOperatorConfigCR. spec.containers.resources.limits.cpu- Specifies the number of CPUs. The DPDK pod usually requires exclusive CPUs to be allocated from the kubelet. This is achieved by setting CPU Manager policy to
staticand creating a pod withGuaranteedQoS. spec.containers.resources.limits.hugepages-1Gi- Specifies the hugepage size
hugepages-1Giorhugepages-2Miand the quantity of hugepages that will be allocated to the DPDK pod. Configure2Miand1Gihugepages separately. Configuring1Gihugepage requires adding kernel arguments to Nodes. For example, adding kernel argumentsdefault_hugepagesz=1GB,hugepagesz=1Gandhugepages=16will result in16*1Gihugepages be allocated during system boot. spec.runtimeClassName- Specifies the performance profile runtime class. If your performance profile is not named
cnf-performance profile, replace that string with the correct performance profile name.
-
Create the DPDK pod by running the following command:
$ oc create -f dpdk-pod-rootless.yaml
Additional resources
- Virtio_user as Exception Path (DPDK documentation)
- Creating a performance profile
- Configuring an SR-IOV network device
Overview of achieving a specific DPDK line rate
To achieve a specific Data Plane Development Kit (DPDK) line rate, deploy a Node Tuning Operator and configure Single Root I/O Virtualization (SR-IOV). You must also tune the DPDK settings for the following resources:
- Isolated CPUs
- Hugepages
- The topology scheduler
In previous versions of OpenShift Container Platform, the Performance Addon Operator was used to implement automatic tuning to achieve low latency performance for OpenShift Container Platform applications. In OpenShift Container Platform 4.11 and later, this functionality is part of the Node Tuning Operator.
The following diagram shows the components of a DPDK test environment:
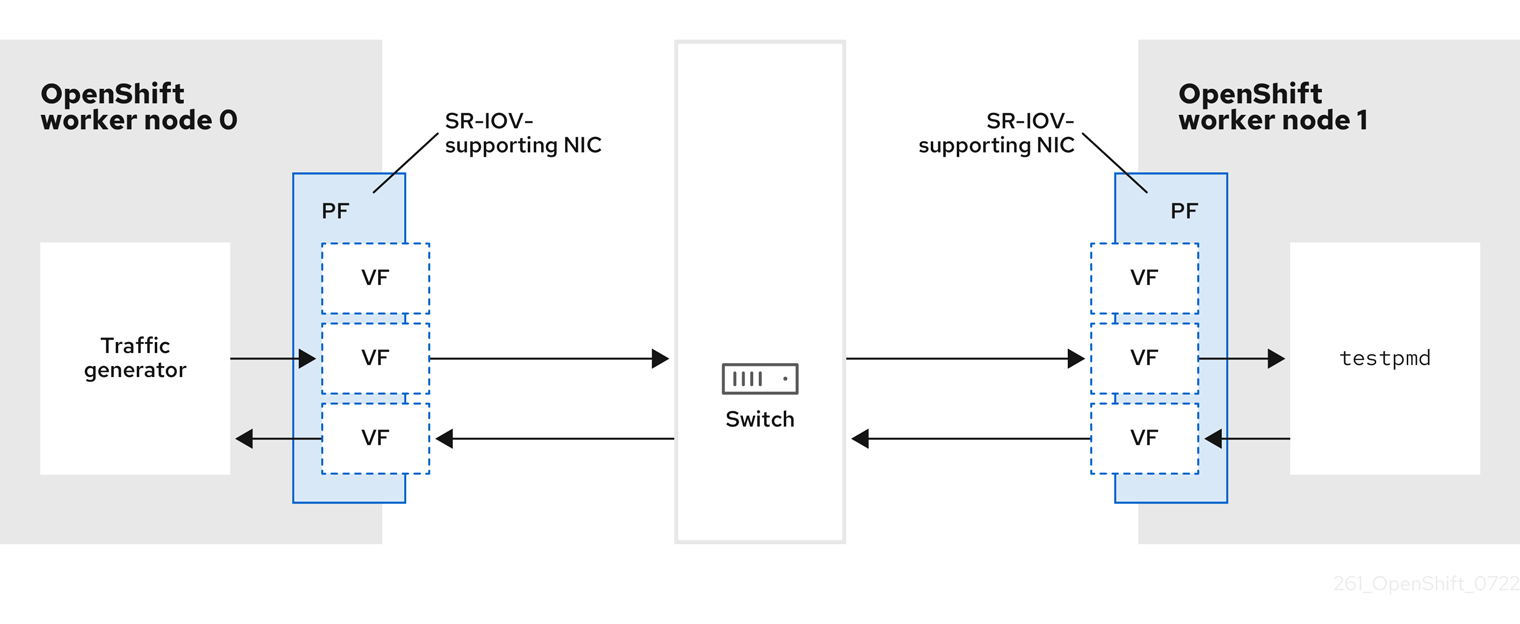
- Traffic generator: An application that can generate high-volume packet traffic.
- SR-IOV-supporting NIC: A network interface controller (NIC) compatible with SR-IOV. The card runs several virtual functions on a physical interface.
- Physical Function (PF): A PCI Express (PCIe) function of a network adapter that supports the SR-IOV interface.
- Virtual Function (VF): A lightweight PCIe function on a network adapter that supports SR-IOV. The VF is associated with the PCIe PF on the network adapter. The VF represents a virtualized instance of the network adapter.
- Switch: A network switch. Nodes can also be connected back-to-back.
testpmd: An example application included with DPDK. Thetestpmdapplication can be used to test the DPDK in a packet-forwarding mode. Thetestpmdapplication is also an example of how to build a fully-fledged application using the DPDK Software Development Kit (SDK).- worker 0 and worker 1: OpenShift Container Platform nodes.
Use SR-IOV and the Node Tuning Operator to achieve a DPDK line rate
You can use the Node Tuning Operator to configure isolated CPUs, hugepages, and a topology scheduler. You can then use the Node Tuning Operator with Single Root I/O Virtualization (SR-IOV) to achieve a specific Data Plane Development Kit (DPDK) line rate.
Prerequisites
-
You have installed the OpenShift CLI (
oc). -
You have installed the SR-IOV Network Operator.
-
You have logged in as a user with
cluster-adminprivileges. -
You have deployed a standalone Node Tuning Operator.
noteIn previous versions of OpenShift Container Platform, the Performance Addon Operator was used to implement automatic tuning to achieve low latency performance for OpenShift applications. In OpenShift Container Platform 4.11 and later, this functionality is part of the Node Tuning Operator.
Procedure
-
Create a
PerformanceProfileobject based on the following example:apiVersion: performance.openshift.io/v2kind: PerformanceProfilemetadata:name: performancespec:globallyDisableIrqLoadBalancing: truecpu:isolated: 21-51,73-103reserved: 0-20,52-72hugepages:defaultHugepagesSize: 1Gpages:- count: 32size: 1Gnet:userLevelNetworking: truenuma:topologyPolicy: "single-numa-node"nodeSelector:node-role.kubernetes.io/worker-cnf: ""where:
metadata.name- Specifies the name of the performance profile.
spec.cpu.isolated- Specifies the CPUs that are isolated for the application workloads. If Hyper-Threading is enabled on the system, allocate the relevant symbolic links to the
isolatedandreservedCPU groups. If the system has multiple non-uniform memory access (NUMA) nodes, allocate CPUs from both NUMAs to both groups. You can also use the Performance Profile Creator for this task. For more information, see Creating a performance profile. spec.cpu.reserved- Specifies the CPUs that are reserved for the operating system and Kubernetes system daemons. You can also specify a list of devices that will have their queues set to the reserved CPU count. For more information, see Reducing NIC queues using the Node Tuning Operator.
spec.hugepages.defaultHugepagesSize- Specifies the default size of hugepages.
spec.hugepages.pages- Specifies the number and size of hugepages to allocate. You can specify the NUMA configuration for the hugepages. By default, the system allocates an even number to every NUMA node on the system.
spec.net.userLevelNetworking- Specifies whether to enable user-level networking. Set to
truefor DPDK workloads. spec.numa.topologyPolicy- Specifies the NUMA topology policy. Set to
single-numa-nodeto ensure that all resources are allocated from the same NUMA node. spec.nodeSelector- Specifies the node selector label for nodes that this performance profile applies to.
-
Save the
yamlfile asmlx-dpdk-perfprofile-policy.yaml. -
Apply the performance profile using the following command:
$ oc create -f mlx-dpdk-perfprofile-policy.yaml
DPDK library for use with container applications
An optional library, app-netutil, provides several API methods for gathering network information about a pod from within a container running within that pod.
This library can assist with integrating SR-IOV virtual functions (VFs) in Data Plane Development Kit (DPDK) mode into the container. The library provides both a Golang API and a C API.
Currently there are three API methods implemented:
GetCPUInfo()- This function determines which CPUs are available to the container and returns the list.
GetHugepages()- This function determines the amount of huge page memory requested in the
Podspec for each container and returns the values. GetInterfaces()- This function determines the set of interfaces in the container and returns the list. The return value includes the interface type and type-specific data for each interface.
The repository for the library includes a sample Dockerfile to build a container image, dpdk-app-centos. The container image can run one of the following DPDK sample applications, depending on an environment variable in the pod specification: l2fwd, l3wd or testpmd. The container image provides an example of integrating the app-netutil library into the container image itself. The library can also integrate into an init container. The init container can collect the required data and pass the data to an existing DPDK workload.
Example SR-IOV Network Operator for virtual functions
You can use the Single Root I/O Virtualization (SR-IOV) Network Operator to allocate and configure Virtual Functions (VFs) from SR-IOV-supporting Physical Function NICs on the nodes.
For more information on deploying the Operator, see Installing the SR-IOV Network Operator. For more information on configuring an SR-IOV network device, see Configuring an SR-IOV network device.
There are some differences between running Data Plane Development Kit (DPDK) workloads on Intel VFs and Mellanox VFs. This section provides object configuration examples for both VF types. The following is an example of an sriovNetworkNodePolicy object used to run DPDK applications on Intel NICs:
apiVersion: sriovnetwork.openshift.io/v1
kind: SriovNetworkNodePolicy
metadata:
  name: dpdk-nic-1
  namespace: openshift-sriov-network-operator
spec:
  deviceType: vfio-pci
  needVhostNet: true
  nicSelector:
    pfNames: ["ens3f0"]
  nodeSelector:
    node-role.kubernetes.io/worker-cnf: ""
  numVfs: 10
  priority: 99
  resourceName: dpdk_nic_1
---
apiVersion: sriovnetwork.openshift.io/v1
kind: SriovNetworkNodePolicy
metadata:
  name: dpdk-nic-1
  namespace: openshift-sriov-network-operator
spec:
  deviceType: vfio-pci
  needVhostNet: true
  nicSelector:
    pfNames: ["ens3f1"]
  nodeSelector:
  node-role.kubernetes.io/worker-cnf: ""
  numVfs: 10
  priority: 99
  resourceName: dpdk_nic_2
where:
spec.deviceType- For Intel NICs,
deviceTypemust bevfio-pci. spec.needVhostNet- If kernel communication with DPDK workloads is required, set to
true. This mounts the/dev/net/tunand/dev/vhost-netdevices into the container so the application can create a tap device and connect the tap device to the DPDK workload.
The following is an example of an sriovNetworkNodePolicy object for Mellanox NICs:
apiVersion: sriovnetwork.openshift.io/v1
kind: SriovNetworkNodePolicy
metadata:
  name: dpdk-nic-1
  namespace: openshift-sriov-network-operator
spec:
  deviceType: netdevice
  isRdma: true
  nicSelector:
    rootDevices:
      - "0000:5e:00.1"
  nodeSelector:
    node-role.kubernetes.io/worker-cnf: ""
  numVfs: 5
  priority: 99
  resourceName: dpdk_nic_1
---
apiVersion: sriovnetwork.openshift.io/v1
kind: SriovNetworkNodePolicy
metadata:
  name: dpdk-nic-2
  namespace: openshift-sriov-network-operator
spec:
  deviceType: netdevice
  isRdma: true
  nicSelector:
    rootDevices:
      - "0000:5e:00.0"
  nodeSelector:
    node-role.kubernetes.io/worker-cnf: ""
  numVfs: 5
  priority: 99
  resourceName: dpdk_nic_2
where:
spec.deviceType- For Mellanox devices the
deviceTypemust benetdevice. spec.isRdma- For Mellanox devices
isRdmamust betrue. Mellanox cards are connected to DPDK applications using Flow Bifurcation. This mechanism splits traffic between Linux user space and kernel space, and can enhance line rate processing capability.
Example SR-IOV network operator
The following is an example definition of an sriovNetwork object. In this case, Intel and Mellanox configurations are identical:
apiVersion: sriovnetwork.openshift.io/v1
kind: SriovNetwork
metadata:
  name: dpdk-network-1
  namespace: openshift-sriov-network-operator
spec:
  ipam: '{"type": "host-local","ranges": [[{"subnet": "10.0.1.0/24"}]],"dataDir":
   "/run/my-orchestrator/container-ipam-state-1"}'
  networkNamespace: dpdk-test
  spoofChk: "off"
  trust: "on"
  resourceName: dpdk_nic_1
---
apiVersion: sriovnetwork.openshift.io/v1
kind: SriovNetwork
metadata:
  name: dpdk-network-2
  namespace: openshift-sriov-network-operator
spec:
  ipam: '{"type": "host-local","ranges": [[{"subnet": "10.0.2.0/24"}]],"dataDir":
   "/run/my-orchestrator/container-ipam-state-1"}'
  networkNamespace: dpdk-test
  spoofChk: "off"
  trust: "on"
  resourceName: dpdk_nic_2
- You can use a different IP Address Management (IPAM) implementation, such as Whereabouts. For more information, see Dynamic IP address assignment configuration with Whereabouts.
- You must request the
networkNamespacewhere the network attachment definition will be created. You must create thesriovNetworkCR under theopenshift-sriov-network-operatornamespace. - The
resourceNamevalue must match that of theresourceNamecreated under thesriovNetworkNodePolicy.
Example DPDK base workload
The following is an example of a Data Plane Development Kit (DPDK) container:
apiVersion: v1
kind: Namespace
metadata:
  name: dpdk-test
---
apiVersion: v1
kind: Pod
metadata:
  annotations:
    k8s.v1.cni.cncf.io/networks: '[
     {
      "name": "dpdk-network-1",
      "namespace": "dpdk-test"
     },
     {
      "name": "dpdk-network-2",
      "namespace": "dpdk-test"
     }
   ]'
    irq-load-balancing.crio.io: "disable"
    cpu-load-balancing.crio.io: "disable"
    cpu-quota.crio.io: "disable"
  labels:
    app: dpdk
  name: testpmd
  namespace: dpdk-test
spec:
  runtimeClassName: performance-performance
  containers:
    - command:
        - /bin/bash
        - -c
        - sleep INF
      image: registry.redhat.io/openshift4/dpdk-base-rhel8
      imagePullPolicy: Always
      name: dpdk
      resources:
        limits:
          cpu: "16"
          hugepages-1Gi: 8Gi
          memory: 2Gi
        requests:
          cpu: "16"
          hugepages-1Gi: 8Gi
          memory: 2Gi
      securityContext:
        capabilities:
          add:
            - IPC_LOCK
            - SYS_RESOURCE
            - NET_RAW
            - NET_ADMIN
        runAsUser: 0
      volumeMounts:
        - mountPath: /mnt/huge
          name: hugepages
  terminationGracePeriodSeconds: 5
  volumes:
    - emptyDir:
        medium: HugePages
      name: hugepages
- Request the SR-IOV networks you need. Resources for the devices are injected automatically.
- Disable the CPU and IRQ load balancing base. See Disabling interrupt processing for individual pods for more information.
- Set the
runtimeClasstoperformance-performance. Do not set theruntimeClasstoHostNetworkorprivileged. - Request an equal number of resources for requests and limits to start the pod with
GuaranteedQuality of Service (QoS).
Do not start the pod with SLEEP and then exec into the pod to start the testpmd or the DPDK workload. This can add additional interrupts as the exec process is not pinned to any CPU.
Example testpmd script
The following is an example script for running testpmd:
#!/bin/bash
set -ex
export CPU=$(cat /sys/fs/cgroup/cpuset/cpuset.cpus)
echo ${CPU}

dpdk-testpmd -l ${CPU} -a ${PCIDEVICE_OPENSHIFT_IO_DPDK_NIC_1} -a ${PCIDEVICE_OPENSHIFT_IO_DPDK_NIC_2} -n 4 -- -i --nb-cores=15 --rxd=4096 --txd=4096 --rxq=7 --txq=7 --forward-mode=mac --eth-peer=0,50:00:00:00:00:01 --eth-peer=1,50:00:00:00:00:02
This example uses two different sriovNetwork CRs. The environment variable contains the Virtual Function (VF) PCI address that was allocated for the pod. If you use the same network in the pod definition, you must split the pciAddress. It is important to configure the correct MAC addresses of the traffic generator. This example uses custom MAC addresses.
Use a virtual function in RDMA mode with a Mellanox NIC
RDMA over Converged Ethernet (RoCE) is a Technology Preview feature only. Technology Preview features are not supported with Red Hat production service level agreements (SLAs) and might not be functionally complete. Red Hat does not recommend using them in production. These features provide early access to upcoming product features, enabling customers to test functionality and provide feedback during the development process.
For more information about the support scope of Red Hat Technology Preview features, see Technology Preview Features Support Scope.
RDMA over Converged Ethernet (RoCE) is the only supported mode when using RDMA on OpenShift Container Platform.
Prerequisites
- Install the OpenShift CLI (
oc). - Install the SR-IOV Network Operator.
- Log in as a user with
cluster-adminprivileges.
Procedure
-
Create the following
SriovNetworkNodePolicyobject, and then save the YAML in themlx-rdma-node-policy.yamlfile.apiVersion: sriovnetwork.openshift.io/v1kind: SriovNetworkNodePolicymetadata:name: mlx-rdma-node-policynamespace: openshift-sriov-network-operatorspec:resourceName: mlxnicsnodeSelector:feature.node.kubernetes.io/network-sriov.capable: "true"priority: <priority>numVfs: <num>nicSelector:vendor: "15b3"deviceID: "1015"pfNames: ["<pf_name>", ...]rootDevices: ["<pci_bus_id>", "..."]deviceType: netdeviceisRdma: truewhere:
spec.nicSelector.deviceID- Specifies the device hex code of the SR-IOV network device.
spec.deviceType- Specifies the driver type for the virtual functions. Set to
netdevicefor Mellanox NICs. spec.isRdma- Set to
trueto enable RDMA mode.
noteSee the
Configuring SR-IOV network devicessection for a detailed explanation on each option inSriovNetworkNodePolicy.When applying the configuration specified in a
SriovNetworkNodePolicyobject, the SR-IOV Operator might drain the nodes, and in some cases, reboot nodes. It might take several minutes for a configuration change to apply. Ensure that there are enough available nodes in your cluster to handle the evicted workload beforehand.After the configuration update is applied, all the pods in the
openshift-sriov-network-operatornamespace will change to aRunningstatus. -
Create the
SriovNetworkNodePolicyobject by running the following command:$ oc create -f mlx-rdma-node-policy.yaml -
Create the following
SriovNetworkobject, and then save the YAML in themlx-rdma-network.yamlfile.apiVersion: sriovnetwork.openshift.io/v1kind: SriovNetworkmetadata:name: mlx-rdma-networknamespace: openshift-sriov-network-operatorspec:networkNamespace: <target_namespace>ipam: |-# ...vlan: <vlan>resourceName: mlxnicswhere:
spec.ipam- Specifies a configuration object for the IPAM CNI plugin as a YAML block scalar. The plugin manages IP address assignment for the attachment definition.
noteSee the "Configuring SR-IOV additional network" section for a detailed explanation on each option in
SriovNetwork.An optional library, app-netutil, provides several API methods for gathering network information about a container’s parent pod.
-
Create the
SriovNetworkNodePolicyobject by running the following command:$ oc create -f mlx-rdma-network.yaml -
Create the following
Podspec, and then save the YAML in themlx-rdma-pod.yamlfile.apiVersion: v1kind: Podmetadata:name: rdma-appnamespace: <target_namespace>annotations:k8s.v1.cni.cncf.io/networks: mlx-rdma-networkspec:containers:- name: testpmdimage: <RDMA_image>securityContext:runAsUser: 0capabilities:add: ["IPC_LOCK","SYS_RESOURCE","NET_RAW"]volumeMounts:- mountPath: /mnt/hugename: hugepageresources:limits:memory: "1Gi"cpu: "4"hugepages-1Gi: "4Gi"requests:memory: "1Gi"cpu: "4"hugepages-1Gi: "4Gi"command: ["sleep", "infinity"]volumes:- name: hugepageemptyDir:medium: HugePageswhere:
metadata.namespace- Specifies the same namespace where
SriovNetworkobjectmlx-rdma-networkis created. If you want to create the pod in a different namespace, changetarget_namespacein both thePodspec and theSriovNetworkobject. spec.containers.image- Specifies the RDMA image which includes your application and the RDMA library used by the application.
spec.containers.securityContext.capabilities.add- Specifies additional capabilities required by the application inside the container for hugepage allocation, system resource allocation, and network interface access.
spec.containers.volumeMounts.mountPath- Specifies the path where the hugepage volume is mounted in the RDMA pod. The hugepage volume is backed by the
emptyDirvolume type with the medium beingHugePages. spec.containers.resources.limits.cpu- Specifies the number of CPUs. The RDMA pod usually requires exclusive CPUs be allocated from the kubelet. This is achieved by setting CPU Manager policy to
staticand creating a pod withGuaranteedQoS. spec.containers.resources.limits.hugepages-1Gi- Specifies the hugepage size (
hugepages-1Giorhugepages-2Mi) and the quantity of hugepages that will be allocated to the RDMA pod. Configure2Miand1Gihugepages separately. Configuring1Gihugepage requires adding kernel arguments to Nodes.
-
Create the RDMA pod by running the following command:
$ oc create -f mlx-rdma-pod.yaml
A test pod template for clusters that use OVS-DPDK on OpenStack
The following testpmd pod demonstrates container creation with huge pages, reserved CPUs, and the SR-IOV port.
apiVersion: v1
kind: Pod
metadata:
  name: testpmd-dpdk
  namespace: mynamespace
  annotations:
    cpu-load-balancing.crio.io: "disable"
    cpu-quota.crio.io: "disable"
# ...
spec:
  containers:
  - name: testpmd
    command: ["sleep", "99999"]
    image: registry.redhat.io/openshift4/dpdk-base-rhel8:v4.9
    securityContext:
      capabilities:
        add: ["IPC_LOCK","SYS_ADMIN"]
      privileged: true
      runAsUser: 0
    resources:
      requests:
        memory: 1000Mi
        hugepages-1Gi: 1Gi
        cpu: '2'
        openshift.io/dpdk1: 1
      limits:
        hugepages-1Gi: 1Gi
        cpu: '2'
        memory: 1000Mi
        openshift.io/dpdk1: 1
    volumeMounts:
      - mountPath: /mnt/huge
        name: hugepage
        readOnly: False
  runtimeClassName: performance-cnf-performanceprofile
  volumes:
  - name: hugepage
    emptyDir:
      medium: HugePages
- The name
dpdk1in this example is a user-createdSriovNetworkNodePolicyresource. You can substitute this name for that of a resource that you create. - If your performance profile is not named
cnf-performance profile, replace that string with the correct performance profile name.
Additional resources
- Red Hat certified hardware (Red Hat Ecosystem Catalog)
- Configuring a cluster for RDMA in Red Hat OpenShift AI
- Creating a performance profile
- Adjusting the NIC queues with the performance profile
- Provisioning real-time and low latency workloads
- Installing the SR-IOV Network Operator
- Configuring an SR-IOV network device
- Dynamic IP address assignment configuration with Whereabouts
- Disabling interrupt processing for individual pods
- Configuring an SR-IOV Ethernet network attachment