Setting up the environment for an OpenShift installation
Before you can install an OpenShift Container Platform cluster on bare metal, you must set up your environment for installation.
Installations RHEL on the provisioner node
With the configuration of the prerequisites complete, the next step is to install RHEL 9.x on the provisioner node. The installer uses the provisioner node as the orchestrator while installing the OpenShift Container Platform cluster.
For the purposes of this document, installing RHEL on the provisioner node is out of scope. However, options include but are not limited to using a RHEL Satellite server, PXE, or installation media.
Preparing the provisioner node for OpenShift Container Platform installation
Begin to set up your environment for cluster installation by preparing the provisioner node.
Procedure
- Log in to the provisioner node via
ssh. - Create a non-root user (
kni) and provide that user withsudoprivileges:terminal# useradd kniterminal# passwd kniterminal# echo "kni ALL=(root) NOPASSWD:ALL" | tee -a /etc/sudoers.d/kniterminal# chmod 0440 /etc/sudoers.d/kni - Create an
sshkey for the new user:terminal# su - kni -c "ssh-keygen -t ed25519 -f /home/kni/.ssh/id_rsa -N ''" - Log in as the new user on the provisioner node:terminal
# su - kni - Use Red Hat Subscription Manager to register the provisioner node:terminal
$ sudo subscription-manager register --username=<user> --password=<pass> --auto-attachterminal$ sudo subscription-manager repos --enable=rhel-9-for-<architecture>-appstream-rpms --enable=rhel-9-for-<architecture>-baseos-rpmsNoteFor more information about Red Hat Subscription Manager, see Registering a RHEL system with command-line tools.
- Install the following packages:terminal
$ sudo dnf install -y libvirt qemu-kvm mkisofs python3-devel jq ipmitool - Modify the user to add the
libvirtgroup to the newly created user:terminal$ sudo usermod --append --groups libvirt <user> - Restart
firewalldand enable thehttpservice:terminal$ sudo systemctl start firewalldterminal$ sudo firewall-cmd --zone=public --add-service=http --permanentterminal$ sudo firewall-cmd --reload - Start the modular
libvirtdaemon sockets:terminal$ for drv in qemu interface network nodedev nwfilter secret storage; do sudo systemctl start virt${drv}d{,-ro,-admin}.socket; done - Create the
defaultstorage pool and start it:terminal$ sudo virsh pool-define-as --name default --type dir --target /var/lib/libvirt/imagesterminal$ sudo virsh pool-start defaultterminal$ sudo virsh pool-autostart default - Create a
pull-secret.txtfile:terminal$ vim pull-secret.txtIn a web browser, navigate to Install OpenShift on Bare Metal with installer-provisioned infrastructure. Click Copy pull secret. Paste the contents into the
pull-secret.txtfile and save the contents in thekniuser’s home directory.
Checking NTP server synchronization
The OpenShift Container Platform installation program installs the chrony Network Time Protocol (NTP) service on the cluster nodes. To complete installation, each node must have access to an NTP time server. You can verify NTP server synchronization by using the chrony service.
For disconnected clusters, you must configure the NTP servers on the control plane nodes. For more information see "Configuring NTP for disconnected clusters".
Prerequisites
- You installed the
chronypackage on the target node.
Procedure
- Log in to the node by using the
sshcommand. - View the NTP servers available to the node by running the following command:terminal
$ chronyc sourcesExample outputMS Name/IP address Stratum Poll Reach LastRx Last sample =============================================================================== ^+ time.cloudflare.com 3 10 377 187 -209us[ -209us] +/- 32ms ^+ t1.time.ir2.yahoo.com 2 10 377 185 -4382us[-4382us] +/- 23ms ^+ time.cloudflare.com 3 10 377 198 -996us[-1220us] +/- 33ms ^* brenbox.westnet.ie 1 10 377 193 -9538us[-9761us] +/- 24ms - Use the
pingcommand to ensure that the node can access an NTP server, for example:terminal$ ping time.cloudflare.comExample outputPING time.cloudflare.com (162.159.200.123) 56(84) bytes of data. 64 bytes from time.cloudflare.com (162.159.200.123): icmp_seq=1 ttl=54 time=32.3 ms 64 bytes from time.cloudflare.com (162.159.200.123): icmp_seq=2 ttl=54 time=30.9 ms 64 bytes from time.cloudflare.com (162.159.200.123): icmp_seq=3 ttl=54 time=36.7 ms ...
Configuring networking
Before installation, you must configure networking settings for the provisioner node. Installer-provisioned clusters deploy with a bare-metal bridge and network resources, and an optional provisioning bridge and network resources.
Figure 1. Configure networking
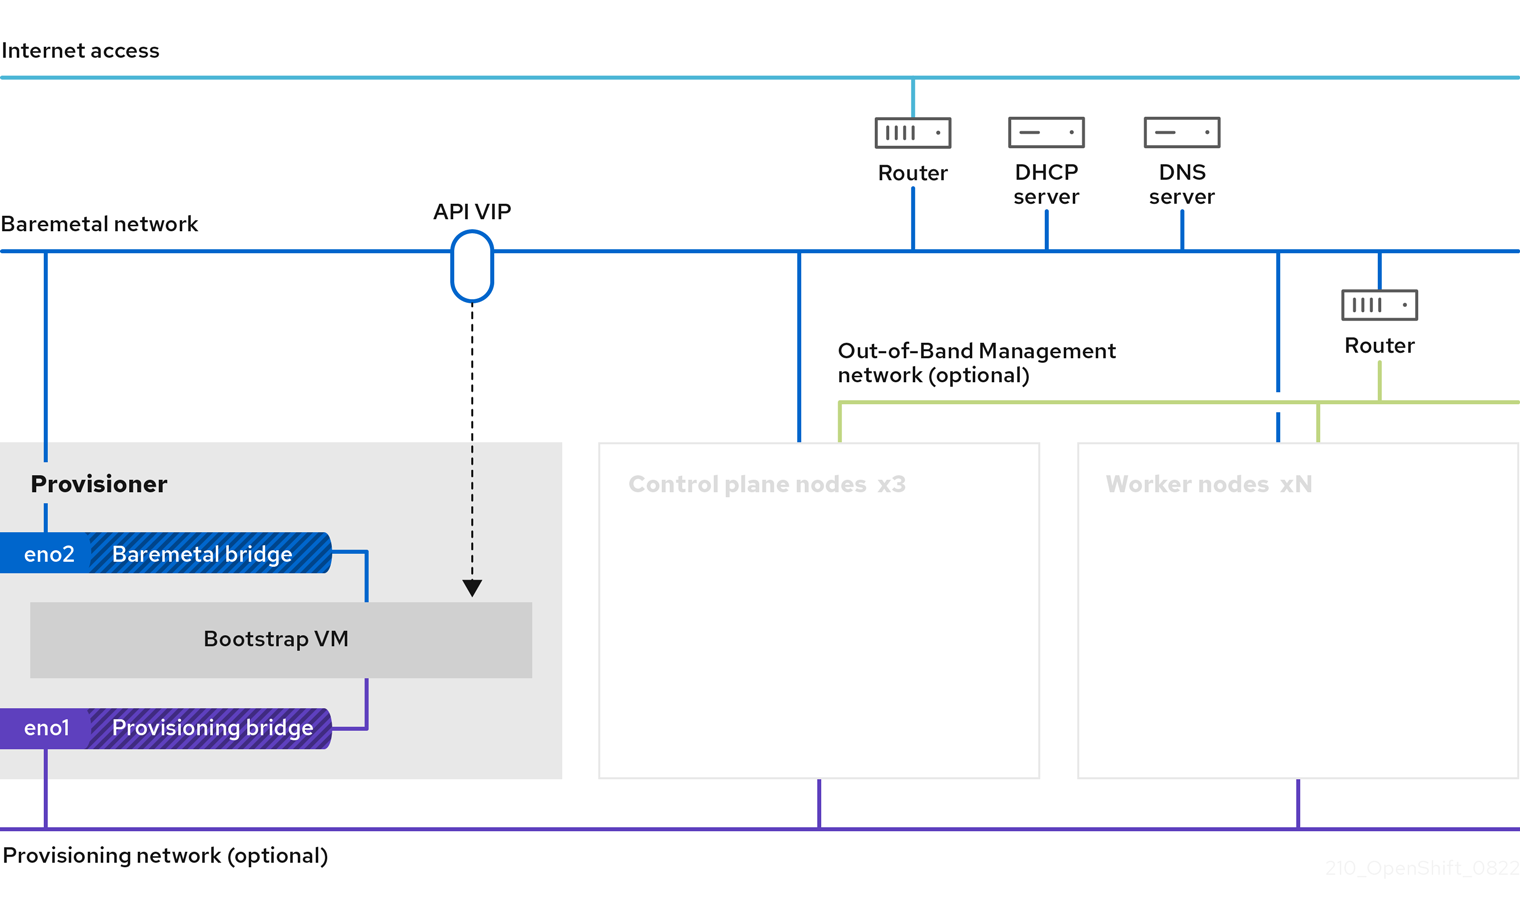
You can also configure networking settings from the OpenShift Container Platform web console.
Prerequisites
- You installed the
nmstatepackage with thesudo dnf install -y <package_name>command. The package includes thenmstatectlCLI.
Procedure
- Configure the bare-metal network:Note
When configuring the bare-metal network and the secure shell (SSH) connection disconnects, NMState has a rollback mechanism that automatically reverts any configurations. You can also use the
nmstatectl gctool to generate configuration files for specified network state files.- For a network using DHCP, run the following command to delete the
/etc/sysconfig/network-scripts/ifcfg-eth0legacy style:yaml$ nmcli con delete "System <baremetal_nic_name>"where:
<baremetal_nic_name>Replace
<baremetal_nic_name>with the name of your network interface controller (NIC).
- For a network that uses Dynamic Host Configuration Protocol (DHCP), create an NMState YAML file and specify the bare-metal bridge interface and any physical interfaces in the file:Example bare-metal bridge interface configuration that uses DHCP
# ... interfaces: - name: <physical_interface_name> type: ethernet state: up ipv4: enabled: false ipv6: enabled: false - name: baremetal type: linux-bridge state: up ipv4: enabled: true dhcp: true bridge: options: stp: enabled: false port: - name: <physical_interface_name> # ... - For a network using static IP addressing and no DHCP network, create an NMState YAML file and specify the bare-metal bridge interface details in the file:Example bare-metal bridge interface configuration that uses static IP addressing and no DHCP network
# ...
dns-resolver:
  config:
    server:
      - <dns_ip_address>
routes:
  config:
    - destination: 0.0.0.0/0
      next-hop-interface: baremetal
      next-hop-address: <gateway_ip>
interfaces:
  - name: <physical_interface_name>
    type: ethernet
    state: up
    ipv4:
      enabled: false
    ipv6:
      enabled: false
  - name: baremetal
    type: linux-bridge
    state: up
    ipv4:
      enabled: true
      dhcp: false
      address:
        - ip: <static_ip_address>
          prefix-length: 24
    bridge:
      options:
        stp:
          enabled: false
      port:
        - name: <physical_interface_name>
# ...
where:
<dns-resolver>Defines the DNS server for your bare-metal system.
<server>Replace
<dns_ip_address>with the IP address for the DNS server.<type>Defines the bridge interface and its static IP configuration.
<gateway>Replace
<gateway_ip>with the IP address of the gateway.<name>Details the physical interface that you set as the bridge port.
- For a network using DHCP, run the following command to delete the
- Apply the network configuration from the YAML file to the network interfaces for the host by entering the following command:terminal
$ nmstatectl apply <path_to_network_yaml> - Back up the network configuration YAML file by entering the following command:terminal
$ nmstatectl show > backup-nmstate.yml - Optional: If you are deploying your cluster in a provisioning network, create or edit an NMState YAML file and specify the details in the file.Note
The IPv6 address can be any address that does not route through the bare-metal network.
Ensure that you enabled Unified Extensible Firmware Interface (UEFI) and set UEFI PXE settings for the IPv6 protocol when using IPv6 addressing.
Example NMState YAML file for a provisioning network# ... interfaces: - name: eth1 type: ethernet state: up ipv4: enabled: false ipv6: enabled: false - name: provisioning type: linux-bridge state: up ipv4: enabled: true dhcp: false address: - ip: 172.22.0.254 prefix-length: 24 ipv6: enabled: true dhcp: false address: - ip: fd00:1101::1 prefix-length: 64 bridge: options: stp: enabled: false port: - name: eth1 # ... - Optional: Establish an SSH connection into the
provisionernode by running the following command:terminal# ssh kni@provisioner.<cluster_name>.<domain>where
<cluster_name>.<domain>Replace
<cluster_name>with the name of your cluster and<domain>with the fully qualified domain name (FQDN) of your cluster.
- Verify that the connection bridges have been properly created by running the following command:terminal
$ sudo nmcli con showExample outputNAME UUID TYPE DEVICE baremetal 832f645a-9337-4afc-b48e-4a55c5779eab bridge baremetal provisioning e7756e01-d026-4a38-b460-129afaac0ec2 bridge provisioning Wired connection 1 49ff4c9c-db76-3139-8c18-c49fa7deb39a ethernet eth0 Wired connection 2 c1fb12b1-88a6-3c07-93b9-187c99204c43 ethernet eth1 lo aa030e0f-21ca-498f-b6ce-bac7d4d793f0 loopback lo
The baremetal-runtimecfg tool
To prevent incorrect IP address assignments, learn how the baremetal-runtimecfg tool determines node IP addresses between your physical network and the Kubernetes control plane.
The baremetal-runtimecfg tool uses the following selection logic sequence to determine the IP address for a node:
- The tool looks at the
NODEIP_HINTand all API and Ingress VIP addresses. - The tool selects an IP address on the same subnet.
- If no address match is found, the tool looks at the default route and selects an IP address from the interface used by that route.
The baremetal-runtimecfg tool uses the following component order of precedence to sort IP addresses for a node:
- Default route priority
- Link index
- IP address family
- Address subnet contains the default gateway
- Public versus private
- Real IPv6 versus IPv4-mapped IPv6 addresses
- Alphanumeric stability
If the wrong IP address is provided because a node has multiple IP addresses on the primary interface, such as br-ex, an IP address mismatch is likely the issue because of the following scenarios:
- Specifically for a secondary IP address on the same subnet as the primary IP address. During a node reboot, if both IP addresses are candidates, the
baremetal-runtimecfgtool might select the secondary IP address based on the sort criteria of the tool. - During a node reboot, if a primary IP address and a secondary IP address on the same subnet are both candidates, the
baremetal-runtimecfgtool might select the secondary IP address based on sorting criteria of the tool. - If the
baremetal-runtimecfgtool does not set a node IP for the Kubelet service, Kubelet chooses an IP address associated with the default route.
Creating a manifest object that includes a customized br-ex bridge
By default, OpenShift Container Platform automatically configures the Open vSwitch (OVS) br-ex bridge on bare-metal nodes. For advanced networking requirements, you can override this default behavior on bare-metal platforms. To do this, create a MachineConfig object that includes an NMState configuration file.
Consider using the customized br-ex bridge configuration for any of the following tasks:
- You need to modify the
br-exbridge after you installed the cluster. - You need to modify the maximum transmission unit (MTU) for your cluster.
- You need to update DNS values.
- You need to modify attributes for a different bond interface. Examples include MIImon (Media Independent Interface Monitor), bonding mode or Quality of Service (QoS).
- You need to enable Link Layer Discovery Protocol (LLDP) to discover and troubleshoot switch connectivity.
Use the default OVS br-ex bridge for standard environments.
Use the default OVS br-ex bridge mechanism for single network interface controller (NIC) environments with default network settings.
After you install Red Hat Enterprise Linux CoreOS (RHCOS) and the system reboots, the Machine Config Operator injects Ignition configuration files into each node. This operation ensures that each node receives the br-ex bridge network configuration. To prevent configuration conflicts, the default OVS br-ex bridge mechanism is disabled.
The following list of interface names are reserved and you cannot use the names with NMstate configurations:
br-extbr-intbr-localbr-nexthopbr0ext-vxlanextgenev_sys_*intk8s-*ovn-k8s-*patch-br-*tun0vxlan_sys_*
Prerequisites
- Optional: You have installed the
nmstatectlCLI tool to validate your NMState configuration.
Procedure
- Create an NMState configuration file and define a customized
br-exbridge network configuration in the file:Example of an NMState configuration for a customized br-ex bridge networkinterfaces: - name: enp2s0 type: ethernet state: up mtu: 9000 ipv4: enabled: false ipv6: enabled: false - name: br-ex type: ovs-bridge state: up ipv4: enabled: false dhcp: false ipv6: enabled: false dhcp: false bridge: options: mcast-snooping-enable: true port: - name: enp2s0 - name: br-ex - name: br-ex type: ovs-interface state: up copy-mac-from: enp2s0 mtu: 9000 ipv4: enabled: true dhcp: true auto-route-metric: 48 ipv6: enabled: true dhcp: true auto-route-metric: 48 # ...where:
interfaces.nameSpecifies the name of the interface.
interfaces.typeSpecifies the type of ethernet.
interfaces.stateSpecifies the requested state for the interface after creation.
mtuTo ensure network stability and performance, you must explicitly declare the MTU in the manifest for every interface. Do not rely on automatic MTU configuration. The MTU configured on a bridge port or VLAN-tagged interface must not exceed the maximum frame size supported by the attached physical medium. A mismatch causes packet fragmentation or connectivity loss.
ipv4.enabledDisables IPv4 and IPv6 in this example.
port.nameSpecifies the node NIC to which the bridge attaches.
auto-route-metricSets the parameter to
48to ensure thebr-exdefault route always has the highest precedence (lowest metric). This configuration prevents routing conflicts with any other interfaces that are automatically configured by theNetworkManagerservice.
- Use the
catcommand to base64-encode the contents of the NMState configuration:terminal$ cat <nmstate_configuration>.yml | base64where:
<nmstate_configuration>Replace
<nmstate_configuration>with the name of your NMState resource YAML file.
- Create a
MachineConfigmanifest file and define a customizedbr-exbridge network configuration analogous to the following example. The installation program automatically applies the updates from theMachineConfigobject to your cluster.yamlapiVersion: machineconfiguration.openshift.io/v1 kind: MachineConfig metadata: labels: machineconfiguration.openshift.io/role: worker name: 10-br-ex-worker spec: config: ignition: version: 3.2.0 storage: files: - contents: source: data:text/plain;charset=utf-8;base64,<base64_encoded_nmstate_configuration> mode: 0644 overwrite: true path: /etc/nmstate/openshift/worker-0.yml - contents: source: data:text/plain;charset=utf-8;base64,<base64_encoded_nmstate_configuration> mode: 0644 overwrite: true path: /etc/nmstate/openshift/worker-1.yml # ...where:
metadata.nameSpecifies the name of the policy.
contents.sourceWrites the encoded base64 information to the specified path.
pathFor each node in your cluster, specify the hostname path to your node and the base-64 encoded Ignition configuration file data for the machine type. The
workerrole is the default role for nodes in your cluster. You must use the.ymlextension for configuration files. For example, use$(hostname -s).ymlwhen specifying the short hostname path for each node or all nodes in theMachineConfigmanifest file. You can apply a single global configuration to all nodes in your cluster by using the/etc/nmstate/openshift/cluster.ymlconfiguration file. In this case, you do not need to specify the short hostname path for each node, such as/etc/nmstate/openshift/<node_hostname>.yml. For example:
Example /etc/nmstate/openshift/cluster.yml configuration file# ... - contents: source: data:text/plain;charset=utf-8;base64,<base64_encoded_nmstate_configuration> mode: 0644 overwrite: true path: /etc/nmstate/openshift/cluster.yml # ...
Next steps
- Scaling compute nodes to apply the manifest object that includes a customized
br-exbridge to each compute node that exists in your cluster. For more information, see "Expanding the cluster".
Scaling each machine set to compute nodes
To scale each machine set to compute nodes, you must apply a customized br-ex bridge configuration to all compute nodes in your OpenShift Container Platform cluster. You must then edit your MachineConfig custom resource (CR) and modify its roles.
Additionally, you must create a BareMetalHost CR that defines information for your bare-metal machine, such as hostname, credentials, and your other required parameters. After you configure these resources, you must scale machine sets, so that the machine sets can apply the resource configuration to each compute node and reboot the nodes.
Prerequisites
- You created a
MachineConfigmanifest object that includes a customizedbr-exbridge configuration.
Procedure
- Edit the
MachineConfigCR by entering the following command:terminal$ oc edit mc <machineconfig_custom_resource_name> - Add each compute node configuration to the CR, so that the CR can manage roles for each defined compute node in your cluster.
- Create a
Secretobject namedextraworker-secretthat has a minimal static IP configuration. - Apply the
extraworker-secretsecret to each node in your cluster by entering the following command. This step provides each compute node access to the Ignition config file.terminal$ oc apply -f ./extraworker-secret.yaml - Create a
BareMetalHostresource and specify the network secret in thepreprovisioningNetworkDataNameparameter:Example BareMetalHost resource with an attached network secretapiVersion: metal3.io/v1alpha1 kind: BareMetalHost spec: # ... preprovisioningNetworkDataName: ostest-extraworker-0-network-config-secret # ... - To manage the
BareMetalHostobject within theopenshift-machine-apinamespace of your cluster, change to the namespace by entering the following command:terminal$ oc project openshift-machine-api - Get the machine sets:terminal
$ oc get machinesets - Scale each machine set by entering the following command. You must run this command for each machine set.terminal
$ oc scale machineset <machineset_name> --replicas=<n>where:
<machineset_name>Specifies the name of the machine set.
<n>Specifies the number of compute nodes.
Establishing communication between subnets
In a typical OpenShift Container Platform cluster setup, all nodes, including the control plane and compute nodes, reside in the same network. However, for edge computing scenarios, it can be beneficial to locate compute nodes closer to the edge.
This often involves using different network segments or subnets for the remote nodes than the subnet used by the control plane and local compute nodes. Such a setup can reduce latency for the edge and allow for enhanced scalability.
Before installing OpenShift Container Platform, you must configure the network properly to ensure that the edge subnets containing the remote nodes can reach the subnet containing the control plane nodes and receive traffic from the control plane too.
During cluster installation, assign permanent IP addresses to nodes in the network configuration of the install-config.yaml configuration file. If you do not do this, nodes might get assigned a temporary IP address that can impact how traffic reaches the nodes. For example, if a node has a temporary IP address assigned to it and you configured a bonded interface for a node, the bonded interface might receive a different IP address.
You can run control plane nodes in the same subnet or multiple subnets by configuring a user-managed load balancer in place of the default load balancer. With a multiple subnet environment, you can reduce the risk of your OpenShift Container Platform cluster from failing because of a hardware failure or a network outage. For more information, see "Services for a user-managed load balancer" and "Configuring a user-managed load balancer".
Running control plane nodes in a multiple subnet environment requires completion of the following key tasks:
- Configuring a user-managed load balancer instead of the default load balancer by specifying
UserManagedin theloadBalancer.typeparameter of theinstall-config.yamlfile. - Configuring a user-managed load balancer address in the
ingressVIPsandapiVIPsparameters of theinstall-config.yamlfile. - Adding the multiple subnet Classless Inter-Domain Routing (CIDR) and the user-managed load balancer IP addresses to the
networking.machineNetworksparameter in theinstall-config.yamlfile.
Deploying a cluster with multiple subnets requires using virtual media, such as redfish-virtualmedia and idrac-virtualmedia.
This procedure details the network configuration required to allow the remote compute nodes in the second subnet to communicate effectively with the control plane nodes in the first subnet and to allow the control plane nodes in the first subnet to communicate effectively with the remote compute nodes in the second subnet.
In this procedure, the cluster spans two subnets:
- The first subnet (
10.0.0.0) contains the control plane and local compute nodes. - The second subnet (
192.168.0.0) contains the edge compute nodes.
Procedure
- Configure the first subnet to communicate with the second subnet:
- Log in as
rootto a control plane node by running the following command:terminal$ sudo su - - Get the name of the network interface by running the following command:terminal
# nmcli dev status - Add a route to the second subnet (
192.168.0.0) via the gateway by running the following command:terminal# nmcli connection modify <interface_name> +ipv4.routes "192.168.0.0/24 via <gateway>"Replace
<interface_name>with the interface name. Replace<gateway>with the IP address of the actual gateway.Example# nmcli connection modify eth0 +ipv4.routes "192.168.0.0/24 via 192.168.0.1" - Apply the changes by running the following command:terminal
# nmcli connection up <interface_name>Replace
<interface_name>with the interface name. - Verify the routing table to ensure the route has been added successfully:terminal
# ip route - Repeat the previous steps for each control plane node in the first subnet.Note
Adjust the commands to match your actual interface names and gateway.
- Log in as
- Configure the second subnet to communicate with the first subnet:
- Log in as
rootto a remote compute node by running the following command:terminal$ sudo su - - Get the name of the network interface by running the following command:terminal
# nmcli dev status - Add a route to the first subnet (
10.0.0.0) via the gateway by running the following command:terminal# nmcli connection modify <interface_name> +ipv4.routes "10.0.0.0/24 via <gateway>"Replace
<interface_name>with the interface name. Replace<gateway>with the IP address of the actual gateway.Example# nmcli connection modify eth0 +ipv4.routes "10.0.0.0/24 via 10.0.0.1" - Apply the changes by running the following command:terminal
# nmcli connection up <interface_name>Replace
<interface_name>with the interface name. - Verify the routing table to ensure the route has been added successfully by running the following command:terminal
# ip route - Repeat the previous steps for each compute node in the second subnet.Note
Adjust the commands to match your actual interface names and gateway.
- Log in as
- After you have configured the networks, test the connectivity to ensure the remote nodes can reach the control plane nodes and the control plane nodes can reach the remote nodes.
- From the control plane nodes in the first subnet, ping a remote node in the second subnet by running the following command:terminal
$ ping <remote_node_ip_address>If the ping is successful, it means the control plane nodes in the first subnet can reach the remote nodes in the second subnet. If you do not receive a response, review the network configurations and repeat the procedure for the node.
- From the remote nodes in the second subnet, ping a control plane node in the first subnet by running the following command:terminal
$ ping <control_plane_node_ip_address>If the ping is successful, it means the remote compute nodes in the second subnet can reach the control plane in the first subnet. If you do not receive a response, review the network configurations and repeat the procedure for the node.
- From the control plane nodes in the first subnet, ping a remote node in the second subnet by running the following command:
Retrieving the OpenShift Container Platform installer
Use the stable-4.x version of the installation program and your selected architecture to deploy the generally available stable version of OpenShift Container Platform.
Procedure
- Retrieve the installation program by running one of the following commands:terminal
$ export VERSION=stable-4.22terminal$ export RELEASE_ARCH=<architecture>terminal$ export RELEASE_IMAGE=$(curl -s https://mirror.openshift.com/pub/openshift-v4/$RELEASE_ARCH/clients/ocp/$VERSION/release.txt | grep 'Pull From: quay.io' | awk -F ' ' '{print $3}')
Extracting the OpenShift Container Platform installer
Extract the OpenShift Container Platform installer after retrieving it to prepare for the installation of the cluster.
Procedure
- Set the environment variables:terminal
$ export cmd=openshift-baremetal-installterminal$ export pullsecret_file=~/pull-secret.txtterminal$ export extract_dir=$(pwd) - Get the
ocbinary:terminal$ curl -s https://mirror.openshift.com/pub/openshift-v4/clients/ocp/$VERSION/openshift-client-linux.tar.gz | tar zxvf - oc - Extract the installer:terminal
$ sudo cp oc /usr/local/binterminal$ oc adm release extract --registry-config "${pullsecret_file}" --command=$cmd --to "${extract_dir}" ${RELEASE_IMAGE}terminal$ sudo cp openshift-baremetal-install /usr/local/bin
Creating an RHCOS images cache
To employ image caching, you must download the Red Hat Enterprise Linux CoreOS (RHCOS) image used by the bootstrap VM to provision the cluster nodes. Image caching is optional, but it is especially useful when running the installation program on a network with limited bandwidth.
The installation program no longer needs the clusterOSImage RHCOS image because the correct image is in the release payload.
If you are running the installation program on a network with limited bandwidth and the RHCOS images download takes more than 15 to 20 minutes, the installation program will timeout. Caching images on a web server will help in such scenarios.
If you enable TLS for the HTTPD server, you must confirm the root certificate is signed by an authority trusted by the client and verify the trusted certificate chain between your OpenShift Container Platform hub and spoke clusters and the HTTPD server. Using a server configured with an untrusted certificate prevents the images from being downloaded to the image creation service. Using untrusted HTTPS servers is not supported.
Install a container that contains the images.
Procedure
- Install
podman:terminal$ sudo dnf install -y podman - Open firewall port
8080to be used for RHCOS image caching:terminal$ sudo firewall-cmd --add-port=8080/tcp --zone=public --permanentterminal$ sudo firewall-cmd --reload - Create a directory to store the
bootstraposimage:terminal$ mkdir /home/kni/rhcos_image_cache - Set the appropriate SELinux context for the newly created directory:terminal
$ sudo semanage fcontext -a -t httpd_sys_content_t "/home/kni/rhcos_image_cache(/.*)?"terminal$ sudo restorecon -Rv /home/kni/rhcos_image_cache/ - Get the URI for the RHCOS image that the installation program will deploy on the bootstrap VM:terminal
$ export RHCOS_QEMU_URI=$(/usr/local/bin/openshift-baremetal-install coreos print-stream-json | jq -r --arg ARCH "$(arch)" '.architectures[$ARCH].artifacts.qemu.formats["qcow2.gz"].disk.location') - Get the name of the image that the installation program will deploy on the bootstrap VM:terminal
$ export RHCOS_QEMU_NAME=${RHCOS_QEMU_URI##*/} - Get the SHA hash for the RHCOS image that will be deployed on the bootstrap VM:terminal
$ export RHCOS_QEMU_UNCOMPRESSED_SHA256=$(/usr/local/bin/openshift-baremetal-install coreos print-stream-json | jq -r --arg ARCH "$(arch)" '.architectures[$ARCH].artifacts.qemu.formats["qcow2.gz"].disk["uncompressed-sha256"]') - Download the image and place it in the
/home/kni/rhcos_image_cachedirectory:terminal$ curl -L ${RHCOS_QEMU_URI} -o /home/kni/rhcos_image_cache/${RHCOS_QEMU_NAME} - Confirm SELinux type is of
httpd_sys_content_tfor the new file:terminal$ ls -Z /home/kni/rhcos_image_cache - Create the pod:terminal
$ podman run -d --name rhcos_image_cache \
-v /home/kni/rhcos_image_cache:/var/www/html \
-p 8080:8080/tcp \
registry.access.redhat.com/ubi9/httpd-24
This command creates a caching webserver with the name
rhcos_image_cache. This pod serves thebootstrapOSImageimage in theinstall-config.yamlfile for deployment. - Generate the
bootstrapOSImageconfiguration:terminal$ export BAREMETAL_IP=$(ip addr show dev baremetal | awk '/inet /{print $2}' | cut -d"/" -f1)terminal$ export BOOTSTRAP_OS_IMAGE="http://${BAREMETAL_IP}:8080/${RHCOS_QEMU_NAME}?sha256=${RHCOS_QEMU_UNCOMPRESSED_SHA256}"terminal$ echo " bootstrapOSImage=${BOOTSTRAP_OS_IMAGE}" - Add the required configuration to the
install-config.yamlfile underplatform.baremetal:terminalplatform: baremetal: bootstrapOSImage: <bootstrap_os_image>Replace
<bootstrap_os_image>with the value of$BOOTSTRAP_OS_IMAGE.See the "Configuring the install-config.yaml file" section for additional details.
Services for a user-managed load balancer
You can configure an OpenShift Container Platform cluster to use a user-managed load balancer in place of the default load balancer.
Configuring a user-managed load balancer depends on your vendor’s load balancer.
The information and examples in this section are for guideline purposes only. Consult the vendor documentation for more specific information about the vendor’s load balancer.
Red Hat supports the following services for a user-managed load balancer:
- Ingress Controller
- OpenShift API
- OpenShift MachineConfig API
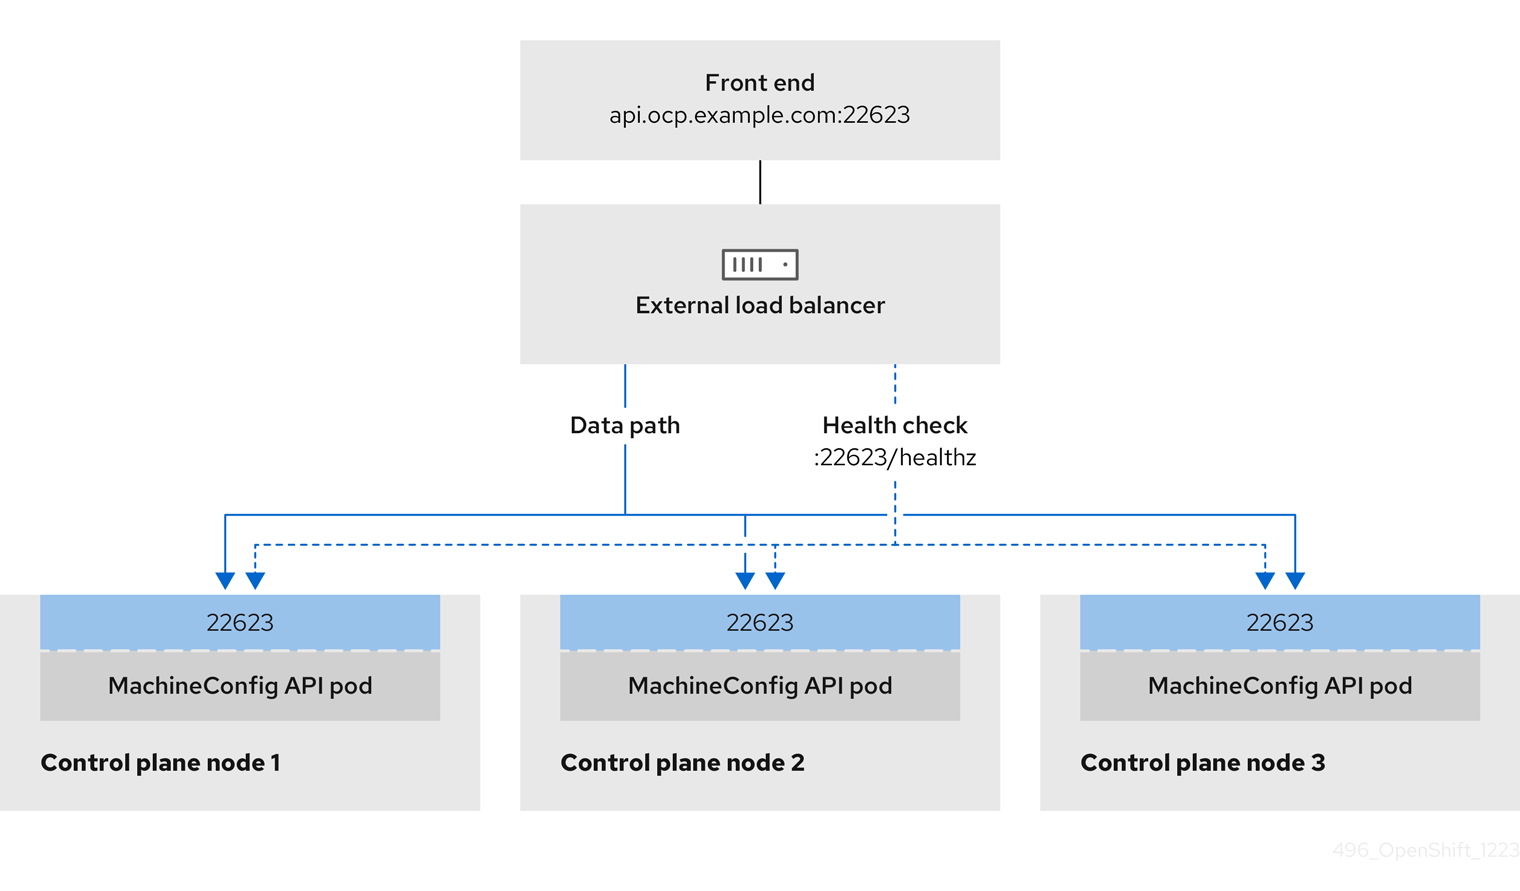
You can choose whether you want to configure one or all of these services for a user-managed load balancer. Configuring only the Ingress Controller service is a common configuration option. To better understand each service, view the following diagrams:
Figure 2. Example network workflow that shows an Ingress Controller operating in an OpenShift Container Platform environment
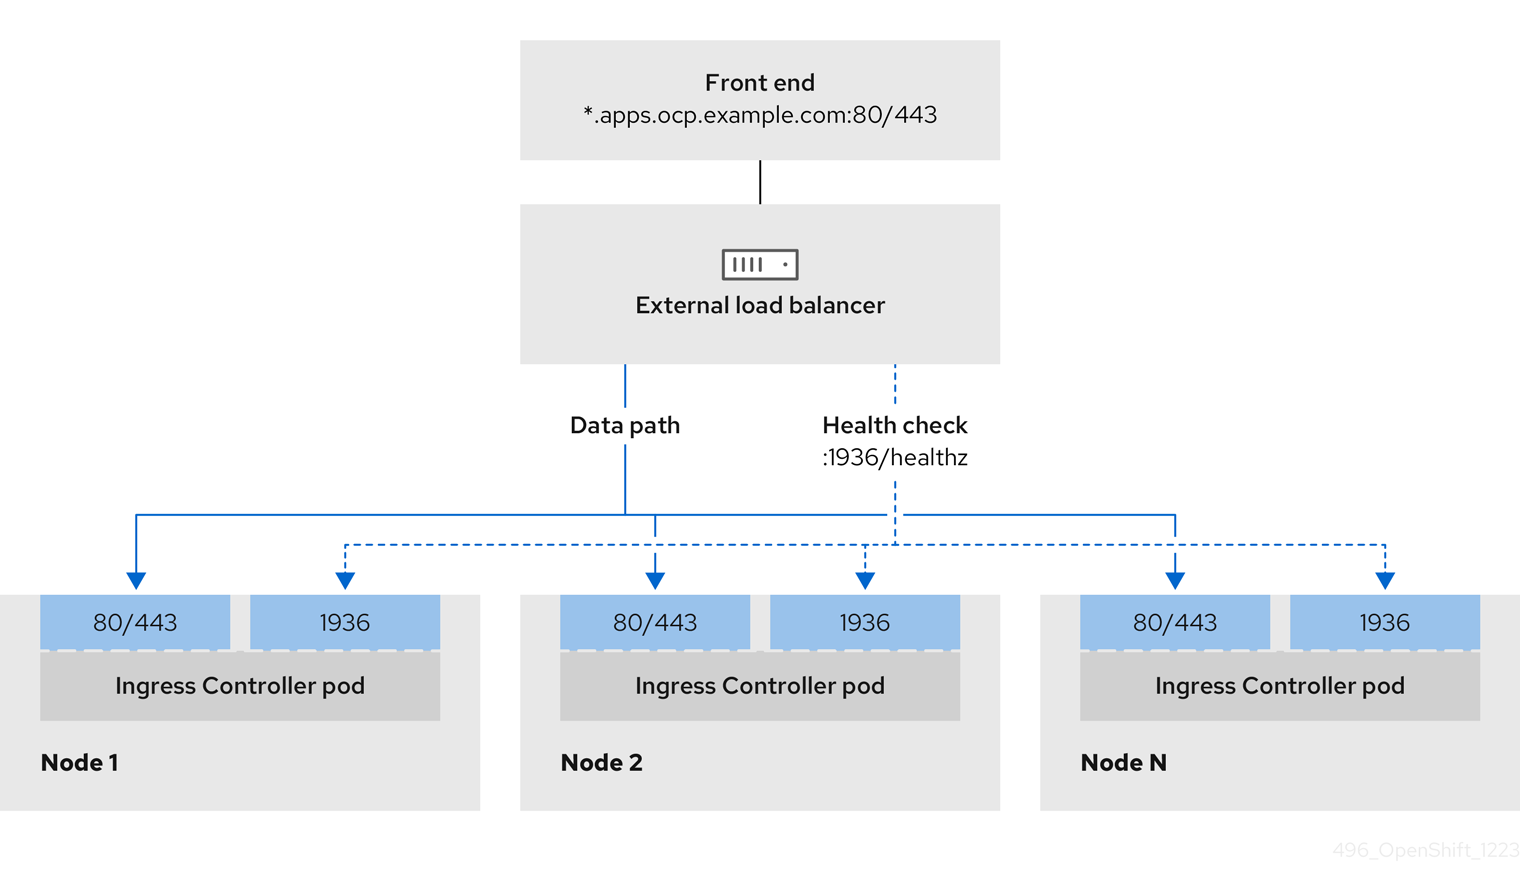
Figure 3. Example network workflow that shows an OpenShift API operating in an OpenShift Container Platform environment
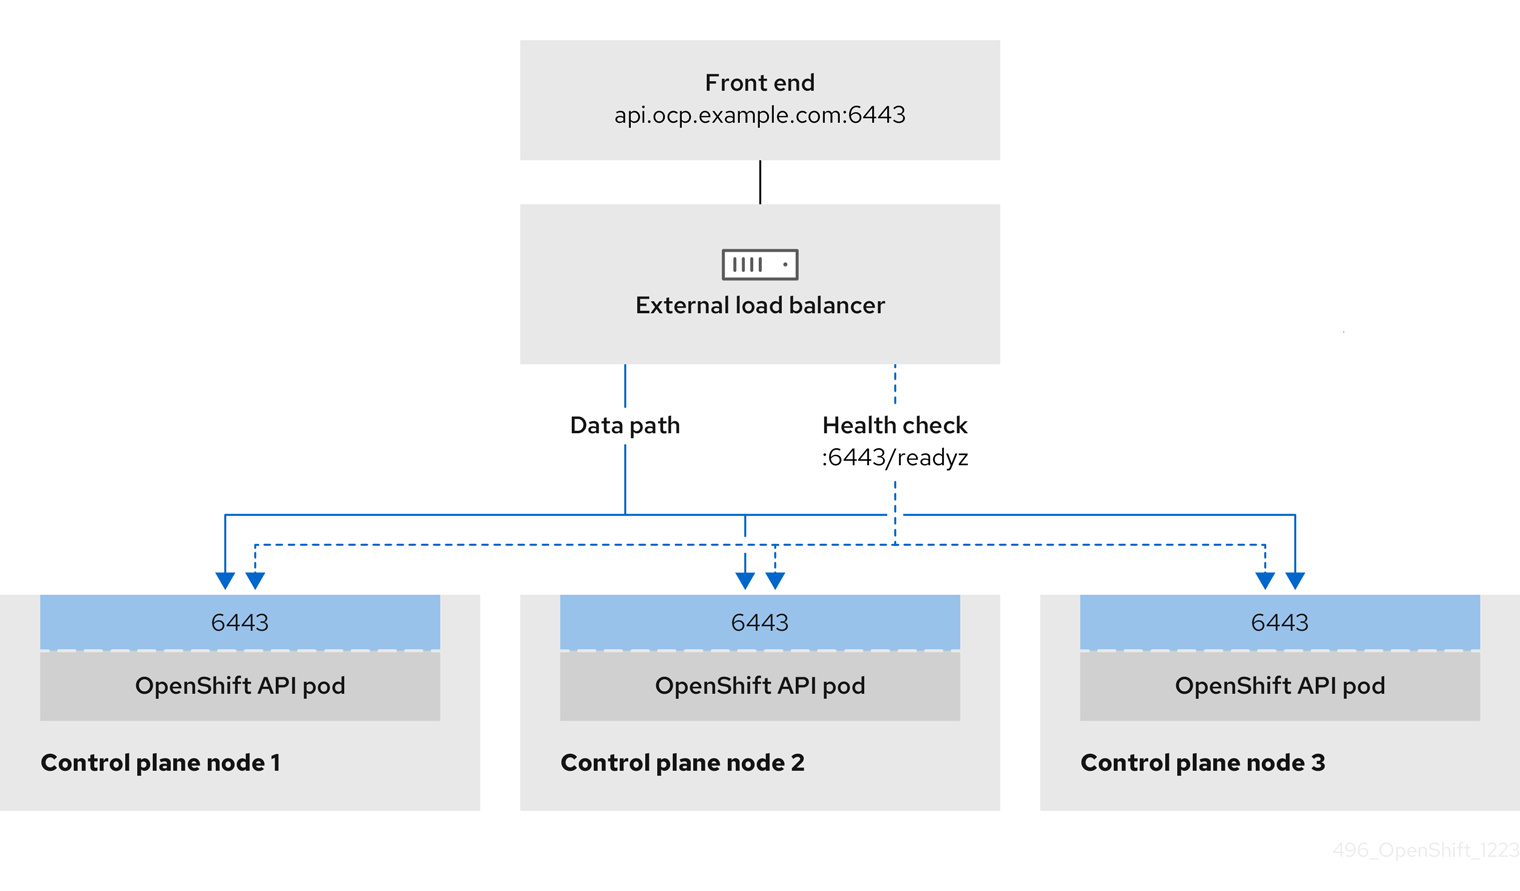
Figure 4. Example network workflow that shows an OpenShift MachineConfig API operating in an OpenShift Container Platform environment
The following configuration options are supported for user-managed load balancers:
- Use a node selector to map the Ingress Controller to a specific set of nodes. You must assign a static IP address to each node in this set, or configure each node to receive the same IP address from the Dynamic Host Configuration Protocol (DHCP). Infrastructure nodes commonly receive this type of configuration.
- Target all IP addresses on a subnet. This configuration can reduce the effort required to maintain the load balancer, because you can create and destroy nodes within those networks without reconfiguring the load balancer targets. If you deploy your ingress pods by using a machine set on a smaller network, such as a
/27or/28, you can simplify your load balancer targets.TipYou can list all IP addresses that exist in a network by checking the machine config pool’s resources.
Before you configure a user-managed load balancer for your OpenShift Container Platform cluster, consider the following information:
- For a front-end IP address, you can use the same IP address for the front-end IP address, the Ingress Controller load balancer, and API load balancer. Check the vendor’s documentation for this capability.
- For a back-end IP address, ensure that an IP address for an OpenShift Container Platform control plane node does not change during the lifetime of the user-managed load balancer. You can achieve this by completing one of the following actions:
- Assign a static IP address to each control plane node.
- Configure each node to receive the same IP address from the DHCP every time the node requests a DHCP lease. Depending on the vendor, the DHCP lease might be in the form of an IP reservation or a static DHCP assignment.
- Manually define each node that runs the Ingress Controller in the user-managed load balancer for the Ingress Controller back-end service. For example, if the Ingress Controller moves to an undefined node, a connection outage can occur.
Configuring a user-managed load balancer
You can configure an OpenShift Container Platform cluster to use a user-managed load balancer in place of the default load balancer.
Before you configure a user-managed load balancer, ensure that you read the "Services for a user-managed load balancer" section.
Read the following prerequisites that apply to the service that you want to configure for your user-managed load balancer.
MetalLB, which runs on a cluster, functions as a user-managed load balancer.
Prerequisites
The following list details OpenShift API prerequisites:
- You defined a front-end IP address.
- TCP ports 6443 and 22623 are exposed on the front-end IP address of your load balancer. Check the following items:
- Port 6443 provides access to the OpenShift API service.
- Port 22623 can provide ignition startup configurations to nodes.
- The front-end IP address and port 6443 are reachable by all users of your system with a location external to your OpenShift Container Platform cluster.
- The front-end IP address and port 22623 are reachable only by OpenShift Container Platform nodes.
- The load balancer backend can communicate with OpenShift Container Platform control plane nodes on port 6443 and 22623.
The following list details Ingress Controller prerequisites:
- You defined a front-end IP address.
- TCP port 443 and port 80 are exposed on the front-end IP address of your load balancer.
- The front-end IP address, port 80 and port 443 are reachable by all users of your system with a location external to your OpenShift Container Platform cluster.
- The front-end IP address, port 80 and port 443 are reachable by all nodes that operate in your OpenShift Container Platform cluster.
- The load balancer backend can communicate with OpenShift Container Platform nodes that run the Ingress Controller on ports 80, 443, and 1936.
The following list details prerequisites for health check URL specifications:
You can configure most load balancers by setting health check URLs that determine if a service is available or unavailable. OpenShift Container Platform provides these health checks for the OpenShift API, Machine Configuration API, and Ingress Controller backend services.
The following example shows a Kubernetes API health check specification for a backend service:
Path: HTTPS:6443/readyz
Healthy threshold: 2
Unhealthy threshold: 2
Timeout: 10
Interval: 10
The following example shows a Machine Config API health check specification for a backend service:
Path: HTTPS:22623/healthz
Healthy threshold: 2
Unhealthy threshold: 2
Timeout: 10
Interval: 10
The following example shows a Ingress Controller health check specification for a backend service:
Path: HTTP:1936/healthz/ready
Healthy threshold: 2
Unhealthy threshold: 2
Timeout: 5
Interval: 10
Procedure
- Configure the HAProxy Ingress Controller, so that you can enable access to the cluster from your load balancer on ports 6443, 22623, 443, and 80. Depending on your needs, you can specify the IP address of a single subnet or IP addresses from multiple subnets in your HAProxy configuration.Example HAProxy configuration with one listed subnet
# ...
listen my-cluster-api-6443
    bind 192.168.1.100:6443
    mode tcp
    balance roundrobin
  option httpchk
  http-check connect
  http-check send meth GET uri /readyz
  http-check expect status 200
    server my-cluster-master-2 192.168.1.101:6443 check inter 10s rise 2 fall 2
    server my-cluster-master-0 192.168.1.102:6443 check inter 10s rise 2 fall 2
    server my-cluster-master-1 192.168.1.103:6443 check inter 10s rise 2 fall 2

listen my-cluster-machine-config-api-22623
    bind 192.168.1.100:22623
    mode tcp
    balance roundrobin
  option httpchk
  http-check connect
  http-check send meth GET uri /healthz
  http-check expect status 200
    server my-cluster-master-2 192.168.1.101:22623 check inter 10s rise 2 fall 2
    server my-cluster-master-0 192.168.1.102:22623 check inter 10s rise 2 fall 2
    server my-cluster-master-1 192.168.1.103:22623 check inter 10s rise 2 fall 2

listen my-cluster-apps-443
    bind 192.168.1.100:443
    mode tcp
    balance roundrobin
  option httpchk
  http-check connect
  http-check send meth GET uri /healthz/ready
  http-check expect status 200
    server my-cluster-worker-0 192.168.1.111:443 check port 1936 inter 10s rise 2 fall 2
    server my-cluster-worker-1 192.168.1.112:443 check port 1936 inter 10s rise 2 fall 2
    server my-cluster-worker-2 192.168.1.113:443 check port 1936 inter 10s rise 2 fall 2

listen my-cluster-apps-80
   bind 192.168.1.100:80
   mode tcp
   balance roundrobin
  option httpchk
  http-check connect
  http-check send meth GET uri /healthz/ready
  http-check expect status 200
    server my-cluster-worker-0 192.168.1.111:80 check port 1936 inter 10s rise 2 fall 2
    server my-cluster-worker-1 192.168.1.112:80 check port 1936 inter 10s rise 2 fall 2
    server my-cluster-worker-2 192.168.1.113:80 check port 1936 inter 10s rise 2 fall 2
# ...
Example HAProxy configuration with multiple listed subnets# ... listen api-server-6443 bind *:6443 mode tcp server master-00 192.168.83.89:6443 check inter 1s server master-01 192.168.84.90:6443 check inter 1s server master-02 192.168.85.99:6443 check inter 1s server bootstrap 192.168.80.89:6443 check inter 1s listen machine-config-server-22623 bind *:22623 mode tcp server master-00 192.168.83.89:22623 check inter 1s server master-01 192.168.84.90:22623 check inter 1s server master-02 192.168.85.99:22623 check inter 1s server bootstrap 192.168.80.89:22623 check inter 1s listen ingress-router-80 bind *:80 mode tcp balance source server worker-00 192.168.83.100:80 check inter 1s server worker-01 192.168.83.101:80 check inter 1s listen ingress-router-443 bind *:443 mode tcp balance source server worker-00 192.168.83.100:443 check inter 1s server worker-01 192.168.83.101:443 check inter 1s listen ironic-api-6385 bind *:6385 mode tcp balance source server master-00 192.168.83.89:6385 check inter 1s server master-01 192.168.84.90:6385 check inter 1s server master-02 192.168.85.99:6385 check inter 1s server bootstrap 192.168.80.89:6385 check inter 1s listen inspector-api-5050 bind *:5050 mode tcp balance source server master-00 192.168.83.89:5050 check inter 1s server master-01 192.168.84.90:5050 check inter 1s server master-02 192.168.85.99:5050 check inter 1s server bootstrap 192.168.80.89:5050 check inter 1s # ... - Use the
curlCLI command to verify that the user-managed load balancer and its resources are operational:- Verify that the cluster machine configuration API is accessible to the Kubernetes API server resource, by running the following command and observing the response:terminal
$ curl https://<loadbalancer_ip_address>:6443/version --insecureIf the configuration is correct, you receive a JSON object in response:
json{ "major": "1", "minor": "11+", "gitVersion": "v1.11.0+ad103ed", "gitCommit": "ad103ed", "gitTreeState": "clean", "buildDate": "2019-01-09T06:44:10Z", "goVersion": "go1.10.3", "compiler": "gc", "platform": "linux/amd64" } - Verify that the cluster machine configuration API is accessible to the Machine config server resource, by running the following command and observing the output:terminal
$ curl -v https://<loadbalancer_ip_address>:22623/healthz --insecureIf the configuration is correct, the output from the command shows the following response:
terminalHTTP/1.1 200 OK Content-Length: 0 - Verify that the controller is accessible to the Ingress Controller resource on port 80, by running the following command and observing the output:terminal
$ curl -I -L -H "Host: console-openshift-console.apps.<cluster_name>.<base_domain>" http://<load_balancer_front_end_IP_address>If the configuration is correct, the output from the command shows the following response:
terminalHTTP/1.1 302 Found content-length: 0 location: https://console-openshift-console.apps.ocp4.private.opequon.net/ cache-control: no-cache - Verify that the controller is accessible to the Ingress Controller resource on port 443, by running the following command and observing the output:terminal
$ curl -I -L --insecure --resolve console-openshift-console.apps.<cluster_name>.<base_domain>:443:<Load Balancer Front End IP Address> https://console-openshift-console.apps.<cluster_name>.<base_domain>If the configuration is correct, the output from the command shows the following response:
terminalHTTP/1.1 200 OK referrer-policy: strict-origin-when-cross-origin set-cookie: csrf-token=UlYWOyQ62LWjw2h003xtYSKlh1a0Py2hhctw0WmV2YEdhJjFyQwWcGBsja261dGLgaYO0nxzVErhiXt6QepA7g==; Path=/; Secure; SameSite=Lax x-content-type-options: nosniff x-dns-prefetch-control: off x-frame-options: DENY x-xss-protection: 1; mode=block date: Wed, 04 Oct 2023 16:29:38 GMT content-type: text/html; charset=utf-8 set-cookie: 1e2670d92730b515ce3a1bb65da45062=1bf5e9573c9a2760c964ed1659cc1673; path=/; HttpOnly; Secure; SameSite=None cache-control: private
- Verify that the cluster machine configuration API is accessible to the Kubernetes API server resource, by running the following command and observing the response:
- Configure the DNS records for your cluster to target the front-end IP addresses of the user-managed load balancer. You must update records to your DNS server for the cluster API and applications over the load balancer. The following examples shows modified DNS records:dns
<load_balancer_ip_address> A api.<cluster_name>.<base_domain> A record pointing to Load Balancer Front Enddns<load_balancer_ip_address> A apps.<cluster_name>.<base_domain> A record pointing to Load Balancer Front EndImportantDNS propagation might take some time for each DNS record to become available. Ensure that each DNS record propagates before validating each record.
- For your OpenShift Container Platform cluster to use the user-managed load balancer, you must specify the following configuration in your cluster’s
install-config.yamlfile:yaml# ... platform: bare-metal: loadBalancer: type: <loadBalancer_type> apiVIPs: - <api_ip> ingressVIPs: - <ingress_ip> # ...where:
<loadBalancer_type>Specifies the load balancer type. Set to
UserManagedto specify a user-managed load balancer for your cluster. The parameter defaults toOpenShiftManagedDefault, which denotes the default internal load balancer. For services defined in anopenshift-kni-infranamespace, a user-managed load balancer can deploy thecorednsservice to pods in your cluster but ignoreskeepalivedandhaproxyservices.<api_ip>Specifies the user-managed load balancer’s public IP address for the Kubernetes API. Mandatory parameter.
<ingress_ip>Specifies the user-managed load balancer’s public IP address for ingress traffic. Mandatory parameter.
Verification
- Use the
curlCLI command to verify that the user-managed load balancer and DNS record configuration are operational:- Verify that you can access the cluster API, by running the following command and observing the output:terminal
$ curl https://api.<cluster_name>.<base_domain>:6443/version --insecureIf the configuration is correct, you receive a JSON object in response:
json{ "major": "1", "minor": "11+", "gitVersion": "v1.11.0+ad103ed", "gitCommit": "ad103ed", "gitTreeState": "clean", "buildDate": "2019-01-09T06:44:10Z", "goVersion": "go1.10.3", "compiler": "gc", "platform": "linux/amd64" } - Verify that you can access the cluster machine configuration, by running the following command and observing the output:terminal
$ curl -v https://api.<cluster_name>.<base_domain>:22623/healthz --insecureIf the configuration is correct, the output from the command shows the following response:
terminalHTTP/1.1 200 OK Content-Length: 0 - Verify that you can access each cluster application on port 80, by running the following command and observing the output:terminal
$ curl http://console-openshift-console.apps.<cluster_name>.<base_domain> -I -L --insecureIf the configuration is correct, the output from the command shows the following response:
terminalHTTP/1.1 302 Found content-length: 0 location: https://console-openshift-console.apps.<cluster-name>.<base domain>/ cache-control: no-cacheHTTP/1.1 200 OK referrer-policy: strict-origin-when-cross-origin set-cookie: csrf-token=39HoZgztDnzjJkq/JuLJMeoKNXlfiVv2YgZc09c3TBOBU4NI6kDXaJH1LdicNhN1UsQWzon4Dor9GWGfopaTEQ==; Path=/; Secure x-content-type-options: nosniff x-dns-prefetch-control: off x-frame-options: DENY x-xss-protection: 1; mode=block date: Tue, 17 Nov 2020 08:42:10 GMT content-type: text/html; charset=utf-8 set-cookie: 1e2670d92730b515ce3a1bb65da45062=9b714eb87e93cf34853e87a92d6894be; path=/; HttpOnly; Secure; SameSite=None cache-control: private - Verify that you can access each cluster application on port 443, by running the following command and observing the output:terminal
$ curl https://console-openshift-console.apps.<cluster_name>.<base_domain> -I -L --insecureIf the configuration is correct, the output from the command shows the following response:
terminalHTTP/1.1 200 OK referrer-policy: strict-origin-when-cross-origin set-cookie: csrf-token=UlYWOyQ62LWjw2h003xtYSKlh1a0Py2hhctw0WmV2YEdhJjFyQwWcGBsja261dGLgaYO0nxzVErhiXt6QepA7g==; Path=/; Secure; SameSite=Lax x-content-type-options: nosniff x-dns-prefetch-control: off x-frame-options: DENY x-xss-protection: 1; mode=block date: Wed, 04 Oct 2023 16:29:38 GMT content-type: text/html; charset=utf-8 set-cookie: 1e2670d92730b515ce3a1bb65da45062=1bf5e9573c9a2760c964ed1659cc1673; path=/; HttpOnly; Secure; SameSite=None cache-control: private
- Verify that you can access the cluster API, by running the following command and observing the output:
Setting the cluster node hostnames through DHCP
On Red Hat Enterprise Linux CoreOS (RHCOS) machines, NetworkManager sets the hostnames. By default, DHCP provides the hostnames to NetworkManager, which is the recommended method.
The NetworkManager gets the hostnames through a reverse DNS lookup in the following cases:
- If DHCP does not provide the hostnames
- If you use kernel arguments to set the hostnames
- If you use another method to set the hostnames
Reverse DNS lookup occurs after the network has been initialized on a node, and can increase the time it takes NetworkManager to set the hostname. Other system services can start before NetworkManager setting the hostname, which can cause those services to use a default hostname such as localhost.
You can avoid the delay in setting hostnames by using DHCP to provide the hostname for each cluster node. Additionally, setting the hostnames through DHCP can bypass manual DNS record name configuration errors in environments that have a DNS split-horizon implementation.
Local arbiter node configuration prerequisites
To retain high availability (HA) while reducing infrastructure costs for your cluster, you can configure an OpenShift Container Platform cluster with two control plane nodes and one local arbiter node.
A local arbiter node is a lower-cost, co-located machine that participates in control plane quorum decisions. Unlike a standard control plane node, the arbiter node does not run the full set of control plane services. You can use this configuration to maintain HA in your cluster with only two fully provisioned control plane nodes instead of three.
You can configure a local arbiter node only. Remote arbiter nodes are not supported.
To deploy a cluster with two control plane nodes and one local arbiter node, you must define the following nodes in the install-config.yaml file:
- 2 control plane nodes
- 1 arbiter node
The arbiter node must meet the following minimum system requirements:
- 2 threads
- 8 GB of RAM
- 50 GB of SSD or equivalent storage
The arbiter node must be located in a network environment with an end-to-end latency of less than 500 milliseconds, including disk I/O. In high-latency environments, you might need to apply the etcd slow profile.
The control plane nodes must meet the following minimum system requirements:
- 4 threads
- 16 GB of RAM
- 120 GB of SSD or equivalent storage
Additionally, the control plane nodes must also have enough storage for the workload.
Configuring a local arbiter node by using installer-provisioned infrastructure
To retain high availability (HA) while reducing infrastructure costs for your cluster, you can configure an OpenShift Container Platform cluster with two control plane nodes and one local arbiter node.
Prerequisites
- You have downloaded OpenShift CLI (
oc) and the installation program. - You have logged into the OpenShift CLI (
oc).
Procedure
- Edit the
install-config.yamlfile to define the arbiter node alongside control plane nodes.Example install-config.yaml configuration for deploying an arbiter nodeapiVersion: v1 baseDomain: devcluster.openshift.com compute: - architecture: amd64 hyperthreading: Enabled name: worker platform: {} replicas: 0 arbiter: architecture: amd64 hyperthreading: Enabled replicas: 1 name: arbiter platform: baremetal: {} controlPlane: architecture: amd64 hyperthreading: Enabled name: master platform: baremetal: {} replicas: 2 platform: baremetal: # ... hosts: - name: cluster-master-0 role: master # ... - name: cluster-master-1 role: master ... - name: cluster-arbiter-0 role: arbiter # ...where:
arbiterSpecifies the arbiter machine pool. You must configure this field to deploy a cluster with an arbiter node.
arbiter.replicasSpecifies the value for the
arbiter.replicasparameter. Set thereplicasfield to1for the arbiter pool. You cannot set this field to a value that is greater than 1.arbiter.nameSpecifies a name for the arbiter machine pool.
controlPlaneSpecifies the control plane machine pool.
controlPlane.replicasSpecifies the value for the
controlPlane.replicasparameter. When an arbiter pool is defined, two control plane replicas are valid.
- Save the modified
install-config.yamlfile.
Configuring the install-config.yaml file
The install-config.yaml file requires some additional details. Most of the information teaches the installation program and the resulting cluster enough about the available hardware that it is able to fully manage it.
The installation program no longer needs the clusterOSImage RHCOS image because the correct image is in the release payload.
Procedure
- Configure
install-config.yaml. Change the appropriate variables to match the environment, includingpullSecretandsshKey:yamlapiVersion: v1 baseDomain: <domain> metadata: name: <cluster_name> networking: machineNetwork: - cidr: <public_cidr> networkType: OVNKubernetes compute: - name: worker replicas: 2 controlPlane: name: master replicas: 3 platform: baremetal: {} platform: baremetal: additionalNTPServers: - <ntp_domain_or_ip> apiVIPs: - <api_ip> ingressVIPs: - <wildcard_ip> provisioningNetworkCIDR: <CIDR> bootstrapExternalStaticIP: <bootstrap_static_ip_address> bootstrapExternalStaticGateway: <bootstrap_static_gateway> bootstrapExternalStaticDNS: <bootstrap_static_dns> hosts: - name: openshift-master-0 role: master bmc: address: ipmi://<out_of_band_ip> username: <user> password: <password> bootMACAddress: <NIC1_mac_address> rootDeviceHints: deviceName: "<installation_disk_drive_path>" - name: <openshift_master_1> role: master bmc: address: ipmi://<out_of_band_ip> username: <user> password: <password> bootMACAddress: <NIC1_mac_address> rootDeviceHints: deviceName: "<installation_disk_drive_path>" - name: <openshift_master_2> role: master bmc: address: ipmi://<out_of_band_ip> username: <user> password: <password> bootMACAddress: <NIC1_mac_address> rootDeviceHints: deviceName: "<installation_disk_drive_path>" - name: <openshift_worker_0> role: worker bmc: address: ipmi://<out_of_band_ip> username: <user> password: <password> bootMACAddress: <NIC1_mac_address> - name: <openshift_worker_1> role: worker bmc: address: ipmi://<out_of_band_ip> username: <user> password: <password> bootMACAddress: <NIC1_mac_address> rootDeviceHints: deviceName: "<installation_disk_drive_path>" pullSecret: '<pull_secret>' sshKey: '<ssh_pub_key>'where:
compute.replicasSpecifies the value for the
compute.replicasparameter. Scale the compute machines based on the number of compute nodes that are part of the OpenShift Container Platform cluster. Valid options for thereplicasvalue are0and integers greater than or equal to2. Set the number of replicas to0to deploy a three-node cluster, which contains only three control plane machines. A three-node cluster is a smaller, more resource-efficient cluster that can be used for testing, development, and production. You cannot install the cluster with only one compute node.platform.baremetal.additionalNTPServersSpecifies the optional list of additional NTP server domain names or IP addresses to add to each host configuration when the cluster host clocks are out of synchronization.
platform.baremetal.bootstrapExternalStaticIPSpecifies the value for the
bootstrapExternalStaticIPparameter. When deploying a cluster with static IP addresses, you must set thebootstrapExternalStaticIPconfiguration setting to specify the static IP address of the bootstrap VM when there is no DHCP server on the bare metal network.platform.baremetal.bootstrapExternalStaticGatewaySpecifies the value for the
bootstrapExternalStaticGatewayparameter. When deploying a cluster with static IP addresses, you must set thebootstrapExternalStaticGatewayconfiguration setting to specify the gateway IP address for the bootstrap VM when there is no DHCP server on the bare metal network.platform.baremetal.bootstrapExternalStaticDNSSpecifies the value for the
bootstrapExternalStaticDNSparameter. When deploying a cluster with static IP addresses, you must set thebootstrapExternalStaticDNSconfiguration setting to specify the DNS address for the bootstrap VM when there is no DHCP server on the bare metal network.platform.baremetal.hosts.bmc.addressSpecifies the value for the
platform.baremetal.hosts.bmc.addressparameter. See the BMC addressing sections for more options.platform.baremetal.hosts.rootDeviceHints.deviceNameSpecifies the value for the
platform.baremetal.hosts.rootDeviceHints.deviceNameparameter. To set the path to the installation disk drive, enter the kernel name of the disk. For example,/dev/sda.
ImportantBecause the disk discovery order is not guaranteed, the kernel name of the disk can change across booting options for machines with multiple disks. For example,
/dev/sdabecomes/dev/sdband vice versa. To avoid this issue, you must use persistent disk attributes, such as the disk World Wide Name (WWN) or/dev/disk/by-path/. It is recommended to use the/dev/disk/by-path/<device_path>link to the storage location. To use the disk WWN, replace thedeviceNameparameter with thewwnWithExtensionparameter. Depending on the parameter that you use, enter either of the following values:- The disk name. For example,
/dev/sda, or/dev/disk/by-path/. - The disk WWN. For example,
"0x64cd98f04fde100024684cf3034da5c2". Ensure that you enter the disk WWN value within quotes so that it is used as a string value and not a hexadecimal value.
Failure to meet these requirements for the
rootDeviceHintsparameter might result in the following error:textironic-inspector inspection failed: No disks satisfied root device hintsNoteBefore OpenShift Container Platform 4.12, the cluster installation program only accepted an IPv4 address or an IPv6 address for the
apiVIPandingressVIPconfiguration settings. In OpenShift Container Platform 4.12 and later, these configuration settings are deprecated. Instead, use a list format in theapiVIPsandingressVIPsconfiguration settings to specify IPv4 addresses, IPv6 addresses, or both IP address formats. - Create a directory to store the cluster configuration:terminal
$ mkdir ~/clusterconfigs - Copy the
install-config.yamlfile to the new directory:terminal$ cp install-config.yaml ~/clusterconfigs - Ensure all bare metal nodes are powered off prior to installing the OpenShift Container Platform cluster:terminal
$ ipmitool -I lanplus -U <user> -P <password> -H <management-server-ip> power off - Remove old bootstrap resources if any are left over from a previous deployment attempt:bash
for i in $(sudo virsh list | tail -n +3 | grep bootstrap | awk {'print $2'});
do
  sudo virsh destroy $i;
  sudo virsh undefine $i;
  sudo virsh vol-delete $i --pool $i;
  sudo virsh vol-delete $i.ign --pool $i;
  sudo virsh pool-destroy $i;
  sudo virsh pool-undefine $i;
done
Additional installation configuration parameters
Some parameters, such as the cluster domain name, are required in the install-config.yaml file when installing a cluster on bare metal. Others, such as the provisioning network CIDR, are optional.
Required parameters
| Parameters | Default | Description |
|---|---|---|
baseDomain |
The domain name for the cluster. For example, example.com. |
|
bootMode |
UEFI |
The boot mode for a node. Options are legacy, UEFI, and UEFISecureBoot. If bootMode is not set, Ironic sets it while inspecting the node.
|
platform:
  baremetal:
bootstrapExternalStaticDNS |
The static network DNS of the bootstrap node. You must set this value when deploying a cluster with static IP addresses when there is no Dynamic Host Configuration Protocol (DHCP) server on the bare-metal network. If you do not set this value, the installation program will use the value from bootstrapExternalStaticGateway, which causes problems when the IP address values of the gateway and DNS are different. |
|
platform:
  baremetal:
bootstrapExternalStaticIP |
The static IP address for the bootstrap VM. You must set this value when deploying a cluster with static IP addresses when there is no DHCP server on the bare metal network. | |
platform:
  baremetal:
bootstrapExternalStaticGateway |
The static IP address of the gateway for the bootstrap VM. You must set this value when deploying a cluster with static IP addresses when there is no DHCP server on the bare metal network. | |
sshKey |
The sshKey parameter sets the key in the ~/.ssh/id_rsa.pub file required to access the control plane nodes and compute nodes. Typically, this key is from the provisioner node. |
|
pullSecret |
The pullSecret parameter sets a copy of the pull secret downloaded from the Install OpenShift on Bare Metal page when preparing the provisioner node. |
|
metadata:
name: |
The OpenShift Container Platform cluster name. For example, openshift. |
|
networking:
    machineNetwork:
- cidr: |
The public CIDR (Classless Inter-Domain Routing) of the external network. For example, 10.0.0.0/24. |
|
compute: - name: worker |
The OpenShift Container Platform cluster requires a name for each compute node even if there are zero nodes. | |
compute:
replicas: 2 |
Replicas sets the number of compute nodes in the OpenShift Container Platform cluster. | |
controlPlane:
name: master |
The OpenShift Container Platform cluster requires a name for control plane nodes. | |
controlPlane:
replicas: 3 |
Replicas sets the number of control plane nodes included as part of the OpenShift Container Platform cluster. | |
provisioningNetworkInterface |
The name of the network interface on nodes connected to the provisioning network. For OpenShift Container Platform 4.9 and later releases, use the bootMACAddress parameter to enable Ironic to identify the IP address of the NIC instead of using the provisioningNetworkInterface parameter to identify the name of the NIC. |
|
defaultMachinePlatform |
The default configuration used for machine pools without a platform configuration. | |
apiVIPs |
(Optional) The virtual IP address for Kubernetes API communication. You must either provide this setting in the install-config.yaml file as a reserved IP from the MachineNetwork parameter or preconfigured in the DNS so that the default name resolves correctly. Use the virtual IP address and not the FQDN when adding a value to the apiVIPs configuration setting in the install-config.yaml file. For dual-stack networking, the primary IP address can be either an IPv4 network or an IPv6 network. If not set, the installation program uses api.<cluster_name>.<base_domain> to derive the IP address from the DNS.
|
bmcCACert |
redfish and redfish-virtualmedia need this parameter to manage BMC addresses when using self-signed certificates with disableCertificateVerification set to False. |
ingressVIPs |
|
| (Optional) The virtual IP address for ingress traffic. You must either provide this setting in the install-config.yaml file as a reserved IP from the MachineNetwork parameter or preconfigured in the DNS so that the default name resolves correctly. Use the virtual IP address and not the FQDN when adding a value to the ingressVIPs configuration setting in the install-config.yaml file. For dual-stack networking, the primary IP address can be either an IPv4 network or an IPv6 network. If not set, the installation program uses test.apps.<cluster_name>.<base_domain> to derive the IP address from the DNS.
|
Optional Parameters
| Parameters | Default | Description |
|---|---|---|
platform:
  baremetal:
    additionalNTPServers:
- <ip_address_or_domain_name> |
An optional list of additional NTP servers to add to each host. You can use an IP address or a domain name to specify each NTP server. Additional NTP servers are user-defined NTP servers that enable preinstallation clock synchronization when the cluster host clocks are out of synchronization. | |
provisioningDHCPRange |
172.22.0.10,172.22.0.100 |
Defines the IP range for nodes on the provisioning network. |
provisioningNetworkCIDR |
172.22.0.0/24 |
The CIDR for the network to use for provisioning. When not using the default address range on the provisioning network, you must set this configuration parameter. |
clusterProvisioningIP |
The third IP address of the provisioningNetworkCIDR. |
The IP address within the cluster where the provisioning services run. Defaults to the third IP address of the provisioning subnet. For example, 172.22.0.3. |
bootstrapProvisioningIP |
The second IP address of the provisioningNetworkCIDR. |
The IP address on the bootstrap VM where the provisioning services run while the installation program is deploying the control plane nodes. Defaults to the second IP address of the provisioning subnet. For example, 172.22.0.2 or 2620:52:0:1307::2. |
externalBridge |
baremetal |
The name of the bare metal bridge of the hypervisor attached to the bare metal network. |
provisioningBridge |
provisioning |
The name of the provisioning bridge on the provisioner host attached to the provisioning network. |
architecture |
Defines the host architecture for your cluster. Valid values are amd64 or arm64. |
|
defaultMachinePlatform |
The default configuration used for machine pools without a platform configuration. | |
bootstrapOSImage |
A URL to override the default operating system image for the bootstrap node. The URL must contain a SHA-256 hash of the image. For example: https://mirror.openshift.com/rhcos-<version>-qemu.qcow2.gz?sha256=<uncompressed_sha256>. |
|
provisioningNetwork |
The provisioningNetwork parameter determines whether the cluster uses the provisioning network. If it does, the parameter also determines if the cluster manages the network.Disabled: Set this parameter to Disabled to disable the requirement for a provisioning network. When set to Disabled, you must only use virtual media based provisioning, or install the cluster by using the Assisted Installer. If Disabled and using power management, BMCs must be accessible from the bare metal network. If Disabled, you must provide two IP addresses on the bare metal network for the provisioning services to use.Managed: Set this parameter to Managed, which is the default, to fully manage the provisioning network, including DHCP, TFTP, and so on.Unmanaged: Set this parameter to Unmanaged to enable the provisioning network but take care of manual configuration of DHCP. Virtual media provisioning is recommended but PXE is still available if required. |
|
httpProxy |
Set this parameter to the appropriate HTTP proxy used within your environment. | |
httpsProxy |
Set this parameter to the appropriate HTTPS proxy used within your environment. | |
noProxy |
Set this parameter to the appropriate list of exclusions for proxy usage within your environment. |
Hosts
The hosts parameter is a list of separate bare metal assets used to build the cluster.
Hosts
| Name | Default | Description |
|---|---|---|
name |
The name of the BareMetalHost resource to associate with the details. For example, openshift-master-0. |
|
role |
The role of the bare metal node. Either master (control plane node) or worker (compute node). |
|
bmc |
Connection details for the baseboard management controller. See the BMC addressing section for additional details. | |
bmc:
address: |
The protocol and address of the BMC as a URL. | |
bmc:
username: |
The username of the BMC. | |
bmc:
password: |
The password of the BMC. | |
bmc:
disableCertificateVerification: |
False |
redfish and redfish-virtualmedia need this parameter to manage BMC addresses. For OpenShift Container Platform 4.16 and earlier, the value should be True when using a self-signed certificate. OpenShift Container Platform supports self-signed certificates with certificate verification when used with the bmcVerifyCA parameter. |
platform:
  baremetal:
bmcVerifyCA: |
A local or self-signed CA certificate that the installation program will use to secure communication with the BMC. If you specify your own CA certificate, ensure that disableCertificateVerification is set to False so that the user-provided CA certificate is validated. |
|
bootMACAddress |
The MAC address of the NIC that the host uses for the provisioning network. Ironic retrieves the IP address by using the bootMACAddress parameter. Then, it binds to the host.
|
|
networkConfig |
Set this optional parameter to configure the network interface of a host. See "(Optional) Configuring host network interfaces" for additional details. |
BMC addressing
The Intelligent Platform Management Interface (IPMI) and the Redfish network boot protocol are two common methods of addressing a Baseboard Management Controller (BMC).
To deploy clusters with virtualized control planes running on OpenShift Virtualization VMs instead of physical servers, you can use KubeVirt Redfish to expose VMs as Redfish endpoints. You can use this approach to deploy virtualized control planes with installer-provisioned infrastructure. See "Understanding virtualized control planes" for more information.
Most vendors support Baseboard Management Controller (BMC) addressing with the Intelligent Platform Management Interface (IPMI). IPMI does not encrypt communications. It is suitable for use within a data center over a secured or dedicated management network. Check with your vendor to see if they support Redfish network boot.
Redfish delivers simple and secure management for converged, hybrid IT and the Software Defined Data Center (SDDC). Redfish is human readable and machine capable, and leverages common internet and web services standards to expose information directly to the modern tool chain. If your hardware does not support Redfish network boot, use IPMI.
You can change the BMC address during installation while the node is in the Registering state. If you need to change the BMC address after the node leaves the Registering state, you must disconnect the node from Ironic, edit the BareMetalHost resource, and reconnect the node to Ironic. See the Editing a BareMetalHost resource section for details.
IPMI
IPMI uses the ipmi://<out_of_band_ip>:<port> address format, which defaults to port 623 if not specified. The following example demonstrates an IPMI configuration within the install-config.yaml file.
platform:
  baremetal:
    hosts:
      - name: openshift-master-0
        role: master
        bmc:
          address: ipmi://<out_of_band_ip>
          username: <user>
password: <password>When PXE booting using IPMI for BMC addressing, you must use a provisioning network. It is not possible to PXE boot hosts without a provisioning network. If you deploy without a provisioning network, you must use a virtual media BMC addressing option such as redfish-virtualmedia or idrac-virtualmedia. See "Redfish virtual media for HPE iLO" in the "BMC addressing for HPE iLO" section or "Redfish virtual media for Dell iDRAC" in the "BMC addressing for Dell iDRAC" section for additional details.
Redfish network boot
To enable Redfish, use redfish:// or redfish+http:// to disable TLS. The installation program requires both the hostname or the IP address and the path to the system ID. The following example demonstrates a Redfish configuration within the install-config.yaml file.
platform:
  baremetal:
    hosts:
      - name: openshift-master-0
        role: master
        bmc:
          address: redfish://<out_of_band_ip>/redfish/v1/Systems/1
          username: <user>
          password: <password>
It is recommended to have a certificate of authority for the out-of-band management addresses. On OpenShift Container Platform 4.16 and earlier, you must include disableCertificateVerification: True in the bmc configuration if using self-signed certificates. The following example demonstrates a Redfish configuration by using the disableCertificateVerification: True configuration parameter within the install-config.yaml file.
platform:
  baremetal:
    hosts:
      - name: openshift-master-0
        role: master
        bmc:
          address: redfish://<out_of_band_ip>/redfish/v1/Systems/1
          username: <user>
          password: <password>
          disableCertificateVerification: True
On OpenShift Container Platform 4.17 and later, you can include disableCertificateVerification: False in the bmc configuration to verify self-signed certificates when used in conjunction with the bmcCACert parameter. The following example demonstrates the configuration of a BMC CA certificate.
platform:
  baremetal:
    bmcCACert:
      -----BEGIN CERTIFICATE-----
      ......
      ......
      ......
      -----END CERTIFICATE-----
      -----BEGIN CERTIFICATE-----
      ......
      ......
      ......
      -----END CERTIFICATE-----
      -----BEGIN CERTIFICATE-----
      ......
      ......
      ......
      -----END CERTIFICATE-----
     hosts:
      - name: openshift-master-0
        role: master
        bmc:
          address: redfish://<out_of_band_ip>/redfish/v1/Systems/1
          username: <user>
          password: <password>
disableCertificateVerification: FalseVerifying support for Redfish APIs
When installing using the Redfish API, the installation program calls several Redfish endpoints on the baseboard management controller (BMC) when using installer-provisioned infrastructure on bare metal. If you use Redfish, ensure that your BMC supports all of the Redfish APIs before installation.
Procedure
- Set the IP address or hostname and ID of the BMC:
- Set the IP address or hostname of the BMC by running the following command:terminal
$ export SERVER=<ip_address>Replace
<ip_address>with the IP address or hostname of the BMC. - Set the ID of the system by running the following command:terminal
$ export SystemID=<system_id>Replace
<system_id>with the system ID. For example,System.Embedded.1or1. See the following vendor-specific BMC sections for details.
- Set the IP address or hostname of the BMC by running the following command:
- Check the list of Redfish APIs:
- Check
power onsupport by running the following command:terminal$ curl -u $USER:$PASS -X POST -H'Content-Type: application/json' -H'Accept: application/json' -d '{"ResetType": "On"}' https://$SERVER/redfish/v1/Systems/$SystemID/Actions/ComputerSystem.Reset - Check
power offsupport by running the following command:terminal$ curl -u $USER:$PASS -X POST -H'Content-Type: application/json' -H'Accept: application/json' -d '{"ResetType": "ForceOff"}' https://$SERVER/redfish/v1/Systems/$SystemID/Actions/ComputerSystem.Reset - Check the temporary boot implementation that uses
pxeby running the following command:terminal$ curl -u $USER:$PASS -X PATCH -H "Content-Type: application/json" -H "If-Match: <ETAG>" https://$Server/redfish/v1/Systems/$SystemID/ -d '{"Boot": {"BootSourceOverrideTarget": "pxe", "BootSourceOverrideEnabled": "Once"}} - Check the status of setting the firmware boot mode that uses
LegacyorUEFIby running the following command:terminal$ curl -u $USER:$PASS -X PATCH -H "Content-Type: application/json" -H "If-Match: <ETAG>" https://$Server/redfish/v1/Systems/$SystemID/ -d '{"Boot": {"BootSourceOverrideMode":"UEFI"}}
- Check
- Check the list of Redfish virtual media APIs:
- Check the ability to set the temporary boot device that uses
cdordvdby running the following command:terminal$ curl -u $USER:$PASS -X PATCH -H "Content-Type: application/json" -H "If-Match: <ETAG>" https://$Server/redfish/v1/Systems/$SystemID/ -d '{"Boot": {"BootSourceOverrideTarget": "cd", "BootSourceOverrideEnabled": "Once"}}' - Virtual media might use
POSTorPATCH, depending on your hardware. Check the ability to mount virtual media by running one of the following commands:terminal$ curl -u $USER:$PASS -X POST -H "Content-Type: application/json" https://$Server/redfish/v1/Managers/$ManagerID/VirtualMedia/$VmediaId -d '{"Image": "https://example.com/test.iso", "TransferProtocolType": "HTTPS", "UserName": "", "Password":""}'terminal$ curl -u $USER:$PASS -X PATCH -H "Content-Type: application/json" -H "If-Match: <ETAG>" https://$Server/redfish/v1/Managers/$ManagerID/VirtualMedia/$VmediaId -d '{"Image": "https://example.com/test.iso", "TransferProtocolType": "HTTPS", "UserName": "", "Password":""}'NoteThe
PowerOnandPowerOffcommands for Redfish APIs are the same for the Redfish virtual media APIs. In some hardware, you might only find theVirtualMediaresource underSystems/$SystemIDinstead ofManagers/$ManagerID. For theVirtualMediaresource, theUserNameandPasswordfields are optional.ImportantHTTPSandHTTPare the only supported parameter types forTransferProtocolTypes.
- Check the ability to set the temporary boot device that uses
BMC addressing for Dell iDRAC
You can configure the bmc parameter to use the iDRAC virtual media protocol, the Redfish network boot protocol, or the IPMI protocol to connect to a Dell iDRAC system.
The address configuration setting for each bmc entry is a URL for connecting to the OpenShift Container Platform cluster nodes, including the type of controller in the URL scheme and its location on the network. The username configuration for each bmc entry must specify a user with Administrator privileges.
BMC address formats for Dell iDRAC
| Protocol | Address Format |
|---|---|
| iDRAC virtual media | idrac-virtualmedia://<out_of_band_ip>/redfish/v1/Systems/System.Embedded.1 |
| Redfish network boot | redfish://<out_of_band_ip>/redfish/v1/Systems/System.Embedded.1 |
| IPMI | ipmi://<out_of_band_ip> |
Use idrac-virtualmedia as the protocol for Redfish virtual media. redfish-virtualmedia will not work on Dell hardware. Dell’s idrac-virtualmedia uses the Redfish standard with Dell’s OEM extensions.
See the following sections for additional details.
Redfish virtual media for Dell iDRAC
For Redfish virtual media on Dell servers, use idrac-virtualmedia:// in the address setting. Using redfish-virtualmedia:// will not work.
Use idrac-virtualmedia:// as the protocol for Redfish virtual media. Using redfish-virtualmedia:// will not work on Dell hardware, because the idrac-virtualmedia:// protocol corresponds to the idrac hardware type and the Redfish protocol in Ironic. Dell’s idrac-virtualmedia:// protocol uses the Redfish standard with Dell’s OEM extensions. Ironic also supports the idrac type with the WSMAN protocol. Therefore, you must specify idrac-virtualmedia:// to avoid unexpected behavior when electing to use Redfish with virtual media on Dell hardware.
The following example demonstrates using iDRAC virtual media within the install-config.yaml file.
platform:
  baremetal:
    hosts:
      - name: openshift-master-0
        role: master
        bmc:
          address: idrac-virtualmedia://<out_of_band_ip>/redfish/v1/Systems/System.Embedded.1
          username: <user>
          password: <password>
It is recommended to have a certificate of authority for the out-of-band management addresses. For OpenShift Container Platform 4.16 and earlier, you must include disableCertificateVerification: True in the bmc configuration if using self-signed certificates. For OpenShift Container Platform 4.17 and later, you can include disableCertificateVerification: False when used in conjunction with the bmcCACert configuration setting.
Ensure the OpenShift Container Platform cluster nodes have AutoAttach enabled through the iDRAC console. The menu path is: Configuration → Virtual Media → Attach Mode → AutoAttach.
The following example demonstrates a Redfish configuration by using the disableCertificateVerification: True configuration parameter within the install-config.yaml file.
platform:
  baremetal:
    hosts:
      - name: openshift-master-0
        role: master
        bmc:
          address: idrac-virtualmedia://<out_of_band_ip>/redfish/v1/Systems/System.Embedded.1
          username: <user>
          password: <password>
          disableCertificateVerification: True
The following example demonstrates a Redfish configuration by using the disableCertificateVerification: False configuration parameter along with the bmcCACert configuration parameter within the install-config.yaml file.
platform:
  baremetal:
    bmcCACert:
      -----BEGIN CERTIFICATE-----
      ......
      ......
      ......
      -----END CERTIFICATE-----
      -----BEGIN CERTIFICATE-----
      ......
      ......
      ......
      -----END CERTIFICATE-----
      -----BEGIN CERTIFICATE-----
      ......
      ......
      ......
      -----END CERTIFICATE-----
    hosts:
      - name: openshift-master-0
        role: master
        bmc:
          address: idrac-virtualmedia://<out_of_band_ip>/redfish/v1/Systems/System.Embedded.1
          username: <user>
          password: <password>
          disableCertificateVerification: False
Redfish network boot for iDRAC
To enable Redfish, use redfish:// or redfish+http:// to disable transport layer security (TLS). The installation program requires both the hostname or the IP address and the path to the system ID. The following example demonstrates a Redfish configuration within the install-config.yaml file.
platform:
  baremetal:
    hosts:
      - name: openshift-master-0
        role: master
        bmc:
          address: redfish://<out_of_band_ip>/redfish/v1/Systems/System.Embedded.1
          username: <user>
          password: <password>
It is recommended to have a certificate of authority for the out-of-band management addresses. For OpenShift Container Platform 4.16 and earlier, you must include disableCertificateVerification: True in the bmc configuration if using self-signed certificates. For OpenShift Container Platform 4.17 and later, you can include disableCertificateVerification: False when used in conjunction with the bmcCACert configuration setting.
The following example demonstrates a Redfish configuration by using the disableCertificateVerification: True configuration parameter within the install-config.yaml file.
platform:
  baremetal:
    hosts:
      - name: openshift-master-0
        role: master
        bmc:
          address: redfish://<out_of_band_ip>/redfish/v1/Systems/System.Embedded.1
          username: <user>
          password: <password>
          disableCertificateVerification: True
The following example demonstrates a Redfish configuration by using the disableCertificateVerification: False configuration parameter along with the bmcCACert configuration parameter within the install-config.yaml file.
platform:
  baremetal:
    bmcCACert:
      -----BEGIN CERTIFICATE-----
      ......
      ......
      ......
      -----END CERTIFICATE-----
      -----BEGIN CERTIFICATE-----
      ......
      ......
      ......
      -----END CERTIFICATE-----
      -----BEGIN CERTIFICATE-----
      ......
      ......
      ......
      -----END CERTIFICATE-----
    hosts:
      - name: openshift-master-0
        role: master
        bmc:
          address: redfish://<out_of_band_ip>/redfish/v1/Systems/System.Embedded.1
          username: <user>
          password: <password>
disableCertificateVerification: FalseThere is a known issue on Dell iDRAC 9 with firmware version 04.40.00.00 and all releases up to including the 5.xx series for installer-provisioned installations on bare metal deployments. The virtual console plugin defaults to eHTML5, an enhanced version of HTML5, which causes problems with the InsertVirtualMedia workflow. Set the plugin to use HTML5 to avoid this issue. The menu path is Configuration → Virtual console → Plug-in Type → HTML5 .
Ensure the OpenShift Container Platform cluster nodes have AutoAttach enabled through the iDRAC console. The menu path is: Configuration → Virtual Media → Attach Mode → AutoAttach .
BMC addressing for HPE iLO
You can connect to an HPE iLO system using the Redfish virtual media protocol, the Redfish network boot protocol, or the IPMI protocol.
The address field for each bmc entry is a URL for connecting to the OpenShift Container Platform cluster nodes, including the type of controller in the URL scheme and its location on the network.
| Protocol | Address Format |
|---|---|
| Redfish virtual media | redfish-virtualmedia://<out_of_band_ip>/redfish/v1/Systems/1 |
| Redfish network boot | redfish://<out_of_band_ip>/redfish/v1/Systems/1 |
| IPMI | ipmi://<out_of_band_ip> |
Redfish virtual media for HPE iLO
To enable Redfish virtual media for HPE servers, use redfish-virtualmedia:// in the address setting. The following example demonstrates using Redfish virtual media within the install-config.yaml file.
platform:
  baremetal:
    hosts:
      - name: openshift-master-0
        role: master
        bmc:
          address: redfish-virtualmedia://<out_of_band_ip>/redfish/v1/Systems/1
          username: <user>
          password: <password>
It is recommended to have a certificate of authority for the out-of-band management addresses. For OpenShift Container Platform 4.16 and earlier, you must include disableCertificateVerification: True in the bmc configuration if using self-signed certificates. For OpenShift Container Platform 4.17 and later, you can include disableCertificateVerification: False when used in conjunction with the bmcCACert parameter.
The following example demonstrates a Redfish configuration by using the disableCertificateVerification: True configuration parameter within the install-config.yaml file.
platform:
  baremetal:
    hosts:
      - name: openshift-master-0
        role: master
        bmc:
          address: redfish-virtualmedia://<out_of_band_ip>/redfish/v1/Systems/1
          username: <user>
          password: <password>
          disableCertificateVerification: True
The following example demonstrates a Redfish configuration by using the disableCertificateVerification: False configuration parameter along with the bmcCACert configuration parameter within the install-config.yaml file.
platform:
  baremetal:
    bmcCACert:
      -----BEGIN CERTIFICATE-----
      ......
      ......
      ......
      -----END CERTIFICATE-----
      -----BEGIN CERTIFICATE-----
      ......
      ......
      ......
      -----END CERTIFICATE-----
      -----BEGIN CERTIFICATE-----
      ......
      ......
      ......
      -----END CERTIFICATE-----
    hosts:
      - name: openshift-master-0
        role: master
        bmc:
          address: redfish-virtualmedia://<out_of_band_ip>/redfish/v1/Systems/1
          username: <user>
          password: <password>
disableCertificateVerification: FalseRedfish virtual media is not supported on 9th generation systems running iLO4, because Ironic does not support iLO4 with virtual media.
Redfish network boot for HPE iLO
To enable Redfish, use redfish:// or redfish+http:// to disable TLS. The installation program requires both the hostname or the IP address and the path to the system ID. The following example demonstrates a Redfish configuration within the install-config.yaml file.
platform:
  baremetal:
    hosts:
      - name: openshift-master-0
        role: master
        bmc:
          address: redfish://<out_of_band_ip>/redfish/v1/Systems/1
          username: <user>
          password: <password>
It is recommended to have a certificate of authority for the out-of-band management addresses. For OpenShift Container Platform 4.16 and earlier, you must include disableCertificateVerification: True in the bmc configuration if using self-signed certificates. For OpenShift Container Platform 4.17 and later, you can include disableCertificateVerification: False when used in conjunction with the bmcCACert parameter.
The following example demonstrates a Redfish configuration by using the disableCertificateVerification: True configuration parameter within the install-config.yaml file.
platform:
  baremetal:
    hosts:
      - name: openshift-master-0
        role: master
        bmc:
          address: redfish://<out_of_band_ip>/redfish/v1/Systems/1
          username: <user>
          password: <password>
          disableCertificateVerification: True
The following example demonstrates a Redfish configuration by using the disableCertificateVerification: False configuration parameter along with the bmcCACert configuration parameter within the install-config.yaml file.
platform:
  baremetal:
    bmcCACert:
      -----BEGIN CERTIFICATE-----
      ......
      ......
      ......
      -----END CERTIFICATE-----
      -----BEGIN CERTIFICATE-----
      ......
      ......
      ......
      -----END CERTIFICATE-----
      -----BEGIN CERTIFICATE-----
      ......
      ......
      ......
      -----END CERTIFICATE-----
    hosts:
      - name: openshift-master-0
        role: master
        bmc:
          address: redfish://<out_of_band_ip>/redfish/v1/Systems/1
          username: <user>
          password: <password>
          disableCertificateVerification: True
BMC addressing for Fujitsu iRMC
You can connect to a Fujitsu iRMC system using the iRMC protocol or the IPMI protocol. The address field for each bmc entry is a URL for connecting to the OpenShift Container Platform cluster nodes, including the type of controller in the URL scheme and its location on the network.
| Protocol | Address Format |
|---|---|
| iRMC | irmc://<out-of-band-ip> |
| IPMI | ipmi://<out-of-band-ip> |
Fujitsu nodes can use irmc://<out-of-band-ip> and defaults to port 443. The following example demonstrates an iRMC configuration within the install-config.yaml file.
platform:
  baremetal:
    hosts:
      - name: openshift-master-0
        role: master
        bmc:
          address: irmc://<out-of-band-ip>
          username: <user>
password: <password>Currently Fujitsu supports iRMC S5 firmware version 3.05P and above for installer-provisioned installation on bare metal.
BMC addressing for Cisco Integrated Management Controller
You can connect to a Cisco Integrated Management Controller (CIMC) system using the Redfish virtual media protocol. The address field for each bmc entry is a URL for connecting to the OpenShift Container Platform cluster nodes, including the type of controller in the URL scheme and its location on the network.
For Cisco UCS C-Series and X-Series servers, Red Hat supports Cisco Integrated Management Controller (CIMC).
| Protocol | Address Format |
|---|---|
| Redfish virtual media | redfish-virtualmedia://<server_kvm_ip>/redfish/v1/Systems/<serial_number> |
To enable Redfish virtual media for Cisco UCS C-Series and X-Series servers, use redfish-virtualmedia:// in the address setting. The following example demonstrates using Redfish virtual media within the install-config.yaml file.
platform:
  baremetal:
    hosts:
      - name: openshift-master-0
        role: master
        bmc:
          address: redfish-virtualmedia://<server_kvm_ip>/redfish/v1/Systems/<serial_number>
          username: <user>
          password: <password>
While it is recommended to have a certificate of authority for the out-of-band management addresses, you must include disableCertificateVerification: True in the bmc configuration if using self-signed certificates. The following example demonstrates a Redfish configuration by using the disableCertificateVerification: True configuration parameter within the install-config.yaml file.
platform:
  baremetal:
    hosts:
      - name: openshift-master-0
        role: master
        bmc:
          address: redfish-virtualmedia://<server_kvm_ip>/redfish/v1/Systems/<serial_number>
          username: <user>
          password: <password>
          disableCertificateVerification: True
Root device hints
The rootDeviceHints parameter enables the installer to provision the Red Hat Enterprise Linux CoreOS (RHCOS) image to a particular device. The installer examines the devices in the order it discovers them, and compares the discovered values with the hint values. The installer uses the first discovered device that matches the hint value. The configuration can combine multiple hints, but a device must match all hints for the installer to select it.
Subfields
| Subfield | Description |
|---|---|
deviceName |
A string containing a Linux device name such as /dev/vda or /dev/disk/by-path/.
The hint must match the actual value exactly. |
hctl |
A string containing a SCSI bus address like 0:0:0:0. The hint must match the actual value exactly. |
model |
A string containing a vendor-specific device identifier. The hint can be a substring of the actual value. |
vendor |
A string containing the name of the vendor or manufacturer of the device. The hint can be a sub-string of the actual value. |
serialNumber |
A string containing the device serial number. The hint must match the actual value exactly. |
minSizeGigabytes |
An integer representing the minimum size of the device in gigabytes. |
wwn |
A string containing the unique storage identifier. The hint must match the actual value exactly. |
wwnWithExtension |
A string containing the unique storage identifier with the vendor extension appended. The hint must match the actual value exactly. |
wwnVendorExtension |
A string containing the unique vendor storage identifier. The hint must match the actual value exactly. |
rotational |
A boolean indicating whether the device should be a rotating disk (true) or not (false). |
     - name: master-0
       role: master
       bmc:
         address: ipmi://10.10.0.3:6203
         username: admin
         password: redhat
       bootMACAddress: de:ad:be:ef:00:40
       rootDeviceHints:
         deviceName: "/dev/sda"
Setting proxy settings
You can deploy an OpenShift Container Platform cluster while using a proxy by editing the install-config.yaml file.
Procedure
- Add proxy values under the
proxykey mapping:yamlapiVersion: v1 baseDomain: <domain> proxy: httpProxy: http://USERNAME:PASSWORD@proxy.example.com:PORT httpsProxy: https://USERNAME:PASSWORD@proxy.example.com:PORT noProxy: <WILDCARD_OF_DOMAIN>,<PROVISIONING_NETWORK/CIDR>,<BMC_ADDRESS_RANGE/CIDR>The following is an example of
noProxywith values.yamlnoProxy: .example.com,172.22.0.0/24,10.10.0.0/24 - With a proxy enabled, set the appropriate values of the proxy in the corresponding key/value pair.
Key considerations:
- If the proxy does not have an HTTPS proxy, change the value of
httpsProxyfromhttps://tohttp://. - If the cluster uses a provisioning network, include it in the
noProxysetting, otherwise the installation program fails. - Set all of the proxy settings as environment variables within the provisioner node. For example,
HTTP_PROXY,HTTPS_PROXY, andNO_PROXY.
- If the proxy does not have an HTTPS proxy, change the value of
Deploying with no provisioning network
You can deploy an OpenShift Container Platform cluster without a provisioning network, by changing the install-config.yaml file.
Procedure
- Make the following changes to the
install-config.yamlfile:yamlplatform: baremetal: apiVIPs: - <api_VIP> ingressVIPs: - <ingress_VIP> provisioningNetwork: "Disabled"Add the
provisioningNetworkconfiguration setting, if needed, and set it toDisabled.ImportantThe
provisioningnetwork is required for PXE booting. If you deploy without aprovisioningnetwork, you must use a virtual media BMC addressing option such asredfish-virtualmediaoridrac-virtualmedia. See "Redfish virtual media for HPE iLO" in the "BMC addressing for HPE iLO" section or "Redfish virtual media for Dell iDRAC" in the "BMC addressing for Dell iDRAC" section for additional details.
Deploying IP addressing with dual-stack networking
When deploying IP addressing with dual-stack networking for the bootstrap virtual machine (VM), the bootstrap VM functions with a single IP version.
The following examples are for DHCP. DHCP-based dual stack clusters can deploy with one IPv4 and one IPv6 virtual IP address (VIP) each from Day 1.
Deploying a cluster with static IP addresses involves configuring IP addresses for the bootstrap VM, API, and ingress VIPs. Configuring dual-stack with a static IP set in install-config requires one VIP each for API and ingress. Add secondary VIPs after deployment.
For dual-stack networking in OpenShift Container Platform clusters, you can configure IPv4 and IPv6 address endpoints for cluster nodes. To configure IPv4 and IPv6 address endpoints for cluster nodes, edit the machineNetwork, clusterNetwork, and serviceNetwork configuration settings in the install-config.yaml file. Each setting must have two CIDR entries each. For a cluster with the IPv4 family as the primary address family, specify the IPv4 setting first. For a cluster with the IPv6 family as the primary address family, specify the IPv6 setting first.
machineNetwork:
- cidr: {{ extcidrnet }}
- cidr: {{ extcidrnet6 }}
clusterNetwork:
- cidr: 10.128.0.0/14
  hostPrefix: 23
- cidr: fd02::/48
  hostPrefix: 64
serviceNetwork:
- 172.30.0.0/16
- fd03::/112On a bare metal platform, if you specified an NMState configuration in the networkConfig section of your install-config.yaml file, add interfaces.wait-ip: ipv4+ipv6 to the NMState YAML file to resolve an issue that prevents your cluster from deploying on a dual-stack network.
networkConfig:
  nmstate:
    interfaces:
    - name: <interface_name>
# ...
      wait-ip: ipv4+ipv6
# ...
To provide an interface to the cluster for applications that use IPv4 and IPv6 addresses, configure IPv4 and IPv6 virtual IP (VIP) address endpoints for the Ingress VIP and API VIP services. To configure IPv4 and IPv6 address endpoints, edit the apiVIPs and ingressVIPs configuration settings in the install-config.yaml file . The apiVIPs and ingressVIPs configuration settings use a list format. The order of the list indicates the primary and secondary VIP address for each service.
platform:
  baremetal:
    apiVIPs:
      - <api_ipv4>
      - <api_ipv6>
    ingressVIPs:
      - <wildcard_ipv4>
- <wildcard_ipv6>For a cluster with dual-stack networking configuration, you must assign both IPv4 and IPv6 addresses to the same interface.
Configuring host network interfaces
Before installation, you can set the networkConfig configuration setting in the install-config.yaml file to use NMState to configure host network interfaces.
The most common use case for this functionality is to specify a static IP address on the bare-metal network, but you can also configure other networks such as a storage network. This functionality supports other NMState features such as VLAN, VXLAN, bridges, bonds, routes, MTU, and DNS resolver settings.
Do not set the unsupported rotate option in the DNS resolver settings for your cluster. The option disrupts the DNS resolution function of the internal API.
Prerequisites
- Configure a
PTRDNS record with a valid hostname for each node with a static IP address. - Install the NMState CLI (
nmstate).
If you use a provisioning network, configure it by using the dnsmasq tool in Ironic. To do a fully static deployment, you must use virtual media.
Procedure
- Optional: Consider testing the NMState syntax with
nmstatectl gcbefore including the syntax in theinstall-config.yamlfile, because the installation program does not check the NMState YAML syntax.NoteErrors in the YAML syntax might result in a failure to apply the network configuration. Additionally, maintaining the validated YAML syntax is useful when applying changes by using Kubernetes NMState after deployment or when expanding the cluster.
- Create an NMState YAML file:yaml
interfaces:
- name: <nic1_name>
  type: ethernet
  state: up
  ipv4:
    address:
    - ip: <ip_address>
      prefix-length: 24
    enabled: true
dns-resolver:
  config:
    server:
    - <dns_ip_address>
routes:
  config:
  - destination: 0.0.0.0/0
    next-hop-address: <next_hop_ip_address>
    next-hop-interface: <next_hop_nic1_name>
Replace
<nic1_name>,<ip_address>,<dns_ip_address>,<next_hop_ip_address>and<next_hop_nic1_name>with appropriate values. - Test the configuration file by running the following command:terminal
$ nmstatectl gc <nmstate_yaml_file>Replace
<nmstate_yaml_file>with the configuration file name.
- Create an NMState YAML file:
- Use the
networkConfigconfiguration setting by adding the NMState configuration to hosts within theinstall-config.yamlfile:yamlhosts: - name: openshift-master-0 role: master bmc: address: redfish+http://<out_of_band_ip>/redfish/v1/Systems/ username: <user> password: <password> disableCertificateVerification: null bootMACAddress: <NIC1_mac_address> bootMode: UEFI rootDeviceHints: deviceName: "/dev/sda" networkConfig: interfaces: - name: <nic1_name> type: ethernet state: up ipv4: address: - ip: <ip_address> prefix-length: 24 enabled: true dns-resolver: config: server: - <dns_ip_address> routes: config: - destination: 0.0.0.0/0 next-hop-address: <next_hop_ip_address> next-hop-interface: <next_hop_nic1_name>For
hosts.networkconfig.interfaces, add the NMState YAML syntax to configure the host interfaces.Replace
<nic1_name>,<ip_address>,<dns_ip_address>,<next_hop_ip_address>and<next_hop_nic1_name>with appropriate values.ImportantAfter deploying the cluster, you cannot modify the
networkConfigconfiguration setting ofinstall-config.yamlfile to make changes to the host network interface. Use the Kubernetes NMState Operator to make changes to the host network interface after deployment.
Configuring host network interfaces for subnets
For edge computing scenarios, it can be beneficial to locate compute nodes closer to the edge. To locate remote nodes in subnets, you might use different network segments or subnets for the remote nodes than you used for the control plane subnet and local compute nodes.
You can reduce latency for the edge and allow for enhanced scalability by setting up subnets for edge computing scenarios.
When using the default load balancer, OpenShiftManagedDefault and adding remote nodes to your OpenShift Container Platform cluster, all control plane nodes must run in the same subnet. When using more than one subnet, you can also configure the Ingress VIP to run on the control plane nodes by using a manifest. See "Configuring network components to run on the control plane" for details.
If you have established different network segments or subnets for remote nodes as described in the section on "Establishing communication between subnets", you must specify the subnets in the machineNetwork configuration setting if the workers are using static IP addresses, bonds or other advanced networking. When setting the node IP address in the networkConfig parameter for each remote node, you must also specify the gateway and the DNS server for the subnet containing the control plane nodes when using static IP addresses. This ensures that the remote nodes can reach the subnet containing the control plane and that they can receive network traffic from the control plane.
Deploying a cluster with multiple subnets requires using virtual media, such as redfish-virtualmedia or idrac-virtualmedia, because remote nodes cannot access the local provisioning network.
Procedure
- Add the subnets to the
machineNetworkin theinstall-config.yamlfile when using static IP addresses:yamlnetworking: machineNetwork: - cidr: 10.0.0.0/24 - cidr: 192.168.0.0/24 networkType: OVNKubernetes - Add the gateway and DNS configuration to the
networkConfigparameter of each edge compute node using NMState syntax when using a static IP address or advanced networking such as bonds:yamlnetworkConfig: interfaces: - name: <interface_name> type: ethernet state: up ipv4: enabled: true dhcp: false address: - ip: <node_ip> prefix-length: 24 gateway: <gateway_ip> dns-resolver: config: server: - <dns_ip>where:
networkConfig.interfaces.nameSpecifies the interface name.
networkConfig.interfaces.ipv4.address.ipSpecifies the IP address of the node.
networkConfig.interfaces.ipv4.gatewaySpecifies the IP address of the gateway.
networkConfig.dns-resolver.cofig.serverSpecifies the IP address of the DNS server.
Configuring address generation modes for SLAAC in dual-stack networks
For dual-stack clusters that use Stateless Address AutoConfiguration (SLAAC), you must specify a global value for the ipv6.addr-gen-mode network setting. You can set this value using NMState to configure the RAM disk and the cluster configuration files. If you do not configure a consistent ipv6.addr-gen-mode in these locations, IPv6 address mismatches can occur between CSR resources and BareMetalHost resources in the cluster.
Prerequisites
- Install the NMState CLI (
nmstate).
Procedure
- Optional: Consider testing the NMState YAML syntax with the
nmstatectl gccommand before including it in theinstall-config.yamlfile because the installation program will not check the NMState YAML syntax.- Create an NMState YAML file:yaml
interfaces:
- name: eth0
  ipv6:
    addr-gen-mode: <address_mode>
Replace
<address_mode>with the type of address generation mode required for IPv6 addresses in the cluster. Valid values areeui64,stable-privacy, orrandom. - Test the configuration file by running the following command:terminal
$ nmstatectl gc <nmstate_yaml_file>Replace
<nmstate_yaml_file>with the name of the test configuration file.
- Create an NMState YAML file:
- Add the NMState configuration to the
hosts.networkConfigsection within the install-config.yaml file:yamlhosts: - name: openshift-master-0 role: master bmc: address: redfish+http://<out_of_band_ip>/redfish/v1/Systems/ username: <user> password: <password> disableCertificateVerification: null bootMACAddress: <NIC1_mac_address> bootMode: UEFI rootDeviceHints: deviceName: "/dev/sda" networkConfig: interfaces: - name: eth0 ipv6: addr-gen-mode: <address_mode> ...Replace
<address_mode>with the type of address generation mode required for IPv6 addresses in the cluster. Valid values areeui64,stable-privacy, orrandom.
Configuring host network interfaces for dual-port NIC
Before installation, you can set the networkConfig configuration setting in the install-config.yaml file to configure host network interfaces by using NMState to support dual-port network interface controller (NIC).
OpenShift Virtualization only supports the following bond modes:
- mode=1 active-backup
- mode=2 balance-xor
- mode=4 802.3ad
Prerequisites
- Configure a
PTRDNS record with a valid hostname for each node with a static IP address. - Install the NMState CLI (
nmstate).
Errors in the YAML syntax might result in a failure to apply the network configuration. Additionally, maintaining the validated YAML syntax is useful when applying changes by using Kubernetes NMState after deployment or when expanding the cluster.
Procedure
- Add the NMState configuration to the
networkConfigfield to hosts within theinstall-config.yamlfile:yamlhosts: - name: worker-0 role: worker bmc: address: redfish+http://<out_of_band_ip>/redfish/v1/Systems/ username: <user> password: <password> disableCertificateVerification: false bootMACAddress: <NIC1_mac_address> bootMode: UEFI networkConfig: interfaces: - name: eno1 type: ethernet state: up mac-address: 0c:42:a1:55:f3:06 ipv4: enabled: true dhcp: false ethernet: sr-iov: total-vfs: 2 ipv6: enabled: false dhcp: false - name: sriov:eno1:0 type: ethernet state: up ipv4: enabled: false ipv6: enabled: false - name: sriov:eno1:1 type: ethernet state: down - name: eno2 type: ethernet state: up mac-address: 0c:42:a1:55:f3:07 ipv4: enabled: true ethernet: sr-iov: total-vfs: 2 ipv6: enabled: false - name: sriov:eno2:0 type: ethernet state: up ipv4: enabled: false ipv6: enabled: false - name: sriov:eno2:1 type: ethernet state: down - name: bond0 type: bond state: up min-tx-rate: 100 max-tx-rate: 200 link-aggregation: mode: active-backup options: primary: sriov:eno1:0 port: - sriov:eno1:0 - sriov:eno2:0 ipv4: address: - ip: 10.19.16.57 prefix-length: 23 dhcp: false enabled: true ipv6: enabled: false dns-resolver: config: server: - 10.11.5.160 - 10.2.70.215 routes: config: - destination: 0.0.0.0/0 next-hop-address: 10.19.17.254 next-hop-interface: bond0 table-id: 254where:
hosts.networkconfigSpecifies the value for the
hosts.networkconfigparameter. ThenetworkConfigfield has information about the network configuration of the host, with subfields includinginterfaces,dns-resolver, androutes.hosts.networkconfig.interfacesSpecifies an array of network interfaces defined for the host.
hosts.networkconfig.interfaces.nameSpecifies the name of the interface.
hosts.networkconfig.interfaces.typeSpecifies the type of interface. This example creates a ethernet interface.
hosts.networkconfig.interfaces.ipv4.dhcpSpecifies the value for the
dhcpparameter. Set this tofalseto disable DHCP for the physical function (PF) if it is not strictly required.hosts.networkconfig.interfaces.ethernet.sr-iov.total-vfsSpecifies the value for the
sr-iov.total-vfsparameter. Set to the number of SR-IOV virtual functions (VFs) to instantiate.hosts.networkconfig.interfaces.stateSpecifies the value for the
stateparameter. Set this toup.hosts.networkconfig.interfaces.ipv4.enabledSpecifies the value for the
ipv4.enabledparameter. Set this tofalseto disable IPv4 addressing for the VF attached to the bond.hosts.networkconfig.interfaces.min-tx-rateSpecifies the value for the
min-tx-rateparameter. Sets a minimum transmission rate, in Mbps, for the VF. This sample value sets a rate of 100 Mbps. * This value must be less than or equal to the maximum transmission rate. * Intel NICs do not support themin-tx-rateparameter. For more information, see BZ#1772847.hosts.networkconfig.interfaces.max-tx-rateSpecifies the value for the
max-tx-rateparameter. Sets a maximum transmission rate, in Mbps, for the VF. This sample value sets a rate of 200 Mbps.hosts.networkconfig.interfaces.link-aggregation.modeSpecifies the needed bond mode.
hosts.networkconfig.interfaces.link-aggregation.options.primarySpecifies the preferred port of the bonding interface. The bond uses the primary device as the first device of the bonding interfaces. The bond does not abandon the primary device interface unless it fails. This setting is particularly useful when one NIC in the bonding interface is faster and, therefore, able to handle a bigger load. This setting is only valid when the bonding interface is in active-backup mode (mode 1).
hosts.networkconfig.interfaces.ipv4.address.ipSpecifies the static IP address for the bond interface. This is the node IP address.
hosts.networkconfig.routes.config.next-hop-interfaceSpecifies the value for the
routes.config.next-hop-interfaceparameter. Setsbond0as the gateway for the default route.
ImportantAfter deploying the cluster, you cannot change the
networkConfigconfiguration setting of theinstall-config.yamlfile to make changes to the host network interface. Use the Kubernetes NMState Operator to make changes to the host network interface after deployment.
Configuring multiple cluster nodes
You can simultaneously configure OpenShift Container Platform cluster nodes with identical settings. Configuring multiple cluster nodes avoids adding redundant information for each node to the install-config.yaml file. This file contains specific parameters to apply an identical configuration to multiple nodes in the cluster.
Compute nodes are configured separately from the controller node. However, configurations for both node types use the highlighted parameters in the install-config.yaml file to enable multi-node configuration. Set the networkConfig parameters to BOND, as shown in the following example:
hosts:
- name: ostest-master-0
 [...]
 networkConfig: &BOND
   interfaces:
   - name: bond0
     type: bond
     state: up
     ipv4:
       dhcp: true
       enabled: true
     link-aggregation:
       mode: active-backup
       port:
       - enp2s0
       - enp3s0
- name: ostest-master-1
 [...]
 networkConfig: *BOND
- name: ostest-master-2
 [...]
networkConfig: *BONDConfiguration of multiple cluster nodes is only available for initial deployments on installer-provisioned infrastructure.
Configuring managed Secure Boot
You can enable managed Secure Boot when deploying an installer-provisioned cluster by using Redfish BMC addressing, such as redfish, redfish-virtualmedia, or idrac-virtualmedia.
Procedure
- Add the
bootModeconfiguration setting for each node to enable managed Secure Boot.Examplehosts: - name: openshift-master-0 role: master bmc: address: redfish://<out_of_band_ip> username: <username> password: <password> bootMACAddress: <NIC1_mac_address> rootDeviceHints: deviceName: "/dev/sda" bootMode: UEFISecureBoot- For
hosts.bmc.address: Ensure thebmc.addresssetting usesredfish,redfish-virtualmedia, oridrac-virtualmediaas the protocol. See "BMC addressing for HPE iLO" or "BMC addressing for Dell iDRAC" for additional details. - For
hosts.bbootMode: ThebootModesetting isUEFIby default. Change it toUEFISecureBootto enable managed Secure Boot.NoteSee "Configuring nodes" in the "Prerequisites" to ensure the nodes can support managed Secure Boot. If the nodes do not support managed Secure Boot, see "Configuring nodes for Secure Boot manually" in the "Configuring nodes" section. Configuring Secure Boot manually requires Redfish virtual media.
NoteRed Hat does not support Secure Boot with IPMI, because IPMI does not provide Secure Boot management facilities.
- For
Manifest configuration files
You can customize your cluster installation by editing the manifest configuration files.
Creating the OpenShift Container Platform manifests
Create manifest files to begin customizing your cluster installation.
Procedure
- Create the OpenShift Container Platform manifests by running the following command:terminal
$ ./openshift-baremetal-install --dir ~/clusterconfigs create manifestsExample outputINFO Consuming Install Config from target directory WARNING Making control-plane schedulable by setting MastersSchedulable to true for Scheduler cluster settings WARNING Discarding the OpenShift Manifest that was provided in the target directory because its dependencies are dirty and it needs to be regenerated
Configuring NTP for disconnected clusters
You can configure NTP servers on control plane nodes and set compute nodes as NTP clients to ensure time synchronization in disconnected clusters that lack access to external NTP servers.
OpenShift Container Platform installs the chrony Network Time Protocol (NTP) service on the cluster nodes.
Figure 5. Configuring NTP for disconnected clusters
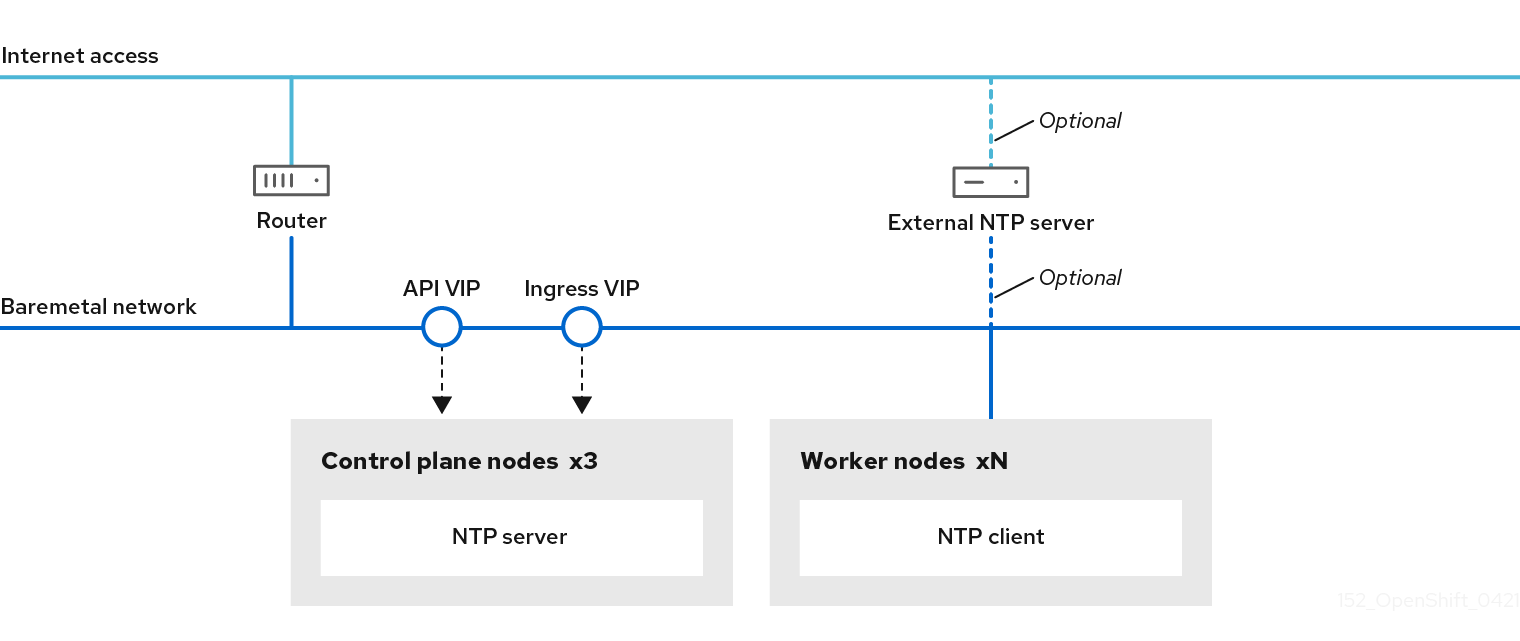
OpenShift Container Platform nodes must agree on a date and time to run properly. When compute nodes retrieve the date and time from the NTP servers on the control plane nodes, it enables the installation and operation of clusters that are not connected to a routable network and thereby do not have access to a higher stratum NTP server.
Procedure
- Install Butane on your installation host by using the following command:terminal
$ sudo dnf -y install butane - Create a Butane config,
99-master-chrony-conf-override.bu, including the contents of thechrony.conffile for the control plane nodes.NoteSee "Creating machine configs with Butane" for information about Butane.
yamlvariant: openshift version: 4.22.0 metadata: name: 99-master-chrony-conf-override labels: machineconfiguration.openshift.io/role: master storage: files: - path: /etc/chrony.conf mode: 0644 overwrite: true contents: inline: | # Use public servers from the pool.ntp.org project. # Please consider joining the pool (https://www.pool.ntp.org/join.html). # The Machine Config Operator manages this file server openshift-master-0.<cluster-name>.<domain> iburst server openshift-master-1.<cluster-name>.<domain> iburst server openshift-master-2.<cluster-name>.<domain> iburst stratumweight 0 driftfile /var/lib/chrony/drift rtcsync makestep 10 3 bindcmdaddress 127.0.0.1 bindcmdaddress ::1 keyfile /etc/chrony.keys commandkey 1 generatecommandkey noclientlog logchange 0.5 logdir /var/log/chrony # Configure the control plane nodes to serve as local NTP servers # for all compute nodes, even if they are not in sync with an # upstream NTP server. # Allow NTP client access from the local network. allow all # Serve time even if not synchronized to a time source. local stratum 3 orphanwhere:
<cluster-name>Specifies the name of the cluster.
<domain>Specifies the fully qualified domain name.
- Use Butane to generate a
MachineConfigobject file,99-master-chrony-conf-override.yaml, containing the configuration to be delivered to the control plane nodes:terminal$ butane 99-master-chrony-conf-override.bu -o 99-master-chrony-conf-override.yaml - Create a Butane config,
99-worker-chrony-conf-override.bu, including the contents of thechrony.conffile for the compute nodes that references the NTP servers on the control plane nodes.yamlvariant: openshift version: 4.22.0 metadata: name: 99-worker-chrony-conf-override labels: machineconfiguration.openshift.io/role: worker storage: files: - path: /etc/chrony.conf mode: 0644 overwrite: true contents: inline: | # The Machine Config Operator manages this file. server openshift-master-0.<cluster-name>.<domain> iburst server openshift-master-1.<cluster-name>.<domain> iburst server openshift-master-2.<cluster-name>.<domain> iburst stratumweight 0 driftfile /var/lib/chrony/drift rtcsync makestep 10 3 bindcmdaddress 127.0.0.1 bindcmdaddress ::1 keyfile /etc/chrony.keys commandkey 1 generatecommandkey noclientlog logchange 0.5 logdir /var/log/chronywhere:
<cluster-name>Specifies the name of the cluster.
<domain>Specifies the fully qualified domain name.
- Use Butane to generate a
MachineConfigobject file,99-worker-chrony-conf-override.yaml, containing the configuration to be delivered to the worker nodes:terminal$ butane 99-worker-chrony-conf-override.bu -o 99-worker-chrony-conf-override.yaml
Configuring network components to run on the control plane
You can configure networking components to run exclusively on the control plane nodes. By default, OpenShift Container Platform allows any node in the machine config pool to host the ingressVIP virtual IP address. However, some environments deploy compute nodes in separate subnets from the control plane nodes, which requires configuring the ingressVIP virtual IP address to run on the control plane nodes.
When deploying remote nodes in separate subnets, you must place the ingressVIP virtual IP address exclusively with the control plane nodes.
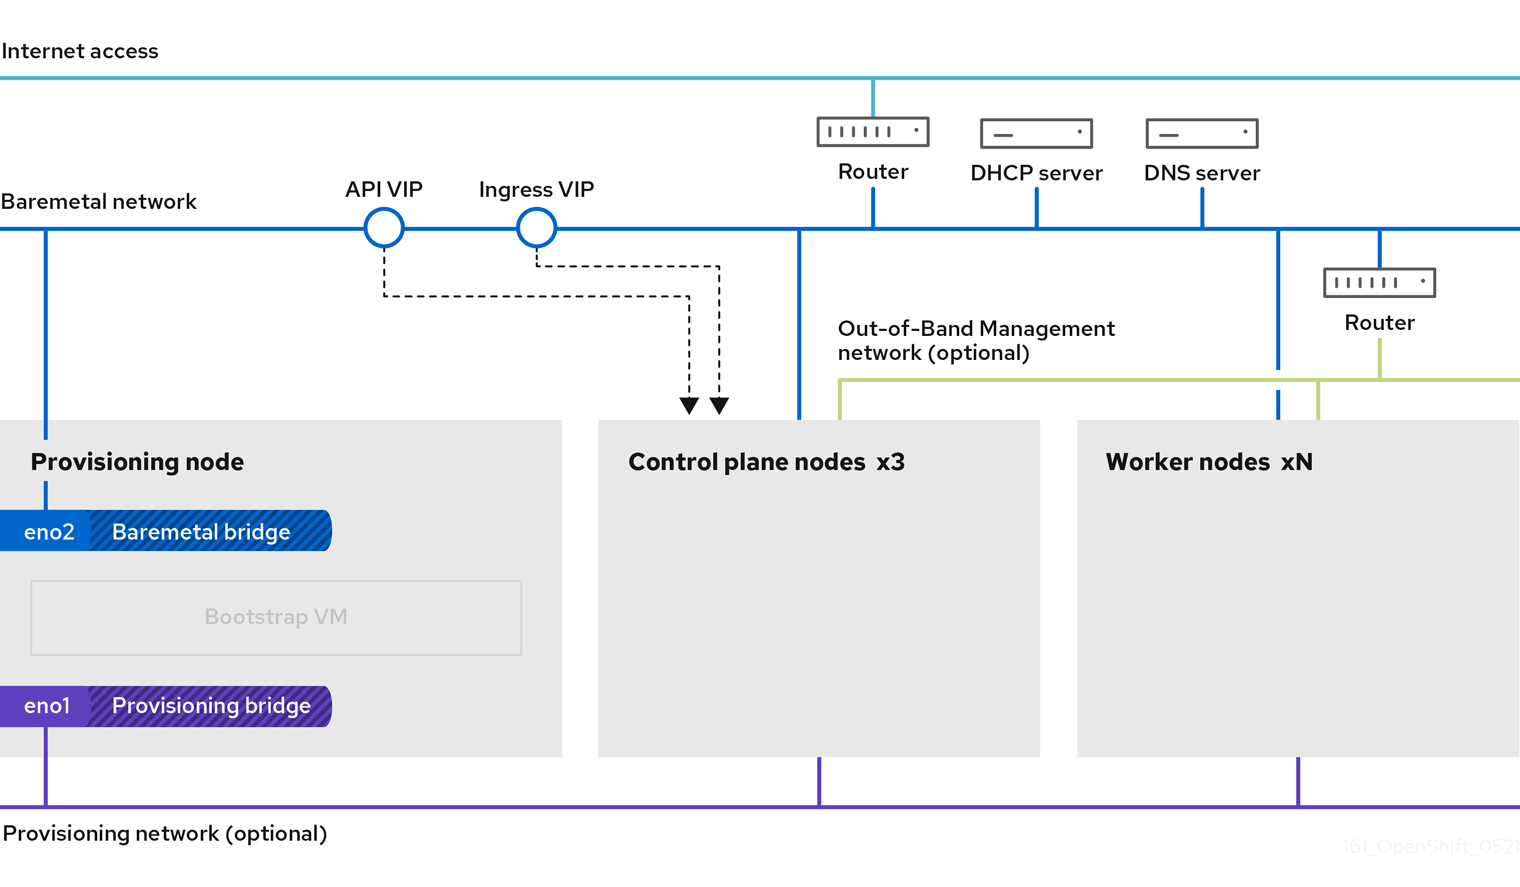
Procedure
- Change to the directory storing the
install-config.yamlfile:terminal$ cd ~/clusterconfigs - Switch to the
manifestssubdirectory:terminal$ cd manifests - Create a file named
cluster-network-avoid-workers-99-config.yaml:terminal$ touch cluster-network-avoid-workers-99-config.yaml - Open the
cluster-network-avoid-workers-99-config.yamlfile in an editor and enter a custom resource (CR) that describes the Operator configuration:yamlapiVersion: machineconfiguration.openshift.io/v1 kind: MachineConfig metadata: name: 50-worker-fix-ipi-rwn labels: machineconfiguration.openshift.io/role: worker spec: config: ignition: version: 3.2.0 storage: files: - path: /etc/kubernetes/manifests/keepalived.yaml mode: 0644 contents: source: data:,This manifest places the
ingressVIPvirtual IP address on the control plane nodes. Additionally, this manifest deploys the following processes on the control plane nodes only:openshift-ingress-operatorkeepalived
- Save the
cluster-network-avoid-workers-99-config.yamlfile. - Create a
manifests/cluster-ingress-default-ingresscontroller.yamlfile:yamlapiVersion: operator.openshift.io/v1 kind: IngressController metadata: name: default namespace: openshift-ingress-operator spec: nodePlacement: nodeSelector: matchLabels: node-role.kubernetes.io/master: "" - Consider backing up the
manifestsdirectory. The installation program deletes themanifests/directory when creating the cluster. - Modify the
cluster-scheduler-02-config.ymlmanifest to make the control plane nodes schedulable by setting themastersSchedulablefield totrue. Control plane nodes are not schedulable by default. For example:$ sed -i "s;mastersSchedulable: false;mastersSchedulable: true;g" clusterconfigs/manifests/cluster-scheduler-02-config.ymlNoteIf control plane nodes are not schedulable after completing this procedure, deploying the cluster will fail.
Deploying routers on compute nodes
During installation, the installation program deploys router pods on compute nodes. By default, the installation program installs two router pods. If a deployed cluster requires additional routers to handle external traffic loads destined for services within the OpenShift Container Platform cluster, you can create a yaml file to set an appropriate number of router replicas.
Deploying a cluster with only one compute node is not supported. While modifying the router replicas will address issues with the degraded state when deploying with one compute node, the cluster loses high availability for the ingress API, which is not suitable for production environments.
By default, the installation program deploys two routers. If the cluster has no compute nodes, the installation program deploys the two routers on the control plane nodes by default.
Procedure
- Create a
router-replicas.yamlfile:yamlapiVersion: operator.openshift.io/v1 kind: IngressController metadata: name: default namespace: openshift-ingress-operator spec: replicas: <num-of-router-pods> endpointPublishingStrategy: type: HostNetwork nodePlacement: nodeSelector: matchLabels: node-role.kubernetes.io/worker: ""NoteReplace
<num-of-router-pods>with an appropriate value. If working with just one compute node, setreplicas:to1. If working with more than 3 compute nodes, you can increasereplicas:from the default value2as appropriate. - Save and copy the
router-replicas.yamlfile to theclusterconfigs/openshiftdirectory:terminal$ cp ~/router-replicas.yaml clusterconfigs/openshift/99_router-replicas.yaml
Configuring the BIOS
You can configures the BIOS during the installation process.
Procedure
- Create the manifests.
- Modify the
BareMetalHostresource file corresponding to the node:terminal$ vim clusterconfigs/openshift/99_openshift-cluster-api_hosts-*.yaml - Add the BIOS configuration to the
specsection of theBareMetalHostresource:yamlspec: firmware: simultaneousMultithreadingEnabled: true sriovEnabled: true virtualizationEnabled: trueNoteRed Hat supports three BIOS configurations. Only servers with BMC type
irmcare supported. Other types of servers are currently not supported. - Create the cluster.
Configuring the RAID
You can configure a redundant array of independent disks (RAID) using baseboard management controllers (BMCs) during the installation process.
If you want to configure a hardware RAID for the node, verify that the node has a supported RAID controller. OpenShift Container Platform 4.22 does not support software RAID.
Hardware RAID support by vendor
| Vendor | BMC and protocol | Firmware version | RAID levels |
|---|---|---|---|
| Fujitsu | iRMC | N/A | 0, 1, 5, 6, and 10 |
| Dell | iDRAC with Redfish | Version 6.10.30.20 or later | 0, 1, and 5 |
Procedure
- Create the manifests.
- Modify the
BareMetalHostresource corresponding to the node:terminal$ vim clusterconfigs/openshift/99_openshift-cluster-api_hosts-*.yamlNoteThe following example uses a hardware RAID configuration because OpenShift Container Platform 4.22 does not support software RAID.
- If you added a specific RAID configuration to the
specsection, this causes the node to delete the original RAID configuration in thepreparingphase and perform a specified configuration on the RAID. For example:yamlspec: raid: hardwareRAIDVolumes: - level: "0" name: "sda" numberOfPhysicalDisks: 1 rotational: true sizeGibibytes: 0The
levelparameter is a required field, and the others are optional fields. - If you added an empty RAID configuration to the
specsection, the empty configuration causes the node to delete the original RAID configuration during thepreparingphase, but does not perform a new configuration. For example:yamlspec: raid: hardwareRAIDVolumes: [] - If you do not add a
raidfield in thespecsection, the original RAID configuration is not deleted, and no new configuration will be performed.
- If you added a specific RAID configuration to the
- Create the cluster.
Configuring storage on nodes
You can make changes to operating systems on OpenShift Container Platform nodes by creating MachineConfig objects that are managed by the Machine Config Operator (MCO).
The MachineConfig specification includes an ignition config for configuring the machines at first boot. This config object can be used to modify files, systemd services, and other operating system features running on OpenShift Container Platform machines.
Use the ignition config to configure storage on nodes. The following MachineSet manifest example demonstrates about adding a partition to a device on a primary node. In this example, apply the manifest before installation to have a partition named recovery with a size of 16 GiB on the primary node.
Procedure
- Create a
custom-partitions.yamlfile and include aMachineConfigobject that contains your partition layout:terminalapiVersion: machineconfiguration.openshift.io/v1 kind: MachineConfig metadata: labels: machineconfiguration.openshift.io/role: primary name: 10_primary_storage_config spec: config: ignition: version: 3.2.0 storage: disks: - device: </dev/xxyN> partitions: - label: recovery startMiB: 32768 sizeMiB: 16384 filesystems: - device: /dev/disk/by-partlabel/recovery label: recovery format: xfs - Save and copy the
custom-partitions.yamlfile to theclusterconfigs/openshiftdirectory:terminal$ cp ~/<MachineConfig_manifest> ~/clusterconfigs/openshift
Creating a disconnected registry
In some cases, you might want to install an OpenShift Container Platform cluster using a local copy of the installation registry. This could be for enhancing network efficiency because the cluster nodes are on a network that does not have access to the internet.
A local, or mirrored, copy of the registry requires the following:
- A certificate for the registry node. This can be a self-signed certificate.
- A web server that a container on a system will serve.
- An updated pull secret that contains the certificate and local repository information.
- Creating a disconnected registry on a registry node is optional. If you need to create a disconnected registry on a registry node, you must complete all of the following sub-sections.
- If you have already prepared a mirror registry for a disconnected installation by mirroring images, you can skip directly to "Modify the install-config.yaml file to use the disconnected registry" section. For more information about preparing a mirror registry for a disconnected installation by mirroring images see, "Mirroring images for a disconnected installation".
Preparing the registry node to host the mirrored registry
Prepare a registry node to host your local mirror registry for a OpenShift Container Platform installation.
Complete the following steps before hosting a mirrored registry on bare metal.
Procedure
- Open the firewall port on the registry node:terminal
$ sudo firewall-cmd --add-port=5000/tcp --zone=libvirt --permanentterminal$ sudo firewall-cmd --add-port=5000/tcp --zone=public --permanentterminal$ sudo firewall-cmd --reload - Install the required packages for the registry node:terminal
$ sudo yum -y install python3 podman httpd httpd-tools jq - Create the directory structure where the repository information will be held:terminal
$ sudo mkdir -p /opt/registry/{auth,certs,data}
Mirroring the OpenShift Container Platform image repository for a disconnected registry
Mirror the OpenShift Container Platform image repository to a local registry to provide your disconnected environment with the container images.
Complete the following steps to mirror the OpenShift Container Platform image repository for a disconnected registry.
The oc adm release mirror command is deprecated as of OpenShift Container Platform 4.22 and will be removed in a future release.
As an alternative, use the oc-mirror plugin v2.
Prerequisites
- Your mirror host has access to the internet.
- You configured a mirror registry to use in your restricted network and can access the certificate and credentials that you configured.
- You downloaded the pull secret from Red Hat OpenShift Cluster Manager and modified it to include authentication to your mirror repository.
Procedure
- Review the Download OpenShift Container Platform page to determine the version of OpenShift Container Platform that you want to install and determine the corresponding tag on the Repository Tags page.
- Set the required environment variables:
- Export the release version:terminal
$ OCP_RELEASE=<release_version>For
<release_version>, specify the tag that corresponds to the version of OpenShift Container Platform to install, such as4.5.4. - Export the local registry name and host port:terminal
$ LOCAL_REGISTRY='<local_registry_host_name>:<local_registry_host_port>'For
<local_registry_host_name>, specify the registry domain name for your mirror repository, and for<local_registry_host_port>, specify the port that it serves content on. - Export the local repository name:terminal
$ LOCAL_REPOSITORY='<local_repository_name>'For
<local_repository_name>, specify the name of the repository to create in your registry, such asocp4/openshift4. - Export the name of the repository to mirror:terminal
$ PRODUCT_REPO='openshift-release-dev'For a production release, you must specify
openshift-release-dev. - Export the path to your registry pull secret:terminal
$ LOCAL_SECRET_JSON='<path_to_pull_secret>'For
<path_to_pull_secret>, specify the absolute path to and file name of the pull secret for your mirror registry that you created. - Export the release mirror:terminal
$ RELEASE_NAME="ocp-release"For a production release, you must specify
ocp-release. - Export the type of architecture for your cluster:terminal
$ ARCHITECTURE=<cluster_architecture> (1)For
<cluster_architecture>, specify the architecture of the cluster, such asx86_64,aarch64,s390x, orppc64le. - Export the path to the directory to host the mirrored images:terminal
$ REMOVABLE_MEDIA_PATH=<path> (1)For
<path>, specify the full path, including the initial forward slash (/) character.
- Export the release version:
- Mirror the version images to the mirror registry:
- If your mirror host does not have internet access, take the following actions:
- Connect the removable media to a system that is connected to the internet.
- Review the images and configuration manifests to mirror:terminal
$ oc adm release mirror -a ${LOCAL_SECRET_JSON} \ --from=quay.io/${PRODUCT_REPO}/${RELEASE_NAME}:${OCP_RELEASE}-${ARCHITECTURE} \ --to=${LOCAL_REGISTRY}/${LOCAL_REPOSITORY} \ --to-release-image=${LOCAL_REGISTRY}/${LOCAL_REPOSITORY}:${OCP_RELEASE}-${ARCHITECTURE} --dry-run - Record the entire
imageContentSourcessection from the output of the previous command. The information about your mirrors is unique to your mirrored repository, and you must add theimageContentSourcessection to theinstall-config.yamlfile during installation. - Mirror the images to a directory on the removable media:terminal
$ oc adm release mirror -a ${LOCAL_SECRET_JSON} --to-dir=${REMOVABLE_MEDIA_PATH}/mirror quay.io/${PRODUCT_REPO}/${RELEASE_NAME}:${OCP_RELEASE}-${ARCHITECTURE} - Take the media to the restricted network environment and upload the images to the local container registry.terminal
$ oc image mirror -a ${LOCAL_SECRET_JSON} --from-dir=${REMOVABLE_MEDIA_PATH}/mirror "file://openshift/release:${OCP_RELEASE}*" ${LOCAL_REGISTRY}/${LOCAL_REPOSITORY} (1)For
REMOVABLE_MEDIA_PATH, you must use the same path that you specified when you mirrored the images.
- If the local container registry is connected to the mirror host, take the following actions:
- Directly push the release images to the local registry by using following command:terminal
$ oc adm release mirror -a ${LOCAL_SECRET_JSON}  \
     --from=quay.io/${PRODUCT_REPO}/${RELEASE_NAME}:${OCP_RELEASE}-${ARCHITECTURE} \
     --to=${LOCAL_REGISTRY}/${LOCAL_REPOSITORY} \
     --to-release-image=${LOCAL_REGISTRY}/${LOCAL_REPOSITORY}:${OCP_RELEASE}-${ARCHITECTURE}
This command pulls the release information as a digest, and its output includes the
imageContentSourcesdata that you require when you install your cluster. - Record the entire
imageContentSourcessection from the output of the previous command. The information about your mirrors is unique to your mirrored repository, and you must add theimageContentSourcessection to theinstall-config.yamlfile during installation.NoteThe image name gets patched to Quay.io during the mirroring process, and the podman images will show Quay.io in the registry on the bootstrap virtual machine.
- Directly push the release images to the local registry by using following command:
- If your mirror host does not have internet access, take the following actions:
- To create the installation program that is based on the content that you mirrored, extract it and pin it to the release:
- If your mirror host does not have internet access, run the following command:terminal
$ oc adm release extract -a ${LOCAL_SECRET_JSON} --command=openshift-baremetal-install "${LOCAL_REGISTRY}/${LOCAL_REPOSITORY}:${OCP_RELEASE}" - If the local container registry is connected to the mirror host, run the following command:terminal
$ oc adm release extract -a ${LOCAL_SECRET_JSON} --command=openshift-baremetal-install "${LOCAL_REGISTRY}/${LOCAL_REPOSITORY}:${OCP_RELEASE}-${ARCHITECTURE}"ImportantTo ensure that you use the correct images for the version of OpenShift Container Platform that you selected, you must extract the installation program from the mirrored content.
You must perform this step on a machine with an active internet connection.
If you are in a disconnected environment, use the
--imageflag as part of must-gather and point to the payload image.
- If your mirror host does not have internet access, run the following command:
- For clusters using installer-provisioned infrastructure, run the following command:terminal
$ openshift-baremetal-install
Modify the install-config.yaml file to use the disconnected registry
On the provisioner node, the install-config.yaml file should use the newly created pull-secret from the pull-secret-update.txt file. The install-config.yaml file must also contain the disconnected registry node’s certificate and registry information.
Procedure
- Add the disconnected registry node’s certificate to the
install-config.yamlfile:terminal$ echo "additionalTrustBundle: |" >> install-config.yamlThe certificate should follow the
"additionalTrustBundle: |"line and be properly indented, usually by two spaces.terminal$ sed -e 's/^/ /' /opt/registry/certs/domain.crt >> install-config.yaml - Add the mirror information for the registry to the
install-config.yamlfile:terminal$ echo "imageContentSources:" >> install-config.yamlterminal$ echo "- mirrors:" >> install-config.yamlterminal$ echo " - registry.example.com:5000/ocp4/openshift4" >> install-config.yamlReplace
registry.example.comwith the registry’s fully qualified domain name.terminal$ echo " source: quay.io/openshift-release-dev/ocp-release" >> install-config.yamlterminal$ echo "- mirrors:" >> install-config.yamlterminal$ echo " - registry.example.com:5000/ocp4/openshift4" >> install-config.yamlReplace
registry.example.comwith the registry’s fully qualified domain name.terminal$ echo " source: quay.io/openshift-release-dev/ocp-v4.0-art-dev" >> install-config.yaml
Validation checklist for installation
Ensure that all required steps are completed before installing OpenShift Container Platform.
- [ ] OpenShift Container Platform installer has been retrieved.
- [ ] OpenShift Container Platform installer has been extracted.
- [ ] Required parameters for the
install-config.yamlhave been configured. - [ ] The
hostsparameter for theinstall-config.yamlhas been configured. - [ ] The
bmcparameter for theinstall-config.yamlhas been configured. - [ ] Conventions for the values configured in the
bmcaddressfield have been applied. - [ ] Created the OpenShift Container Platform manifests.
- [ ] (Optional) Deployed routers on compute nodes.
- [ ] (Optional) Created a disconnected registry.
- [ ] (Optional) Validate disconnected registry settings if in use.