Configuring PTP devices
The PTP Operator adds the NodePtpDevice.ptp.openshift.io custom resource definition (CRD) to OpenShift Container Platform.
When installed, the PTP Operator searches your cluster for Precision Time Protocol (PTP) capable network devices on each node. The Operator creates and updates a NodePtpDevice custom resource (CR) object for each node that provides a compatible PTP-capable network device.
Network interface controller (NIC) hardware with built-in PTP capabilities sometimes require a device-specific configuration. You can use hardware-specific NIC features for supported hardware with the PTP Operator by configuring a plugin in the PtpConfig custom resource (CR). The linuxptp-daemon service uses the named parameters in the plugin stanza to start linuxptp processes, ptp4l and phc2sys, based on the specific hardware configuration.
In OpenShift Container Platform 4.22, supported PtpConfig plugins include Intel E810 hardware configuration, Intel Granite Rapids-D plugin configurations (e830 and e825), and optional ntpfailover behavior.
Installing the PTP Operator using the CLI
As a cluster administrator, you can install the Operator by using the CLI.
Prerequisites
- A cluster installed on bare-metal hardware with nodes that have hardware that supports PTP.
- Install the OpenShift CLI (
oc). - Log in as a user with
cluster-adminprivileges.
Procedure
-
Create a namespace for the PTP Operator.
- Save the following YAML in the
ptp-namespace.yamlfile:apiVersion: v1kind: Namespacemetadata:name: openshift-ptpannotations:workload.openshift.io/allowed: managementlabels:name: openshift-ptpopenshift.io/cluster-monitoring: "true" - Create the
NamespaceCR:$ oc create -f ptp-namespace.yaml
- Save the following YAML in the
-
Create an Operator group for the PTP Operator.
- Save the following YAML in the
ptp-operatorgroup.yamlfile:apiVersion: operators.coreos.com/v1kind: OperatorGroupmetadata:name: ptp-operatorsnamespace: openshift-ptpspec:targetNamespaces:- openshift-ptp - Create the
OperatorGroupCR:$ oc create -f ptp-operatorgroup.yaml
- Save the following YAML in the
-
Subscribe to the PTP Operator.
- Save the following YAML in the
ptp-sub.yamlfile:apiVersion: operators.coreos.com/v1alpha1kind: Subscriptionmetadata:name: ptp-operator-subscriptionnamespace: openshift-ptpspec:channel: "stable"name: ptp-operatorsource: redhat-operatorssourceNamespace: openshift-marketplace - Create the
SubscriptionCR:$ oc create -f ptp-sub.yaml
- Save the following YAML in the
-
To verify that the Operator is installed, enter the following command:
$ oc get csv -n openshift-ptp -o custom-columns=Name:.metadata.name,Phase:.status.phaseExample outputName Phase4.22.0-202301261535 Succeeded
Installing the PTP Operator by using the web console
As a cluster administrator, you can install the PTP Operator by using the web console.
If you are installing by using the CLI, you must create the namespace and Operator group before installing the Operator. If you are installing by using the web console, the Operator Lifecycle Manager (OLM) automatically creates the namespace.
Procedure
- Install the PTP Operator using the OpenShift Container Platform web console:
- In the OpenShift Container Platform web console, click Ecosystem → Software Catalog.
- Type
ptpin the Filter by keyword box to find the PTP Operator. - Click the PTP Operator tile, and then click Install.
- On the Install Operator page, ensure that A specific namespace on the cluster is selected and the Operator recommended Namespace
openshift-ptpis shown. Click Install. - Wait for the installation to complete and then click View installed Operators.
- Optional: Verify that the PTP Operator installed successfully:
-
Navigate to Ecosystem → Installed Operators.
-
Ensure that PTP Operator is listed in the openshift-ptp project with a Status of Succeeded.
noteDuring installation an Operator might display a Failed status. If the installation later succeeds with an Succeeded message, you can ignore the Failed message.
If the Operator does not appear as installed, to troubleshoot further:
- Go to the Ecosystem → Installed Operators page and inspect the Operator Subscriptions and Install Plans tabs for any failure or errors under Status.
- Go to the Workloads → Pods page and check the logs for pods in the
openshift-ptpproject.
-
Discovering PTP-capable network devices in your cluster
Identify PTP-capable network devices that exist in your cluster so that you can configure them
Prerequisites
- You installed the PTP Operator.
Procedure
-
To return a complete list of PTP capable network devices in your cluster, run the following command:
$ oc get NodePtpDevice -n openshift-ptp -o yamlExample outputapiVersion: v1items:- apiVersion: ptp.openshift.io/v1kind: NodePtpDevicemetadata:creationTimestamp: "2022-01-27T15:16:28Z"generation: 1name: dev-worker-0namespace: openshift-ptpresourceVersion: "6538103"uid: d42fc9ad-bcbf-4590-b6d8-b676c642781aspec: {}status:devices:- name: eno1- name: eno2- name: eno3- name: eno4- name: enp5s0f0- name: enp5s0f1...where:
-worker-0- The value for the
nameparameter is the same as the name of the parent node. devices- The
devicescollection includes a list of the PTP capable devices that the PTP Operator discovers for the node.
Configuring linuxptp services as a grandmaster clock
You can configure the linuxptp services (ptp4l, phc2sys, ts2phc) as grandmaster clock (T-GM) by creating a PtpConfig custom resource (CR) that configures the host NIC.
The ts2phc utility allows you to synchronize the system clock with the PTP grandmaster clock so that the node can stream precision clock signal to downstream PTP ordinary clocks and boundary clocks.
Use the following example PtpConfig CR as the basis to configure linuxptp services as T-GM for an Intel Westport Channel E810-XXVDA4T network interface.
To configure PTP fast events, set appropriate values for ptp4lOpts, ptp4lConf, and ptpClockThreshold. ptpClockThreshold is used only when events are enabled. See "Configuring the PTP fast event notifications publisher" for more information.
Prerequisites
- For T-GM clocks in production environments, install an Intel E810 Westport Channel NIC in the bare-metal cluster host.
- Install the OpenShift CLI (
oc). - Log in as a user with
cluster-adminprivileges. - Install the PTP Operator.
Procedure
- Create the
PtpConfigCR. For example:-
Depending on your requirements, use one of the following T-GM configurations for your deployment. Save the YAML in the
grandmaster-clock-ptp-config.yamlfile:apiVersion: ptp.openshift.io/v1kind: PtpConfigmetadata:name: grandmasternamespace: openshift-ptpannotations: {}spec:profile:- name: "grandmaster"ptp4lOpts: "-2 --summary_interval -4"phc2sysOpts: -r -u 0 -m -N 8 -R 16 -s $iface_master -n 24ptpSchedulingPolicy: SCHED_FIFOptpSchedulingPriority: 10ptpSettings:logReduce: "true"plugins:e810:enableDefaultConfig: falsesettings:LocalMaxHoldoverOffSet: 1500LocalHoldoverTimeout: 14400MaxInSpecOffset: 1500pins: $e810_pins# "$iface_master":# "U.FL2": "0 2"# "U.FL1": "0 1"# "SMA2": "0 2"# "SMA1": "0 1"ublxCmds:- args: #ubxtool -P 29.20 -z CFG-HW-ANT_CFG_VOLTCTRL,1- "-P"- "29.20"- "-z"- "CFG-HW-ANT_CFG_VOLTCTRL,1"reportOutput: false- args: #ubxtool -P 29.20 -e GPS- "-P"- "29.20"- "-e"- "GPS"reportOutput: false- args: #ubxtool -P 29.20 -d Galileo- "-P"- "29.20"- "-d"- "Galileo"reportOutput: false- args: #ubxtool -P 29.20 -d GLONASS- "-P"- "29.20"- "-d"- "GLONASS"reportOutput: false- args: #ubxtool -P 29.20 -d BeiDou- "-P"- "29.20"- "-d"- "BeiDou"reportOutput: false- args: #ubxtool -P 29.20 -d SBAS- "-P"- "29.20"- "-d"- "SBAS"reportOutput: false- args: #ubxtool -P 29.20 -t -w 5 -v 1 -e SURVEYIN,600,50000- "-P"- "29.20"- "-t"- "-w"- "5"- "-v"- "1"- "-e"- "SURVEYIN,600,50000"reportOutput: true- args: #ubxtool -P 29.20 -p MON-HW- "-P"- "29.20"- "-p"- "MON-HW"reportOutput: true- args: #ubxtool -P 29.20 -p CFG-MSG,1,38,248- "-P"- "29.20"- "-p"- "CFG-MSG,1,38,248"reportOutput: truets2phcOpts: " "ts2phcConf: |[nmea]ts2phc.master 1[global]use_syslog 0verbose 1logging_level 7ts2phc.pulsewidth 100000000#cat /dev/GNSS to find available serial port#example value of gnss_serialport is /dev/ttyGNSS_1700_0ts2phc.nmea_serialport $gnss_serialport[$iface_master]ts2phc.extts_polarity risingts2phc.extts_correction 0ptp4lConf: |[$iface_master]masterOnly 1[$iface_master_1]masterOnly 1[$iface_master_2]masterOnly 1[$iface_master_3]masterOnly 1[global]## Default Data Set#twoStepFlag 1priority1 128priority2 128domainNumber 24#utc_offset 37clockClass 6clockAccuracy 0x27offsetScaledLogVariance 0xFFFFfree_running 0freq_est_interval 1dscp_event 0dscp_general 0dataset_comparison G.8275.xG.8275.defaultDS.localPriority 128## Port Data Set#logAnnounceInterval -3logSyncInterval -4logMinDelayReqInterval -4logMinPdelayReqInterval 0announceReceiptTimeout 3syncReceiptTimeout 0delayAsymmetry 0fault_reset_interval -4neighborPropDelayThresh 20000000masterOnly 0G.8275.portDS.localPriority 128## Run time options#assume_two_step 0logging_level 6path_trace_enabled 0follow_up_info 0hybrid_e2e 0inhibit_multicast_service 0net_sync_monitor 0tc_spanning_tree 0tx_timestamp_timeout 50unicast_listen 0unicast_master_table 0unicast_req_duration 3600use_syslog 1verbose 0summary_interval -4kernel_leap 1check_fup_sync 0clock_class_threshold 7## Servo Options#pi_proportional_const 0.0pi_integral_const 0.0pi_proportional_scale 0.0pi_proportional_exponent -0.3pi_proportional_norm_max 0.7pi_integral_scale 0.0pi_integral_exponent 0.4pi_integral_norm_max 0.3step_threshold 2.0first_step_threshold 0.00002clock_servo pisanity_freq_limit 200000000ntpshm_segment 0## Transport options#transportSpecific 0x0ptp_dst_mac 01:1B:19:00:00:00p2p_dst_mac 01:80:C2:00:00:0Eudp_ttl 1udp6_scope 0x0Euds_address /var/run/ptp4l## Default interface options#clock_type BCnetwork_transport L2delay_mechanism E2Etime_stamping hardwaretsproc_mode filterdelay_filter moving_mediandelay_filter_length 10egressLatency 0ingressLatency 0boundary_clock_jbod 0## Clock description#productDescription ;;revisionData ;;manufacturerIdentity 00:00:00userDescription ;timeSource 0x20recommend:- profile: "grandmaster"priority: 4match:- nodeLabel: "node-role.kubernetes.io/$mcp"noteFor E810 Westport Channel NICs, set the value for
ts2phc.nmea_serialportto/dev/gnss0. -
Create the CR by running the following command:
$ oc create -f grandmaster-clock-ptp-config.yaml
-
Verification
- Check that the
PtpConfigprofile is applied to the node.-
Get the list of pods in the
openshift-ptpnamespace by running the following command:$ oc get pods -n openshift-ptp -o wideExample outputNAME READY STATUS RESTARTS AGE IP NODElinuxptp-daemon-74m2g 3/3 Running 3 4d15h 10.16.230.7 compute-1.example.comptp-operator-5f4f48d7c-x7zkf 1/1 Running 1 4d15h 10.128.1.145 compute-1.example.com -
Check that the profile is correct. Examine the logs of the
linuxptpdaemon that corresponds to the node you specified in thePtpConfigprofile. Run the following command:$ oc logs linuxptp-daemon-74m2g -n openshift-ptp -c linuxptp-daemon-containerExample outputts2phc[94980.334]: [ts2phc.0.config] nmea delay: 98690975 nsts2phc[94980.334]: [ts2phc.0.config] ens3f0 extts index 0 at 1676577329.999999999 corr 0 src 1676577330.901342528 diff -1ts2phc[94980.334]: [ts2phc.0.config] ens3f0 master offset -1 s2 freq -1ts2phc[94980.441]: [ts2phc.0.config] nmea sentence: GNRMC,195453.00,A,4233.24427,N,07126.64420,W,0.008,,160223,,,A,Vphc2sys[94980.450]: [ptp4l.0.config] CLOCK_REALTIME phc offset 943 s2 freq -89604 delay 504phc2sys[94980.512]: [ptp4l.0.config] CLOCK_REALTIME phc offset 1000 s2 freq -89264 delay 474
-
Configuring linuxptp services as a grandmaster clock for 2 E810 NICs
You can configure the linuxptp services (ptp4l, phc2sys, ts2phc) as a grandmaster clock (T-GM) for 2 E810 NICs by creating a PtpConfig custom resource (CR) that configures the NICs.
You can configure the linuxptp services as a T-GM for the following E810 NICs:
- Intel E810-XXVDA4T Westport Channel NIC
- Intel E810-CQDA2T Logan Beach NIC
For distributed RAN (D-RAN) use cases, you can configure PTP for 2 NICs as follows:
- NIC 1 is synced to the global navigation satellite system (GNSS) time source.
- NIC 2 is synced to the 1PPS timing output provided by NIC one. This configuration is provided by the PTP hardware plugin in the
PtpConfigCR.
The 2-card PTP T-GM configuration uses one instance of ptp4l and one instance of ts2phc. The ptp4l and ts2phc programs are each configured to operate on two PTP hardware clocks (PHCs), one for each NIC. The host system clock is synchronized from the NIC that is connected to the GNSS time source.
Use the following example PtpConfig CR as the basis to configure linuxptp services as T-GM for dual Intel E810 network interfaces.
To configure PTP fast events, set appropriate values for ptp4lOpts, ptp4lConf, and ptpClockThreshold. ptpClockThreshold is used only when events are enabled. See "Configuring the PTP fast event notifications publisher" for more information.
Prerequisites
- For T-GM clocks in production environments, install two Intel E810 NICs in the bare-metal cluster host.
- Install the OpenShift CLI (
oc). - Log in as a user with
cluster-adminprivileges. - Install the PTP Operator.
Procedure
- Create the
PtpConfigCR. For example:-
Save the following YAML in the
grandmaster-clock-ptp-config-dual-nics.yamlfile:# In this example two cards $iface_nic1 and $iface_nic2 are connected via# SMA1 ports by a cable and $iface_nic2 receives 1PPS signals from $iface_nic1apiVersion: ptp.openshift.io/v1kind: PtpConfigmetadata:name: grandmasternamespace: openshift-ptpannotations: {}spec:profile:- name: "grandmaster"ptp4lOpts: "-2 --summary_interval -4"phc2sysOpts: -r -u 0 -m -N 8 -R 16 -s $iface_nic1 -n 24ptpSchedulingPolicy: SCHED_FIFOptpSchedulingPriority: 10ptpSettings:logReduce: "true"plugins:e810:enableDefaultConfig: falsesettings:LocalMaxHoldoverOffSet: 1500LocalHoldoverTimeout: 14400MaxInSpecOffset: 1500pins: $e810_pins# "$iface_nic1":# "U.FL2": "0 2"# "U.FL1": "0 1"# "SMA2": "0 2"# "SMA1": "2 1"# "$iface_nic2":# "U.FL2": "0 2"# "U.FL1": "0 1"# "SMA2": "0 2"# "SMA1": "1 1"ublxCmds:- args: #ubxtool -P 29.20 -z CFG-HW-ANT_CFG_VOLTCTRL,1- "-P"- "29.20"- "-z"- "CFG-HW-ANT_CFG_VOLTCTRL,1"reportOutput: false- args: #ubxtool -P 29.20 -e GPS- "-P"- "29.20"- "-e"- "GPS"reportOutput: false- args: #ubxtool -P 29.20 -d Galileo- "-P"- "29.20"- "-d"- "Galileo"reportOutput: false- args: #ubxtool -P 29.20 -d GLONASS- "-P"- "29.20"- "-d"- "GLONASS"reportOutput: false- args: #ubxtool -P 29.20 -d BeiDou- "-P"- "29.20"- "-d"- "BeiDou"reportOutput: false- args: #ubxtool -P 29.20 -d SBAS- "-P"- "29.20"- "-d"- "SBAS"reportOutput: false- args: #ubxtool -P 29.20 -t -w 5 -v 1 -e SURVEYIN,600,50000- "-P"- "29.20"- "-t"- "-w"- "5"- "-v"- "1"- "-e"- "SURVEYIN,600,50000"reportOutput: true- args: #ubxtool -P 29.20 -p MON-HW- "-P"- "29.20"- "-p"- "MON-HW"reportOutput: true- args: #ubxtool -P 29.20 -p CFG-MSG,1,38,248- "-P"- "29.20"- "-p"- "CFG-MSG,1,38,248"reportOutput: truets2phcOpts: " "ts2phcConf: |[nmea]ts2phc.master 1[global]use_syslog 0verbose 1logging_level 7ts2phc.pulsewidth 100000000#cat /dev/GNSS to find available serial port#example value of gnss_serialport is /dev/ttyGNSS_1700_0ts2phc.nmea_serialport $gnss_serialport[$iface_nic1]ts2phc.extts_polarity risingts2phc.extts_correction 0[$iface_nic2]ts2phc.master 0ts2phc.extts_polarity rising#this is a measured value in nanoseconds to compensate for SMA cable delayts2phc.extts_correction -10ptp4lConf: |[$iface_nic1]masterOnly 1[$iface_nic1_1]masterOnly 1[$iface_nic1_2]masterOnly 1[$iface_nic1_3]masterOnly 1[$iface_nic2]masterOnly 1[$iface_nic2_1]masterOnly 1[$iface_nic2_2]masterOnly 1[$iface_nic2_3]masterOnly 1[global]## Default Data Set#twoStepFlag 1priority1 128priority2 128domainNumber 24#utc_offset 37clockClass 6clockAccuracy 0x27offsetScaledLogVariance 0xFFFFfree_running 0freq_est_interval 1dscp_event 0dscp_general 0dataset_comparison G.8275.xG.8275.defaultDS.localPriority 128## Port Data Set#logAnnounceInterval -3logSyncInterval -4logMinDelayReqInterval -4logMinPdelayReqInterval 0announceReceiptTimeout 3syncReceiptTimeout 0delayAsymmetry 0fault_reset_interval -4neighborPropDelayThresh 20000000masterOnly 0G.8275.portDS.localPriority 128## Run time options#assume_two_step 0logging_level 6path_trace_enabled 0follow_up_info 0hybrid_e2e 0inhibit_multicast_service 0net_sync_monitor 0tc_spanning_tree 0tx_timestamp_timeout 50unicast_listen 0unicast_master_table 0unicast_req_duration 3600use_syslog 1verbose 0summary_interval -4kernel_leap 1check_fup_sync 0clock_class_threshold 7## Servo Options#pi_proportional_const 0.0pi_integral_const 0.0pi_proportional_scale 0.0pi_proportional_exponent -0.3pi_proportional_norm_max 0.7pi_integral_scale 0.0pi_integral_exponent 0.4pi_integral_norm_max 0.3step_threshold 2.0first_step_threshold 0.00002clock_servo pisanity_freq_limit 200000000ntpshm_segment 0## Transport options#transportSpecific 0x0ptp_dst_mac 01:1B:19:00:00:00p2p_dst_mac 01:80:C2:00:00:0Eudp_ttl 1udp6_scope 0x0Euds_address /var/run/ptp4l## Default interface options#clock_type BCnetwork_transport L2delay_mechanism E2Etime_stamping hardwaretsproc_mode filterdelay_filter moving_mediandelay_filter_length 10egressLatency 0ingressLatency 0boundary_clock_jbod 1## Clock description#productDescription ;;revisionData ;;manufacturerIdentity 00:00:00userDescription ;timeSource 0x20recommend:- profile: "grandmaster"priority: 4match:- nodeLabel: "node-role.kubernetes.io/$mcp"noteSet the value for
ts2phc.nmea_serialportto/dev/gnss0. -
Create the CR by running the following command:
$ oc create -f grandmaster-clock-ptp-config-dual-nics.yaml
-
Verification
- Check that the
PtpConfigprofile is applied to the node.-
Get the list of pods in the
openshift-ptpnamespace by running the following command:$ oc get pods -n openshift-ptp -o wideExample outputNAME READY STATUS RESTARTS AGE IP NODElinuxptp-daemon-74m2g 3/3 Running 3 4d15h 10.16.230.7 compute-1.example.comptp-operator-5f4f48d7c-x7zkf 1/1 Running 1 4d15h 10.128.1.145 compute-1.example.com -
Check that the profile is correct. Examine the logs of the
linuxptpdaemon that corresponds to the node you specified in thePtpConfigprofile. Run the following command:$ oc logs linuxptp-daemon-74m2g -n openshift-ptp -c linuxptp-daemon-containerExample outputts2phc[509863.660]: [ts2phc.0.config] nmea delay: 347527248 nsts2phc[509863.660]: [ts2phc.0.config] ens2f0 extts index 0 at 1705516553.000000000 corr 0 src 1705516553.652499081 diff 0ts2phc[509863.660]: [ts2phc.0.config] ens2f0 master offset 0 s2 freq -0I0117 18:35:16.000146 1633226 stats.go:57] state updated for ts2phc =s2I0117 18:35:16.000163 1633226 event.go:417] dpll State s2, gnss State s2, tsphc state s2, gm state s2,ts2phc[1705516516]:[ts2phc.0.config] ens2f0 nmea_status 1 offset 0 s2GM[1705516516]:[ts2phc.0.config] ens2f0 T-GM-STATUS s2ts2phc[509863.677]: [ts2phc.0.config] ens7f0 extts index 0 at 1705516553.000000010 corr -10 src 1705516553.652499081 diff 0ts2phc[509863.677]: [ts2phc.0.config] ens7f0 master offset 0 s2 freq -0I0117 18:35:16.016597 1633226 stats.go:57] state updated for ts2phc =s2phc2sys[509863.719]: [ptp4l.0.config] CLOCK_REALTIME phc offset -6 s2 freq +15441 delay 510phc2sys[509863.782]: [ptp4l.0.config] CLOCK_REALTIME phc offset -7 s2 freq +15438 delay 502
-
Configuring linuxptp services as a grandmaster clock for 3 E810 NICs
You can configure the linuxptp services (ptp4l, phc2sys, ts2phc) as a grandmaster clock (T-GM) for 3 E810 NICs by creating a PtpConfig custom resource (CR) that configures the NICs.
You can configure the linuxptp services as a T-GM with 3 NICs for the following E810 NICs:
- Intel E810-XXVDA4T Westport Channel NIC
- Intel E810-CQDA2T Logan Beach NIC
For distributed RAN (D-RAN) use cases, you can configure PTP for 3 NICs as follows:
- NIC 1 is synced to the Global Navigation Satellite System (GNSS)
- NICs 2 and 3 are synced to NIC 1 with 1PPS faceplate connections
Use the following example PtpConfig CRs as the basis to configure linuxptp services as a 3-card Intel E810 T-GM.
Prerequisites
- For T-GM clocks in production environments, install 3 Intel E810 NICs in the bare-metal cluster host.
- Install the OpenShift CLI (
oc). - Log in as a user with
cluster-adminprivileges. - Install the PTP Operator.
Procedure
- Create the
PtpConfigCR. For example:-
Save the following YAML in the
three-nic-grandmaster-clock-ptp-config.yamlfile:# In this example, the three cards are connected via SMA cables:# - $iface_timeTx1 has the GNSS signal input# - $iface_timeTx2 SMA1 is connected to $iface_timeTx1 SMA1# - $iface_timeTx3 SMA1 is connected to $iface_timeTx1 SMA2apiVersion: ptp.openshift.io/v1kind: PtpConfigmetadata:name: gm-3cardnamespace: openshift-ptpannotations:ran.openshift.io/ztp-deploy-wave: "10"spec:profile:- name: grandmasterptp4lOpts: -2 --summary_interval -4phc2sysOpts: -r -u 0 -m -N 8 -R 16 -s $iface_timeTx1 -n 24ptpSchedulingPolicy: SCHED_FIFOptpSchedulingPriority: 10ptpSettings:logReduce: "true"plugins:e810:enableDefaultConfig: falsesettings:LocalHoldoverTimeout: 14400LocalMaxHoldoverOffSet: 1500MaxInSpecOffset: 1500pins:# Syntax guide:# - The 1st number in each pair must be one of:# 0 - Disabled# 1 - RX# 2 - TX# - The 2nd number in each pair must match the channel number$iface_timeTx1:SMA1: 2 1SMA2: 2 2U.FL1: 0 1U.FL2: 0 2$iface_timeTx2:SMA1: 1 1SMA2: 0 2U.FL1: 0 1U.FL2: 0 2$iface_timeTx3:SMA1: 1 1SMA2: 0 2U.FL1: 0 1U.FL2: 0 2ublxCmds:- args: #ubxtool -P 29.20 -z CFG-HW-ANT_CFG_VOLTCTRL,1- "-P"- "29.20"- "-z"- "CFG-HW-ANT_CFG_VOLTCTRL,1"reportOutput: false- args: #ubxtool -P 29.20 -e GPS- "-P"- "29.20"- "-e"- "GPS"reportOutput: false- args: #ubxtool -P 29.20 -d Galileo- "-P"- "29.20"- "-d"- "Galileo"reportOutput: false- args: #ubxtool -P 29.20 -d GLONASS- "-P"- "29.20"- "-d"- "GLONASS"reportOutput: false- args: #ubxtool -P 29.20 -d BeiDou- "-P"- "29.20"- "-d"- "BeiDou"reportOutput: false- args: #ubxtool -P 29.20 -d SBAS- "-P"- "29.20"- "-d"- "SBAS"reportOutput: false- args: #ubxtool -P 29.20 -t -w 5 -v 1 -e SURVEYIN,600,50000- "-P"- "29.20"- "-t"- "-w"- "5"- "-v"- "1"- "-e"- "SURVEYIN,600,50000"reportOutput: true- args: #ubxtool -P 29.20 -p MON-HW- "-P"- "29.20"- "-p"- "MON-HW"reportOutput: true- args: #ubxtool -P 29.20 -p CFG-MSG,1,38,248- "-P"- "29.20"- "-p"- "CFG-MSG,1,38,248"reportOutput: truets2phcOpts: " "ts2phcConf: |[nmea]ts2phc.master 1[global]use_syslog 0verbose 1logging_level 7ts2phc.pulsewidth 100000000#example value of nmea_serialport is /dev/gnss0ts2phc.nmea_serialport (?<gnss_serialport>[/\w\s/]+)leapfile /usr/share/zoneinfo/leap-seconds.list[$iface_timeTx1]ts2phc.extts_polarity risingts2phc.extts_correction 0[$iface_timeTx2]ts2phc.master 0ts2phc.extts_polarity rising#this is a measured value in nanoseconds to compensate for SMA cable delayts2phc.extts_correction -10[$iface_timeTx3]ts2phc.master 0ts2phc.extts_polarity rising#this is a measured value in nanoseconds to compensate for SMA cable delayts2phc.extts_correction -10ptp4lConf: |[$iface_timeTx1]masterOnly 1[$iface_timeTx1_1]masterOnly 1[$iface_timeTx1_2]masterOnly 1[$iface_timeTx1_3]masterOnly 1[$iface_timeTx2]masterOnly 1[$iface_timeTx2_1]masterOnly 1[$iface_timeTx2_2]masterOnly 1[$iface_timeTx2_3]masterOnly 1[$iface_timeTx3]masterOnly 1[$iface_timeTx3_1]masterOnly 1[$iface_timeTx3_2]masterOnly 1[$iface_timeTx3_3]masterOnly 1[global]## Default Data Set#twoStepFlag 1priority1 128priority2 128domainNumber 24#utc_offset 37clockClass 6clockAccuracy 0x27offsetScaledLogVariance 0xFFFFfree_running 0freq_est_interval 1dscp_event 0dscp_general 0dataset_comparison G.8275.xG.8275.defaultDS.localPriority 128## Port Data Set#logAnnounceInterval -3logSyncInterval -4logMinDelayReqInterval -4logMinPdelayReqInterval 0announceReceiptTimeout 3syncReceiptTimeout 0delayAsymmetry 0fault_reset_interval -4neighborPropDelayThresh 20000000masterOnly 0G.8275.portDS.localPriority 128## Run time options#assume_two_step 0logging_level 6path_trace_enabled 0follow_up_info 0hybrid_e2e 0inhibit_multicast_service 0net_sync_monitor 0tc_spanning_tree 0tx_timestamp_timeout 50unicast_listen 0unicast_master_table 0unicast_req_duration 3600use_syslog 1verbose 0summary_interval -4kernel_leap 1check_fup_sync 0clock_class_threshold 7## Servo Options#pi_proportional_const 0.0pi_integral_const 0.0pi_proportional_scale 0.0pi_proportional_exponent -0.3pi_proportional_norm_max 0.7pi_integral_scale 0.0pi_integral_exponent 0.4pi_integral_norm_max 0.3step_threshold 2.0first_step_threshold 0.00002clock_servo pisanity_freq_limit 200000000ntpshm_segment 0## Transport options#transportSpecific 0x0ptp_dst_mac 01:1B:19:00:00:00p2p_dst_mac 01:80:C2:00:00:0Eudp_ttl 1udp6_scope 0x0Euds_address /var/run/ptp4l## Default interface options#clock_type BCnetwork_transport L2delay_mechanism E2Etime_stamping hardwaretsproc_mode filterdelay_filter moving_mediandelay_filter_length 10egressLatency 0ingressLatency 0boundary_clock_jbod 1## Clock description#productDescription ;;revisionData ;;manufacturerIdentity 00:00:00userDescription ;timeSource 0x20ptpClockThreshold:holdOverTimeout: 5maxOffsetThreshold: 1500minOffsetThreshold: -1500recommend:- profile: grandmasterpriority: 4match:- nodeLabel: node-role.kubernetes.io/$mcpnoteSet the value for
ts2phc.nmea_serialportto/dev/gnss0. -
Create the CR by running the following command:
$ oc create -f three-nic-grandmaster-clock-ptp-config.yaml
-
Verification
- Check that the
PtpConfigprofile is applied to the node.-
Get the list of pods in the
openshift-ptpnamespace by running the following command:$ oc get pods -n openshift-ptp -o wideExample outputNAME READY STATUS RESTARTS AGE IP NODElinuxptp-daemon-74m3q 3/3 Running 3 4d15h 10.16.230.7 compute-1.example.comptp-operator-5f4f48d7c-x6zkn 1/1 Running 1 4d15h 10.128.1.145 compute-1.example.com -
Check that the profile is correct. Run the following command, and examine the logs of the
linuxptpdaemon that corresponds to the node you specified in thePtpConfigprofile:$ oc logs linuxptp-daemon-74m3q -n openshift-ptp -c linuxptp-daemon-containerExample outputts2phc[2527.586]: [ts2phc.0.config:7] adding tstamp 1742826342.000000000 to clock /dev/ptp11ts2phc[2527.586]: [ts2phc.0.config:7] adding tstamp 1742826342.000000000 to clock /dev/ptp7ts2phc[2527.586]: [ts2phc.0.config:7] adding tstamp 1742826342.000000000 to clock /dev/ptp14ts2phc[2527.586]: [ts2phc.0.config:7] nmea delay: 56308811 nsts2phc[2527.586]: [ts2phc.0.config:6] /dev/ptp14 offset 0 s2 freq +0ts2phc[2527.587]: [ts2phc.0.config:6] /dev/ptp7 offset 0 s2 freq +0ts2phc[2527.587]: [ts2phc.0.config:6] /dev/ptp11 offset 0 s2 freq -0I0324 14:25:05.000439 106907 stats.go:61] state updated for ts2phc =s2I0324 14:25:05.000504 106907 event.go:419] dpll State s2, gnss State s2, tsphc state s2, gm state s2,I0324 14:25:05.000906 106907 stats.go:61] state updated for ts2phc =s2I0324 14:25:05.001059 106907 stats.go:61] state updated for ts2phc =s2ts2phc[1742826305]:[ts2phc.0.config] ens4f0 nmea_status 1 offset 0 s2GM[1742826305]:[ts2phc.0.config] ens4f0 T-GM-STATUS s2where:
adding tstamp <timestamp> to clock /dev/ptp<N>- Indicates
ts2phcis actively synchronizing the PTP hardware clock (PHC) by applying a specific timestamp. /dev/ptp<N> offset 0 s2 freq +0- Displays the estimated offset between the PTP device and the reference; an offset of 0 and state
s2signifies full synchronization. T-GM-STATUS s2- Confirms the Telecom Grandmaster (T-GM) is in a locked state (
s2), providing a stable time reference for the network.
-
Telecom Grandmaster clocks on Intel Granite Rapids-D hardware
Intel Granite Rapids-D (GNR-D) server platforms support Telecom Grandmaster (T-GM) clock deployments that use onboard Network Acceleration Complex (NAC) ports and optional Carter Flat expansion network interface cards (NICs) to share timing across a single GNSS feed. Before you configure a T-GM profile on GNR-D hardware, verify that your qualified hardware layout, cabling, port counts, and interface naming align with your deployment requirements. The associated procedure provides an example PtpConfig CR, linuxptp plugin expectations, and verification steps for Granite Rapids-D nodes.
In addition to Telecom Grandmaster configurations, Intel Granite Rapids-D (GNR-D) hardware supports a Precision Time Protocol (PTP) boundary clock profile without holdover. For more information about boundary clock configuration on GNR-D hardware, see the Additional resources section.
Telecom Grandmaster clocks on Intel Granite Rapids-D hardware is a Technology Preview feature only. Technology Preview features are not supported with Red Hat production service level agreements (SLAs) and might not be functionally complete. Red Hat does not recommend using them in production. These features provide early access to upcoming product features, enabling customers to test functionality and provide feedback during the development process.
For more information about the support scope of Red Hat Technology Preview features, see Technology Preview Features Support Scope.
Follower digital phase-locked loop (DPLL) behavior on GNR-D add-on network interface cards (NICs) such as Carter Flat cards is only partially visible through the Intel NIC driver: you can read high-level follower DPLL lock state (locked or not locked). Intel does not plan to add interfaces that expose further follower DPLL lock accuracy in software or firmware.
The PTP Operator can surface follower DPLL lock state when the Intel NIC driver exposes it, but it cannot report additional follower DPLL accuracy metrics or diagnose follower DPLL problems on add-on NICs beyond that driver data. Resolution of complex follower DPLL problems might require on-site hardware access and coordination with Intel rather than diagnosis inside OpenShift Container Platform.
- Physical architecture and timing paths
- GNSS receivers attach to the shared timing module on supported GNR-D systems so one antenna feed can discipline multiple time transmitters across NAC and Carter Flat ports. Compared with earlier Intel E810 Westport Channel layouts that relied on faceplate jumpers between cards, GNR-D routes synchronization between cards by using proprietary PCIe wiring instead of external jumper cables, which supports up to 24 time transmitter ports in the same server footprint when you combine onboard ports with two expansion cards.
On current Intel Granite Rapids-D platforms, a server can ship with zero, one, or two Carter Flat expansion cards. The example PtpConfig CR in the associated procedure reflects two cards.
- Interface naming and the GNR-D MachineConfig
-
Onboard NAC ports and Carter Flat ports can appear in the same kernel namespace, which makes Precision Time Protocol (PTP) metrics ambiguous unless interfaces are renamed with distinct prefixes. A common layout applies the MachineConfig manifest
10-rename-gnrd-interfaces-master.yamlso each card presents a unique interface prefix before you apply a Telecom GrandmasterPtpConfigCR.
Additional resources
- Boundary clocks without holdover on Intel Granite Rapids-D hardware
- Configuring linuxptp services as a boundary clock without holdover on Intel Granite Rapids-D hardware
- Configuring GNR-D T-BC holdover on a GNR-D platform
Configuring linuxptp services as a Telecom Grandmaster clock on Intel Granite Rapids-D hardware
Use this procedure to configure the linuxptp services (ptp4l, phc2sys, ts2phc) as a Telecom Grandmaster (T-GM) on Intel Granite Rapids-D (GNR-D) hardware that uses onboard Network Acceleration Complex (NAC) ports and optional Carter Flat expansion network interface cards (NICs). In this deployment, GNSS input disciplines the platform clock and the example PtpConfig CR uses the e830 and e825 plugins for onboard NAC and optional Carter Flat ports.
Telecom Grandmaster clock configuration on Intel Granite Rapids-D (GNR-D) hardware is a Technology Preview feature only. Technology Preview features are not supported with Red Hat production service level agreements (SLAs) and might not be functionally complete. Red Hat does not recommend using them in production. These features provide early access to upcoming product features, enabling customers to test functionality and provide feedback during the development process.
For more information about the support scope of Red Hat Technology Preview features, see Technology Preview Features Support Scope.
Prerequisites
- You have verified your qualified GNR-D hardware layout, including NAC ports, Carter Flat ports, and interface naming.
- The OpenShift CLI (
oc) is installed. - You are logged in as a user with
cluster-adminprivileges. - The PTP Operator is installed.
- You have verified that interface names, GNSS serial paths, and plugin device entries are aligned with your qualified hardware layout.
Procedure
-
Create a
PtpConfigcustom resource (CR) that matches your qualified GNR-D Telecom Grandmaster hardware layout:# Example Telecom Grandmaster PtpConfig for Intel Granite Rapids-D (GNR-D).## Note: This example configuration should be customized to match the desired# configuration For this GNR-D T-GM configuration, we support GNSS incoming to# the onboard connection, and up to 24 Time Transmitter ports including any NAC# ports and any additional Carter Flats ports.apiVersion: ptp.openshift.io/v1kind: PtpConfigmetadata:name: gnrd-tgmnamespace: openshift-ptpannotations:ran.openshift.io/ztp-deploy-wave: "10"spec:profile:- name: "grandmaster"ptp4lOpts: "-2 --summary_interval -4"phc2sysOpts: -r -u 0 -m -w -N 8 -R 16 -n 24 -s eno8703ptpSchedulingPolicy: SCHED_FIFOptpSchedulingPriority: 10ptpSettings:logReduce: "true"plugins:e830:devices:- enp108s0f0- enp110s0f0e825:devices:- eno8703settings:LocalMaxHoldoverOffSet: 1500LocalHoldoverTimeout: 14400MaxInSpecOffset: 100ublxCmds:- args: #ubxtool -P 29.25 -z CFG-HW-ANT_CFG_VOLTCTRL,1- "-P"- "29.25"- "-z"- "CFG-HW-ANT_CFG_VOLTCTRL,1"reportOutput: false- args: #ubxtool -P 29.25 -e GPS- "-P"- "29.25"- "-e"- "GPS"reportOutput: false- args: #ubxtool -P 29.25 -d Galileo- "-P"- "29.25"- "-d"- "Galileo"reportOutput: false- args: #ubxtool -P 29.25 -d GLONASS- "-P"- "29.25"- "-d"- "GLONASS"reportOutput: false- args: #ubxtool -P 29.25 -d BeiDou- "-P"- "29.25"- "-d"- "BeiDou"reportOutput: false- args: #ubxtool -P 29.25 -d SBAS- "-P"- "29.25"- "-d"- "SBAS"reportOutput: false- args: #ubxtool -P 29.25 -t -w 5 -v 1 -e SURVEYIN,600,50000- "-P"- "29.25"- "-t"- "-w"- "5"- "-v"- "1"- "-e"- "SURVEYIN,600,50000"reportOutput: true- args: #ubxtool -P 29.25 -p MON-HW- "-P"- "29.25"- "-p"- "MON-HW"reportOutput: true- args: #ubxtool -P 29.25 -p CFG-MSG,1,38,300- "-P"- "29.25"- "-p"- "CFG-MSG,1,38,248"reportOutput: truets2phcOpts: "-m"ts2phcConf: |[nmea]ts2phc.master 1[global]use_syslog 0verbose 1logging_level 7ts2phc.pulsewidth 100000000ts2phc.nmea_serialport /dev/ttyACM0[eno8703]ts2phc.extts_polarity risingts2phc.extts_correction 0ts2phc.master 0ts2phc.channel 0ts2phc.pin_index 1# This should be one section per Carter Flats (e830) card:[enp108s0f0]ts2phc.extts_polarity risingts2phc.extts_correction 0ts2phc.master 0ts2phc.channel 0ts2phc.pin_index 1[enp110s0f0]ts2phc.extts_polarity risingts2phc.extts_correction 0ts2phc.master 0ts2phc.channel 0ts2phc.pin_index 1ptp4lConf: |# All TimeTransmitter ports should be outlined here with 'masterOnly 1'#[eno8303]# ** Host management interface[eno8403]masterOnly 1[eno8503]masterOnly 1[eno8603]masterOnly 1[eno8703]masterOnly 1[eno8803]masterOnly 1[eno8903]masterOnly 1[eno9003]masterOnly 1[enp108s0f0]masterOnly 1[enp108s0f1]masterOnly 1[enp108s0f2]masterOnly 1[enp108s0f3]masterOnly 1[enp108s0f4]masterOnly 1[enp108s0f5]masterOnly 1[enp108s0f6]masterOnly 1[enp108s0f7]masterOnly 1[enp110s0f0]masterOnly 1[enp110s0f1]masterOnly 1[enp110s0f2]masterOnly 1[enp110s0f3]masterOnly 1[enp110s0f4]masterOnly 1[enp110s0f5]masterOnly 1[enp110s0f6]masterOnly 1[enp110s0f7]masterOnly 1[global]## Default Data Set#twoStepFlag 1priority1 128priority2 128domainNumber 24#utc_offset 37clockClass 6clockAccuracy 0x27offsetScaledLogVariance 0xFFFFfree_running 0freq_est_interval 1dscp_event 0dscp_general 0dataset_comparison G.8275.xG.8275.defaultDS.localPriority 128## Port Data Set#logAnnounceInterval -3logSyncInterval -4logMinDelayReqInterval -4logMinPdelayReqInterval 0announceReceiptTimeout 3syncReceiptTimeout 0delayAsymmetry 0fault_reset_interval 4neighborPropDelayThresh 20000000masterOnly 0G.8275.portDS.localPriority 128## Run time options#assume_two_step 0logging_level 6path_trace_enabled 0follow_up_info 0hybrid_e2e 0inhibit_multicast_service 0net_sync_monitor 0tc_spanning_tree 0tx_timestamp_timeout 50unicast_listen 0unicast_master_table 0unicast_req_duration 3600use_syslog 1verbose 0summary_interval -4kernel_leap 1check_fup_sync 0## Servo Options#pi_proportional_const 0.0pi_integral_const 0.0pi_proportional_scale 0.0pi_proportional_exponent -0.3pi_proportional_norm_max 0.7pi_integral_scale 0.0pi_integral_exponent 0.4pi_integral_norm_max 0.3step_threshold 0.0first_step_threshold 0.00002clock_servo pisanity_freq_limit 200000000ntpshm_segment 0## Transport options#transportSpecific 0x0ptp_dst_mac 01:1B:19:00:00:00p2p_dst_mac 01:80:C2:00:00:0Eudp_ttl 1udp6_scope 0x0Euds_address /var/run/ptp4l## Default interface options#clock_type BCnetwork_transport L2delay_mechanism E2Etime_stamping hardwaretsproc_mode filterdelay_filter moving_mediandelay_filter_length 10egressLatency 0ingressLatency 0boundary_clock_jbod 1## Clock description#productDescription ;;revisionData ;;manufacturerIdentity 00:00:00userDescription ;timeSource 0x20recommend:- match:- nodeLabel: node-role.kubernetes.io/$mcppriority: 4profile: grandmasterwhere:
eno8703-- Specifies the example leading NAC interface name used inphc2sysOpts,plugins.e825.devices, and the primaryts2phcConfstanza. Replace this value with the NAC interface name from your qualified GNR-D hardware layout.enp108s0f0andenp110s0f0-- Specify the example Carter Flat (E830) interface names listed inplugins.e830.devicesand used as Carter Flatts2phcConfstanzas. Replace these values with your Carter Flat interface names. Add or remove stanzas andpluginsentries if you install fewer than two expansion cards.enp108s0f1throughenp108s0f7andenp110s0f1throughenp110s0f7-- Specify additional example time transmitter interfaces on the two Carter Flat cards asmasterOnly 1ports inptp4lConf. Align or remove these stanzas to match your port count and naming.eno8403,eno8503,eno8603,eno8703,eno8803,eno8903, andeno9003-- Specify example onboard NAC time transmitter interfaces asmasterOnly 1ports inptp4lConf. Replace these values with your NAC port names. Remove stanzas you do not use.
-
Customize interface names, the
pluginsdevice list,ts2phcConf,ptp4lConf, and therecommendstanza in the preceding example to match your qualified hardware layout. -
Add or remove Carter Flat interface blocks in
ts2phcConfandptp4lConfto match the number of expansion cards on your server. -
In the
recommendstanza, replace the$mcpplaceholder with the machine config pool label for the nodes that run this PTP profile, for example,worker. -
Save the customized
PtpConfigCR asgnrd-grandmaster-clock-ptp-config.yaml. -
Verify that the
pluginsstanza lists thee830ande825device entries your qualified hardware layout requires. -
Apply the
PtpConfigCR by running the following command:$ oc apply -f gnrd-grandmaster-clock-ptp-config.yaml
Verification
- Verify that the
PtpConfigprofile is applied:- Retrieve the pods in the
openshift-ptpnamespace by running the following command:$ oc get pods -n openshift-ptp -o wide - Review
linuxptpdaemon logs for the pod on your Granite Rapids-D node by running the following command, replacing<linuxptp_daemon_pod>with the pod name that is scheduled on your target node:$ oc logs <linuxptp_daemon_pod> -n openshift-ptp -c linuxptp-daemon-container
- Retrieve the pods in the
Additional resources
- Configuring the PTP fast event notifications publisher
- Boundary clocks without holdover on Intel Granite Rapids-D hardware
- Configuring linuxptp services as a boundary clock without holdover on Intel Granite Rapids-D hardware
- Configuring GNR-D T-BC holdover on a GNR-D platform
Grandmaster clock PtpConfig configuration reference
The following reference information describes the configuration options for the PtpConfig custom resource (CR) that configures the linuxptp services (ptp4l, phc2sys, ts2phc) as a grandmaster clock.
PtpConfig configuration options for PTP Grandmaster clock
| PtpConfig CR field | Description |
|---|---|
plugins |
Specify an array of .exec.cmdline options that configure the NIC for grandmaster clock operation. Grandmaster clock configuration requires certain PTP pins to be disabled.The plugin mechanism allows the PTP Operator to do automated hardware configuration. For the Intel Westport Channel NIC or the Intel Logan Beach NIC, when the enableDefaultConfig field is set to true, the PTP Operator runs a hard-coded script to do the required configuration for the NIC. |
ptp4lOpts |
Specify system configuration options for the ptp4l service. The options should not include the network interface name -i <interface> and service config file -f /etc/ptp4l.conf because the network interface name and the service config file are automatically appended. |
ptp4lConf |
Specify the required configuration to start ptp4l as a grandmaster clock. For example, the ens2f1 interface synchronizes downstream connected devices. For grandmaster clocks, set clockClass to 6 and set clockAccuracy to 0x27. Set timeSource to 0x20 for when receiving the timing signal from a Global navigation satellite system (GNSS). |
tx_timestamp_timeout |
Specify the maximum amount of time to wait for the transmit (TX) timestamp from the sender before discarding the data. |
boundary_clock_jbod |
Specify the JBOD boundary clock time delay value. This value is used to correct the time values that are passed between the network time devices. |
phc2sysOpts |
Specify system config options for the phc2sys service. If this field is empty the PTP Operator does not start the phc2sys service.Note Ensure that the network interface listed here is configured as grandmaster and is referenced as required in the |
ptpSchedulingPolicy |
Configure the scheduling policy for ptp4l and phc2sys processes. Default value is SCHED_OTHER. Use SCHED_FIFO on systems that support FIFO scheduling. |
ptpSchedulingPriority |
Set an integer value from 1-65 to configure FIFO priority for ptp4l and phc2sys processes when ptpSchedulingPolicy is set to SCHED_FIFO. The ptpSchedulingPriority field is not used when ptpSchedulingPolicy is set to SCHED_OTHER. |
ptpClockThreshold |
Optional. If ptpClockThreshold stanza is not present, default values are used for ptpClockThreshold fields. Stanza shows default ptpClockThreshold values. ptpClockThreshold values configure how long after the PTP master clock is disconnected before PTP events are triggered. holdOverTimeout is the time value in seconds before the PTP clock event state changes to FREERUN when the PTP master clock is disconnected. The maxOffsetThreshold and minOffsetThreshold settings configure offset values in nanoseconds that compare against the values for CLOCK_REALTIME (phc2sys) or master offset (ptp4l). When the ptp4l or phc2sys offset value is outside this range, the PTP clock state is set to FREERUN. When the offset value is within this range, the PTP clock state is set to LOCKED. |
ts2phcConf |
Sets the configuration for the ts2phc command.leapfile is the default path to the current leap seconds definition file in the PTP Operator container image.ts2phc.nmea_serialport is the serial port device that is connected to the NMEA GPS clock source. When configured, the GNSS receiver is accessible on /dev/gnss<id>. If the host has multiple GNSS receivers, you can find the correct device by enumerating either of the following devices:
|
ts2phcOpts |
Set options for the ts2phc command. |
recommend |
Specify an array of one or more recommend objects that define rules on how the profile should be applied to nodes. |
.recommend.profile |
Specify the .recommend.profile object name that is defined in the profile section. |
.recommend.priority |
Specify the priority with an integer value between 0 and 99. A larger number gets lower priority, so a priority of 99 is lower than a priority of 10. If a node can be matched with multiple profiles according to rules defined in the match field, the profile with the higher priority is applied to that node. |
.recommend.match |
Specify .recommend.match rules with nodeLabel or nodeName values. |
.recommend.match.nodeLabel |
Set nodeLabel with the key of the node.Labels field from the node object by using the oc get nodes --show-labels command. For example, node-role.kubernetes.io/worker. |
.recommend.match.nodeName |
Set nodeName with the value of the node.Name field from the node object by using the oc get nodes command. For example, compute-1.example.com. |
Grandmaster clock class sync state reference
The following table describes the PTP grandmaster clock (T-GM) gm.ClockClass states.
Clock class states categorize T-GM clocks based on their accuracy and stability with regard to the Primary Reference Time Clock (PRTC) or other timing source.
Holdover specification is the amount of time a PTP clock can maintain synchronization without receiving updates from the primary time source.
T-GM clock class states
| Clock class state | Description |
gm.ClockClass 6 | T-GM clock is connected to a PRTC in LOCKED mode. For example, the PRTC is traceable to a GNSS time source. |
gm.ClockClass 7 | T-GM clock is in HOLDOVER mode, and within holdover specification. The clock source might not be traceable to a category 1 frequency source. |
gm.ClockClass 248 | T-GM clock is in FREERUN mode. |
For more information, see "Phase/time traceability information", ITU-T G.8275.1/Y.1369.1 Recommendations.
Intel E810 NIC hardware configuration reference
Use this information to understand how to use the Intel E810 hardware plugin to configure the E810 network interface as PTP grandmaster clock.
Hardware pin configuration determines how the network interface interacts with other components and devices in the system. The Intel E810 NIC has four connectors for external 1PPS signals: SMA1, SMA2, U.FL1, and U.FL2.
Intel E810 NIC hardware connectors configuration
| Hardware pin | Recommended setting | Description |
|---|---|---|
U.FL1 | 0 1 | Disables the U.FL1 connector input. The U.FL1 connector is output-only. |
U.FL2 | 0 2 | Disables the U.FL2 connector output. The U.FL2 connector is input-only. |
SMA1 | 0 1 | Disables the SMA1 connector input. The SMA1 connector is bidirectional. |
SMA2 | 0 2 | Disables the SMA2 connector output. The SMA2 connector is bidirectional. |
You can set the pin configuration on the Intel E810 NIC by using the spec.profile.plugins.e810.pins parameters as shown in the following example:
pins:
      <interface_name>:
        <connector_name>: <function> <channel_number>
Where:
<function>: Specifies the role of the pin. The following values are associated with the pin role:
0: Disabled1: Rx (Receive timestamping)2: Tx (Transmit timestamping)
<channel number>: A number associated with the physical connector. The following channel numbers are associated with the physical connectors:
1:SMA1orU.FL12:SMA2orU.FL2
Examples:
0 1: Disables the pin mapped toSMA1orU.FL1.1 2: Assigns the Rx function toSMA2orU.FL2.
SMA1 and U.FL1 connectors share channel one. SMA2 and U.FL2 connectors share channel two.
Set spec.profile.plugins.e810.ublxCmds parameters to configure the GNSS clock in the PtpConfig custom resource (CR).
You must configure an offset value to compensate for T-GM GPS antenna cable signal delay. To configure the optimal T-GM antenna offset value, make precise measurements of the GNSS antenna cable signal delay. Red Hat cannot assist in this measurement or provide any values for the required delay offsets.
Each of these ublxCmds stanzas correspond to a configuration that is applied to the host NIC by using ubxtool commands. For example:
ublxCmds:
  - args:
      - "-P"
      - "29.20"
      - "-z"
      - "CFG-HW-ANT_CFG_VOLTCTRL,1"
      - "-z"
      - "CFG-TP-ANT_CABLEDELAY,<antenna_delay_offset>"
    reportOutput: false
where:
"CFG-TP-ANT_CABLEDELAY,<antenna_delay_offset>"- Measured T-GM antenna delay offset in nanoseconds. To get the required delay offset value, you must measure the cable delay using external test equipment.
The following table describes the equivalent ubxtool commands:
Intel E810 ublxCmds configuration
| ubxtool command | Description |
|---|---|
ubxtool -P 29.20 -z CFG-HW-ANT_CFG_VOLTCTRL,1 -z CFG-TP-ANT_CABLEDELAY,<antenna_delay_offset> | Enables antenna voltage control, allows antenna status to be reported in the UBX-MON-RF and UBX-INF-NOTICE log messages, and sets a <antenna_delay_offset> value in nanoseconds that offsets the GPS antenna cable signal delay. |
ubxtool -P 29.20 -e GPS | Enables the antenna to receive GPS signals. |
ubxtool -P 29.20 -d Galileo | Configures the antenna to receive signal from the Galileo GPS satellite. |
ubxtool -P 29.20 -d GLONASS | Disables the antenna from receiving signal from the GLONASS GPS satellite. |
ubxtool -P 29.20 -d BeiDou | Disables the antenna from receiving signal from the BeiDou GPS satellite. |
ubxtool -P 29.20 -d SBAS | Disables the antenna from receiving signal from the SBAS GPS satellite. |
ubxtool -P 29.20 -t -w 5 -v 1 -e SURVEYIN,600,50000 | Configures the GNSS receiver survey-in process to improve its initial position estimate. This can take up to 24 hours to achieve an optimal result. |
ubxtool -P 29.20 -p MON-HW | Runs a single automated scan of the hardware and reports on the NIC state and configuration settings. |
Dual E810 NIC configuration reference
Use this information to understand how to use the Intel E810 hardware plugin to configure a pair of E810 network interfaces as PTP grandmaster clock (T-GM).
Before you configure the dual-NIC cluster host, you must connect the two NICs with an SMA1 cable using the 1PPS faceplace connections.
When you configure a dual-NIC T-GM, you need to compensate for the 1PPS signal delay that occurs when you connect the NICs using the SMA1 connection ports. Various factors such as cable length, ambient temperature, and component and manufacturing tolerances can affect the signal delay. To compensate for the delay, you must calculate the specific value that you use to offset the signal delay.
E810 dual-NIC T-GM PtpConfig CR reference
| PtpConfig field | Description |
|---|---|
spec.profile.plugins.e810.pins |
Configure the E810 hardware pins using the PTP Operator E810 hardware plugin.
|
spec.profile.ts2phcConf |
Use the ts2phcConf field to configure parameters for NIC one and NIC two. Set ts2phc.master 0 for NIC two. This configures the timing source for NIC two from the 1PPS input, not GNSS. Configure the ts2phc.extts_correction value for NIC two to compensate for the delay that is incurred for the specific SMA cable and cable length that you use. The value that you configure depends on your specific measurements and SMA1 cable length. |
spec.profile.ptp4lConf |
Set the value of boundary_clock_jbod to 1 to enable support for multiple NICs. |
Each value in the spec.profile.plugins.e810.pins list follows the <function> <channel_number> format.
Where:
<function>: Specifies the pin role. The following values are associated with the pin role:
0: Disabled1: Receive (Rx) – for 1PPS IN2: Transmit (Tx) – for 1PPS OUT
<channel_number>: A number associated with the physical connector. The following channel numbers are associated with the physical connectors:
1:SMA1orU.FL12:SMA2orU.FL2
Examples:
2 1: Enables1PPS OUT(Tx) onSMA1.1 1: Enables1PPS IN(Rx) onSMA1.
The PTP Operator passes these values to the Intel E810 hardware plugin and writes them to the sysfs pin configuration interface on each NIC.
3-card E810 NIC configuration reference
Use this information to understand how to configure 3 E810 NICs as PTP grandmaster clock (T-GM).
Before you configure the 3-card cluster host, you must connect the 3 NICs by using the 1PPS faceplate connections. The primary NIC 1PPS_out outputs feed the other 2 NICs.
When you configure a 3-card T-GM, you need to compensate for the 1PPS signal delay that occurs when you connect the NICs by using the SMA1 connection ports. Various factors such as cable length, ambient temperature, and component and manufacturing tolerances can affect the signal delay. To compensate for the delay, you must calculate the specific value that you use to offset the signal delay.
3-card E810 T-GM PtpConfig CR reference
| PtpConfig field | Description |
|---|---|
spec.profile.plugins.e810.pins |
Configure the E810 hardware pins with the PTP Operator E810 hardware plugin.
|
spec.profile.ts2phcConf |
Use the ts2phcConf field to configure parameters for the NICs. Set ts2phc.master 0 for NIC 2 and NIC 3. This configures the timing source for NIC 2 and NIC 3 from the 1PPS input, not GNSS. Configure the ts2phc.extts_correction value for NIC 2 and NIC 3 to compensate for the delay that is incurred for the specific SMA cable and cable length that you use. The value that you configure depends on your specific measurements and SMA1 cable length. |
spec.profile.ptp4lConf |
Set the value of boundary_clock_jbod to 1 to enable support for multiple NICs. |
Holdover in a grandmaster clock with GNSS as the source
Holdover allows the grandmaster (T-GM) clock to maintain synchronization performance when the global navigation satellite system (GNSS) source is unavailable. During this period, the T-GM clock relies on its internal oscillator and holdover parameters to reduce timing disruptions.
You can define the holdover behavior by configuring the following holdover parameters in the PTPConfig custom resource (CR):
MaxInSpecOffset- Specifies the maximum allowed offset in nanoseconds. If the T-GM clock exceeds the
MaxInSpecOffsetvalue, it transitions to theFREERUNstate (clock class stategm.ClockClass 248). LocalHoldoverTimeout- Specifies the maximum duration, in seconds, for which the T-GM clock remains in the holdover state before transitioning to the
FREERUNstate. LocalMaxHoldoverOffSet- Specifies the maximum offset that the T-GM clock can reach during the holdover state in nanoseconds.
If the MaxInSpecOffset value is less than the LocalMaxHoldoverOffset value, and the T-GM clock exceeds the maximum offset value, the T-GM clock transitions from the holdover state to the FREERUN state.
If the LocalMaxHoldoverOffSet value is less than the MaxInSpecOffset value, the holdover timeout occurs before the clock reaches the maximum offset. To resolve this issue, set the MaxInSpecOffset field and the LocalMaxHoldoverOffset field to the same value.
For information about clock class states, see "Grandmaster clock class sync state reference" document.
The T-GM clock uses the holdover parameters LocalMaxHoldoverOffSet and LocalHoldoverTimeout to calculate the slope. Slope is the rate at which the phase offset changes over time. It is measured in nanoseconds per second, where the set value indicates how much the offset increases over a given time period.
The T-GM clock uses the slope value to predict and compensate for time drift, so reducing timing disruptions during holdover. The T-GM clock uses the following formula to calculate the slope:
-
Slope =
localMaxHoldoverOffSet/localHoldoverTimeoutFor example, if theLocalHoldOverTimeoutparameter is set to 60 seconds, and theLocalMaxHoldoverOffsetparameter is set to 3000 nanoseconds, the slope is calculated as follows:Slope = 3000 nanoseconds / 60 seconds = 50 nanoseconds per second
The T-GM clock reaches the maximum offset in 60 seconds.
noteThe phase offset is converted from picoseconds to nanoseconds. As a result, the calculated phase offset during holdover is expressed in nanoseconds, and the resulting slope is expressed in nanoseconds per second.
The following figure illustrates the holdover behavior in a T-GM clock with GNSS as the source:
Figure 1. Holdover in a T-GM clock with GNSS as the source
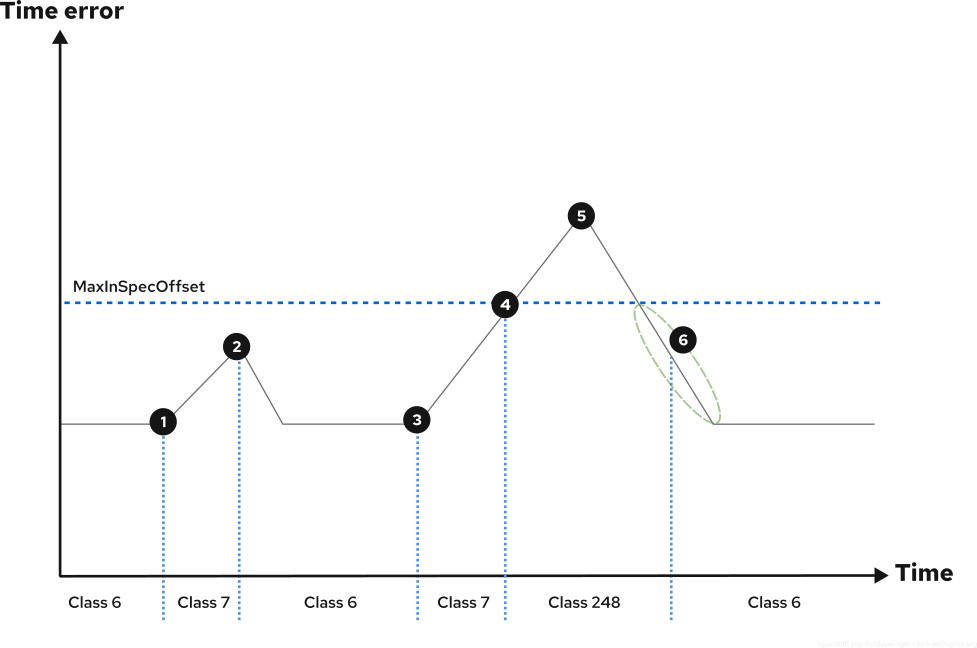
 The GNSS signal is lost, causing the T-GM clock to enter the
 HOLDOVER mode. The T-GM clock maintains time accuracy by using its internal clock.
 The GNSS signal is restored and the T-GM clock re-enters the
 LOCKED mode. When the GNSS signal is restored, the T-GM clock re-enters the LOCKED mode only after all dependent components in the synchronization chain, such as ts2phc offset, digital phase-locked loop (DPLL) phase offset, and GNSS offset, reach a stable LOCKED mode.
 The GNSS signal is lost again, and the T-GM clock re-enters the
 HOLDOVER mode. The time error begins to increase.
 The time error exceeds the
 MaxInSpecOffset threshold due to prolonged loss of traceability.
 The GNSS signal is restored, and the T-GM clock resumes synchronization. The time error starts to decrease.
 The time error decreases and falls back within the
 MaxInSpecOffset threshold.
Applying unassisted holdover for boundary clocks and time synchronous clocks
The unassisted holdover feature enables an Intel E810-XXVDA4T NIC, configured as a PTP boundary clock (T-BC) or telecom time synchronous clock (T-TSC), to maintain time synchronization when the upstream timing source becomes unavailable.
When the upstream source degrades, disconnects, or fails, the NIC enters the holdover state. In this state, the NIC relies on its internal oscillator to maintain accurate time autonomously. On nodes with multiple NICs, one NIC acts as the leading NIC. Other NICs on the node synchronize to the leading NIC through SMA cable connections managed by the ts2phc service.
In T-BC configurations, the time transmitter (TT) ports continue transmitting timing to downstream devices, signaling a degraded but usable clock quality. Timing remains stable on both the local node and the downstream network until the upstream source recovers or the holdover timeout expires.
This example describes how to configure unassisted holdover for a multi-card T-BC configuration with three NICs.
Prerequisites
- Install the OpenShift CLI (
oc). - Log in as a user with
cluster-adminprivileges. - Install the PTP Operator.
- One or more Intel E810-XXVDA4T NICs.
- For multi-card configurations, SMA cables connecting the NICs.
Procedure
-
Create a
PtpConfigCR with two profiles: one for time transmitter (TT) ports and one for the time receiver (TR) port with hardware configuration.-
Define the TT profile that configures downstream-facing ports:
apiVersion: ptp.openshift.io/v1kind: PtpConfigmetadata:name: t-bcnamespace: openshift-ptpspec:profile:- name: 00-tbc-ttptp4lConf: |[ens4f0]masterOnly 1[ens8f0]masterOnly 1[ens1f0]masterOnly 1[global]## Default Data Set#twoStepFlag 1slaveOnly 0priority1 128priority2 128domainNumber 25clockClass 248clockAccuracy 0xFEoffsetScaledLogVariance 0xFFFFfree_running 0freq_est_interval 1dscp_event 0dscp_general 0dataset_comparison G.8275.xG.8275.defaultDS.localPriority 128## Port Data Set#logAnnounceInterval -3logSyncInterval -4logMinDelayReqInterval -4logMinPdelayReqInterval -4announceReceiptTimeout 3syncReceiptTimeout 0delayAsymmetry 0fault_reset_interval -4neighborPropDelayThresh 20000000masterOnly 0G.8275.portDS.localPriority 128## Run time options#assume_two_step 0logging_level 6path_trace_enabled 0follow_up_info 0hybrid_e2e 0inhibit_multicast_service 0net_sync_monitor 0tc_spanning_tree 0tx_timestamp_timeout 50unicast_listen 0unicast_master_table 0unicast_req_duration 3600use_syslog 1verbose 0summary_interval 0kernel_leap 1check_fup_sync 0clock_class_threshold 135## Servo Options#pi_proportional_const 0.60pi_integral_const 0.001pi_proportional_scale 0.0pi_proportional_exponent -0.3pi_proportional_norm_max 0.7pi_integral_scale 0.0pi_integral_exponent 0.4pi_integral_norm_max 0.3step_threshold 2.0first_step_threshold 0.00002max_frequency 900000000clock_servo pisanity_freq_limit 200000000ntpshm_segment 0## Transport options#transportSpecific 0x0ptp_dst_mac AA:BB:CC:DD:EE:FFp2p_dst_mac BB:CC:DD:EE:FF:GGudp_ttl 1udp6_scope 0x0Euds_address /var/run/ptp4l## Default interface options#clock_type BCnetwork_transport L2delay_mechanism E2Etime_stamping hardwaretsproc_mode filterdelay_filter moving_mediandelay_filter_length 10egressLatency 0ingressLatency 0boundary_clock_jbod 1## Clock description#productDescription ;;revisionData ;;manufacturerIdentity 00:00:00userDescription ;timeSource 0xA0ptp4lOpts: -2 --summary_interval -4ptpSchedulingPolicy: SCHED_FIFOptpSchedulingPriority: 10ptpSettings:controllingProfile: 01-tbc-trlogReduce: "false"# ...spec.profile[].ptp4lConfdefines theptp4lconfiguration. In the[ens4f0]interface section, themasterOnly 1setting configures TT ports to transmit timing downstream.clock_type BCsets the clock to boundary clock operation.boundary_clock_jbod 1enables multi-NIC configurations.spec.profile[].ptpSettings.controllingProfilereferences the TR profile that controls holdover behavior.
-
Define the TR profile with the hardware plugin configuration:
# ...- name: 01-tbc-trphc2sysOpts: -r -n 25 -N 8 -R 16 -u 0 -m -s ens4f1plugins:e810:enableDefaultConfig: falseinterconnections:- gnssInput: falseid: ens4f0part: E810-XXVDA4TphaseOutputConnectors:- SMA1- SMA2upstreamPort: ens4f1- id: ens1f0inputConnector:connector: SMA1part: E810-XXVDA4T- id: ens8f0inputConnector:connector: SMA1part: E810-XXVDA4Tpins:ens4f0:SMA1: 2 1SMA2: 2 2U.FL1: 0 1U.FL2: 0 2ens1f0:SMA1: 1 1SMA2: 0 2U.FL1: 0 1U.FL2: 0 2ens8f0:SMA1: 1 1SMA2: 0 2U.FL1: 0 1U.FL2: 0 2settings:LocalHoldoverTimeout: 14400LocalMaxHoldoverOffSet: 1500MaxInSpecOffset: 100# ...phc2sysOptsspecifies the upstream port (ens4f1) as the source for system clock synchronization.plugins.e810.interconnectionsdefines how NICs are connected. The leading NIC (ens4f0) outputs phase to other NICs through SMA cables.plugins.e810.interconnections[].phaseOutputConnectorslists SMA connectors used for cable connections to downstream NICs.plugins.e810.interconnections[].upstreamPortspecifies the TR port that receives timing from upstream. Set this for both T-BC and T-TSC configurations.plugins.e810.pinsconfigures SMA and U.FL pin directions for each NIC.plugins.e810.settingsconfigures holdover behavior. For details about these parameters, see "Holdover in a grandmaster clock with GNSS as the source".
-
Configure the
ptp4lConffor the TR port:# ...ptp4lConf: |[ens4f1]masterOnly 0[global]## Default Data Set#twoStepFlag 1slaveOnly 0priority1 128priority2 128domainNumber 25clockClass 248clockAccuracy 0xFEoffsetScaledLogVariance 0xFFFFfree_running 0freq_est_interval 1dscp_event 0dscp_general 0dataset_comparison G.8275.xG.8275.defaultDS.localPriority 128## Port Data Set#logAnnounceInterval -3logSyncInterval -4logMinDelayReqInterval -4logMinPdelayReqInterval -4announceReceiptTimeout 3syncReceiptTimeout 0delayAsymmetry 0fault_reset_interval -4neighborPropDelayThresh 20000000masterOnly 0G.8275.portDS.localPriority 128## Run time options#assume_two_step 0logging_level 6path_trace_enabled 0follow_up_info 0hybrid_e2e 0inhibit_multicast_service 0net_sync_monitor 0tc_spanning_tree 0tx_timestamp_timeout 50unicast_listen 0unicast_master_table 0unicast_req_duration 3600use_syslog 1verbose 0summary_interval 0kernel_leap 1check_fup_sync 0clock_class_threshold 135## Servo Options#pi_proportional_const 0.60pi_integral_const 0.001pi_proportional_scale 0.0pi_proportional_exponent -0.3pi_proportional_norm_max 0.7pi_integral_scale 0.0pi_integral_exponent 0.4pi_integral_norm_max 0.3step_threshold 2.0first_step_threshold 0.00002max_frequency 900000000clock_servo pisanity_freq_limit 200000000ntpshm_segment 0## Transport options#transportSpecific 0x0ptp_dst_mac AA:BB:CC:DD:EE:HHp2p_dst_mac BB:CC:DD:EE:FF:IIudp_ttl 1udp6_scope 0x0Euds_address /var/run/ptp4l## Default interface options#clock_type OCnetwork_transport L2delay_mechanism E2Etime_stamping hardwaretsproc_mode filterdelay_filter moving_mediandelay_filter_length 10egressLatency 0ingressLatency 0boundary_clock_jbod 1## Clock description#productDescription ;;revisionData ;;manufacturerIdentity 00:00:00userDescription ;timeSource 0xA0ptp4lOpts: -2 --summary_interval -4ptpSchedulingPolicy: SCHED_FIFOptpSchedulingPriority: 10ptpSettings:inSyncConditionThreshold: "10"inSyncConditionTimes: "12"logReduce: "false"# ...spec.profile[].ptp4lConfdefines theptp4lconfiguration. In the[ens4f1]interface section, themasterOnly 0setting configures the TR port to receive timing from upstream.clock_type OCsets the TR profile to ordinary clock because it handles only the upstream-facing port.
-
Configure
ts2phcfor all participating NICs:# ...ts2phcConf: |[global]use_syslogverbose 1logging_level 7ts2phc.pulsewidth 100000000leapfile /usr/share/zoneinfo/leap-seconds.listdomainNumber 25uds_address /var/run/ptp4l.0.socket[ens4f0]ts2phc.extts_polarity risingts2phc.extts_correction -10ts2phc.master 0[ens1f0]ts2phc.extts_polarity risingts2phc.extts_correction -27ts2phc.master 0[ens8f0]ts2phc.extts_polarity risingts2phc.extts_correction -27ts2phc.master 0ts2phcOpts: -s generic -a --ts2phc.rh_external_pps 1# ...- The
domainNumbermust match the upstream PTP domain. - Interface sections like
[ens4f0]list all NICs participating in the configuration. Thets2phc.extts_correctionvalues compensate for cable and hardware delays.
- The
-
Define the
recommendsection to apply profiles to nodes:# ...recommend:- match:- nodeLabel: node-role.kubernetes.io/masterpriority: 4profile: 00-tbc-tt- match:- nodeLabel: node-role.kubernetes.io/masterpriority: 4profile: 01-tbc-tr
-
-
Review the full configuration:
apiVersion: ptp.openshift.io/v1kind: PtpConfigmetadata:name: t-bcnamespace: openshift-ptpspec:profile:- name: 00-tbc-ttptp4lConf: |[ens4f0]masterOnly 1[ens8f0]masterOnly 1[ens1f0]masterOnly 1[global]## Default Data Set#twoStepFlag 1slaveOnly 0priority1 128priority2 128domainNumber 25clockClass 248clockAccuracy 0xFEoffsetScaledLogVariance 0xFFFFfree_running 0freq_est_interval 1dscp_event 0dscp_general 0dataset_comparison G.8275.xG.8275.defaultDS.localPriority 128## Port Data Set#logAnnounceInterval -3logSyncInterval -4logMinDelayReqInterval -4logMinPdelayReqInterval -4announceReceiptTimeout 3syncReceiptTimeout 0delayAsymmetry 0fault_reset_interval -4neighborPropDelayThresh 20000000masterOnly 0G.8275.portDS.localPriority 128## Run time options#assume_two_step 0logging_level 6path_trace_enabled 0follow_up_info 0hybrid_e2e 0inhibit_multicast_service 0net_sync_monitor 0tc_spanning_tree 0tx_timestamp_timeout 50unicast_listen 0unicast_master_table 0unicast_req_duration 3600use_syslog 1verbose 0summary_interval 0kernel_leap 1check_fup_sync 0clock_class_threshold 135## Servo Options#pi_proportional_const 0.60pi_integral_const 0.001pi_proportional_scale 0.0pi_proportional_exponent -0.3pi_proportional_norm_max 0.7pi_integral_scale 0.0pi_integral_exponent 0.4pi_integral_norm_max 0.3step_threshold 2.0first_step_threshold 0.00002max_frequency 900000000clock_servo pisanity_freq_limit 200000000ntpshm_segment 0## Transport options#transportSpecific 0x0ptp_dst_mac AA:BB:CC:DD:EE:FFp2p_dst_mac BB:CC:DD:EE:FF:GGudp_ttl 1udp6_scope 0x0Euds_address /var/run/ptp4l## Default interface options#clock_type BCnetwork_transport L2delay_mechanism E2Etime_stamping hardwaretsproc_mode filterdelay_filter moving_mediandelay_filter_length 10egressLatency 0ingressLatency 0boundary_clock_jbod 1## Clock description#productDescription ;;revisionData ;;manufacturerIdentity 00:00:00userDescription ;timeSource 0xA0ptp4lOpts: -2 --summary_interval -4ptpSchedulingPolicy: SCHED_FIFOptpSchedulingPriority: 10ptpSettings:controllingProfile: 01-tbc-trlogReduce: "false"- name: 01-tbc-trphc2sysOpts: -r -n 25 -N 8 -R 16 -u 0 -m -s ens4f1plugins:e810:enableDefaultConfig: falseinterconnections:- gnssInput: falseid: ens4f0part: E810-XXVDA4TphaseOutputConnectors:- SMA1- SMA2upstreamPort: ens4f1- id: ens1f0inputConnector:connector: SMA1part: E810-XXVDA4T- id: ens8f0inputConnector:connector: SMA1part: E810-XXVDA4Tpins:ens4f0:SMA1: 2 1SMA2: 2 2U.FL1: 0 1U.FL2: 0 2ens1f0:SMA1: 1 1SMA2: 0 2U.FL1: 0 1U.FL2: 0 2ens8f0:SMA1: 1 1SMA2: 0 2U.FL1: 0 1U.FL2: 0 2settings:LocalHoldoverTimeout: 14400LocalMaxHoldoverOffSet: 1500MaxInSpecOffset: 100ptp4lConf: |[ens4f1]masterOnly 0[global]## Default Data Set#twoStepFlag 1slaveOnly 0priority1 128priority2 128domainNumber 25clockClass 248clockAccuracy 0xFEoffsetScaledLogVariance 0xFFFFfree_running 0freq_est_interval 1dscp_event 0dscp_general 0dataset_comparison G.8275.xG.8275.defaultDS.localPriority 128## Port Data Set#logAnnounceInterval -3logSyncInterval -4logMinDelayReqInterval -4logMinPdelayReqInterval -4announceReceiptTimeout 3syncReceiptTimeout 0delayAsymmetry 0fault_reset_interval -4neighborPropDelayThresh 20000000masterOnly 0G.8275.portDS.localPriority 128## Run time options#assume_two_step 0logging_level 6path_trace_enabled 0follow_up_info 0hybrid_e2e 0inhibit_multicast_service 0net_sync_monitor 0tc_spanning_tree 0tx_timestamp_timeout 50unicast_listen 0unicast_master_table 0unicast_req_duration 3600use_syslog 1verbose 0summary_interval 0kernel_leap 1check_fup_sync 0clock_class_threshold 135## Servo Options#pi_proportional_const 0.60pi_integral_const 0.001pi_proportional_scale 0.0pi_proportional_exponent -0.3pi_proportional_norm_max 0.7pi_integral_scale 0.0pi_integral_exponent 0.4pi_integral_norm_max 0.3step_threshold 2.0first_step_threshold 0.00002max_frequency 900000000clock_servo pisanity_freq_limit 200000000ntpshm_segment 0## Transport options#transportSpecific 0x0ptp_dst_mac AA:BB:CC:DD:EE:HHp2p_dst_mac BB:CC:DD:EE:FF:IIudp_ttl 1udp6_scope 0x0Euds_address /var/run/ptp4l## Default interface options#clock_type OCnetwork_transport L2delay_mechanism E2Etime_stamping hardwaretsproc_mode filterdelay_filter moving_mediandelay_filter_length 10egressLatency 0ingressLatency 0boundary_clock_jbod 1## Clock description#productDescription ;;revisionData ;;manufacturerIdentity 00:00:00userDescription ;timeSource 0xA0ptp4lOpts: -2 --summary_interval -4ptpSchedulingPolicy: SCHED_FIFOptpSchedulingPriority: 10ptpSettings:inSyncConditionThreshold: "10"inSyncConditionTimes: "12"logReduce: "false"ts2phcConf: |[global]use_syslog 0verbose 1logging_level 7ts2phc.pulsewidth 100000000leapfile /usr/share/zoneinfo/leap-seconds.listdomainNumber 25uds_address /var/run/ptp4l.0.socket[ens4f0]ts2phc.extts_polarity risingts2phc.extts_correction -10ts2phc.master 0[ens1f0]ts2phc.extts_polarity risingts2phc.extts_correction -27ts2phc.master 0[ens8f0]ts2phc.extts_polarity risingts2phc.extts_correction -27ts2phc.master 0ts2phcOpts: -s generic -a --ts2phc.rh_external_pps 1recommend:- match:- nodeLabel: node-role.kubernetes.io/masterpriority: 4profile: 00-tbc-tt- match:- nodeLabel: node-role.kubernetes.io/masterpriority: 4profile: 01-tbc-trnoteThis example shows a multi-card T-BC configuration with three NICs. To adapt for other scenarios:
T-TSC:
- Remove the
00-tbc-ttprofile entirely - Set
clock_typetoOCin the TR profile - In
ts2phcConf, list only the TR NIC
Single-card T-BC:
- In the TT profile, list only ports from the same NIC as the TR port
- Remove additional NIC entries from the
interconnectionsandpinssections - In
ts2phcConf, list only the single NIC - Set
phaseOutputConnectorsto an empty array or disable all pins if not using SMA outputs
- Remove the
-
Save the configuration to a file, for example
t-bc-holdover-config.yaml, and apply it:$ oc apply -f t-bc-holdover-config.yaml
Verification
-
Get the status of the T-BC by running the following command:
$ oc logs ds/linuxptp-daemon -n openshift-ptp -c linuxptp-daemon-container --since=1s -f | grep T-BCExample outputT-BC[1760525446]:[ts2phc.1.config] ens4f0 offset 1 T-BC-STATUS s2T-BC[1760525447]:[ts2phc.1.config] ens4f0 offset 1 T-BC-STATUS s2T-BC[1760525448]:[ts2phc.1.config] ens4f0 offset -1 T-BC-STATUS s2The status is reported every second:
-
s2: Locked - synchronized with the upstream clock -
s1: Holdover - upstream source lost, internal oscillator maintaining timing -
s0: Unlocked - holdover limits exceeded or no valid holdover data
Additional resources
Configuring GNR-D T-BC holdover on a GNR-D platform
You can configure an Intel® Granite Rapids-D (GNR-D) platform device as telecom boundary clock (T-BC) with holdover support by using the PTP Operator.
Configuring GNR-D T-BC holdover on a GNR-D platform is a Technology Preview feature only. Technology Preview features are not supported with Red Hat production service level agreements (SLAs) and might not be functionally complete. Red Hat does not recommend using them in production. These features provide early access to upcoming product features, enabling customers to test functionality and provide feedback during the development process.
For more information about the support scope of Red Hat Technology Preview features, see Technology Preview Features Support Scope.
In this configuration, one time receiver (TR) port synchronizes to an upstream telecom grandmaster clock, while time transmitter (TT) ports distribute synchronized time to downstream devices. If the upstream timing source degrades, disconnects, or becomes unavailable, the system enters holdover mode and maintains timing by using configured digital phase-locked loop (DPLL) devices.
This configuration requires path-based network interface naming so that the system can consistently identify NAC and Carter Flat interfaces across the deployment. The configuration uses the following custom resources:
MachineConfig: Configures path-based network interface naming for NAC and Carter Flat devices.PtpConfig: Configures the PTP boundary clock profile and timing behavior.HardwareConfig: Configures supported hardware-specific timing and synchronization settings.
For more information about MachineConfig custom resource, see Additional resources.
Prerequisites
- Install the OpenShift CLI (
oc). - Log in as a user with
cluster-adminprivileges. - Install the PTP Operator.
- Deploy a GNR-D platform with supported NIC hardware.
- Identify the TR and TT interfaces for your hardware layout.
Procedure
-
Configure path-based network interface naming for the GNR-D platform:
apiVersion: machineconfiguration.openshift.io/v1kind: MachineConfigmetadata:name: 10-rename-gnrd-interfaces-masterlabels:machineconfiguration.openshift.io/role: masterspec:config:ignition:version: 3.2.0storage:files:- path: /etc/systemd/network/10-interface-8086-12d3.link# [Match]# Property=ID_VENDOR_ID=0x8086# Property=ID_MODEL_ID=0x12d3# [Link]# NamePolicy=pathmode: 420overwrite: truecontents:source: data:text/plain,%5BMatch%5D%0AProperty%3DID_VENDOR_ID%3D0x8086%0AProperty%3DID_MODEL_ID%3D0x12d3%0A%0A%5BLink%5D%0ANamePolicy%3Dpath%0A- This configuration sets
NamePolicy=pathso that network interfaces use stable path-based names.
- This configuration sets
-
Apply the
MachineConfigCR by running the following command:$ oc apply -f gnrd-interface-names.yaml -
Create a
PtpConfigCR with separate TT and TR profiles:apiVersion: ptp.openshift.io/v1kind: PtpConfigmetadata:name: t-bcnamespace: openshift-ptpspec:profile:- name: 00-tbc-ttptp4lConf: |[eno8803]masterOnly 1[eno8903]masterOnly 1[eno9003]masterOnly 1[eno8303]masterOnly 1[eno8403]masterOnly 1[eno8503]masterOnly 1[eno8603]masterOnly 1[enp108s0f0]masterOnly 1[enp108s0f1]masterOnly 1[enp108s0f2]masterOnly 1[enp108s0f3]masterOnly 1[enp108s0f4]masterOnly 1[enp108s0f5]masterOnly 1[enp108s0f6]masterOnly 1[enp108s0f7]masterOnly 1[enp109s0f0]masterOnly 1[enp109s0f1]masterOnly 1[enp109s0f2]masterOnly 1[enp109s0f3]masterOnly 1[enp109s0f4]masterOnly 1[enp109s0f5]masterOnly 1[enp109s0f6]masterOnly 1[enp109s0f7]masterOnly 1[global]## Default Data Set#twoStepFlag 1slaveOnly 0priority1 128priority2 128domainNumber 24#utc_offset 37clockClass 248clockAccuracy 0xFEoffsetScaledLogVariance 0xFFFFfree_running 0freq_est_interval 1dscp_event 0dscp_general 0dataset_comparison G.8275.xG.8275.defaultDS.localPriority 128## Port Data Set#logAnnounceInterval -3logSyncInterval -4logMinDelayReqInterval -4logMinPdelayReqInterval -4announceReceiptTimeout 3syncReceiptTimeout 0delayAsymmetry 0fault_reset_interval -4neighborPropDelayThresh 20000000masterOnly 0G.8275.portDS.localPriority 128## Run time options#assume_two_step 0logging_level 6path_trace_enabled 0follow_up_info 0hybrid_e2e 0inhibit_multicast_service 0net_sync_monitor 0tc_spanning_tree 0tx_timestamp_timeout 50unicast_listen 0unicast_master_table 0unicast_req_duration 3600use_syslog 1verbose 0summary_interval 0kernel_leap 1check_fup_sync 0clock_class_threshold 135## Servo Options#pi_proportional_const 0.60pi_integral_const 0.001pi_proportional_scale 0.0pi_proportional_exponent -0.3pi_proportional_norm_max 0.7pi_integral_scale 0.0pi_integral_exponent 0.4pi_integral_norm_max 0.3step_threshold 2.0first_step_threshold 0.00002max_frequency 900000000clock_servo pisanity_freq_limit 200000000ntpshm_segment 0## Transport options#transportSpecific 0x0ptp_dst_mac 01:1B:19:00:00:00p2p_dst_mac 01:80:C2:00:00:0Eudp_ttl 1udp6_scope 0x0Euds_address /var/run/ptp4l## Default interface options#clock_type BCnetwork_transport L2delay_mechanism E2Etime_stamping hardwaretsproc_mode filterdelay_filter moving_mediandelay_filter_length 10egressLatency 0ingressLatency 0boundary_clock_jbod 1## Clock description#productDescription ;;revisionData ;;manufacturerIdentity 00:00:00userDescription ;timeSource 0xA0ptp4lOpts: -2 --summary_interval -4ptpSchedulingPolicy: SCHED_FIFOptpSchedulingPriority: 10ptpSettings:controllingProfile: 01-tbc-trlogReduce: "false"- name: 01-tbc-trphc2sysOpts: -r -n 24 -N 8 -R 16 -u 0 -m -s eno8703ptp4lConf: |# The interface name is hardware-specific[eno8703]masterOnly 0[global]## Default Data Set#twoStepFlag 1slaveOnly 0priority1 128priority2 128domainNumber 24#utc_offset 37clockClass 248clockAccuracy 0xFEoffsetScaledLogVariance 0xFFFFfree_running 0freq_est_interval 1dscp_event 0dscp_general 0dataset_comparison G.8275.xG.8275.defaultDS.localPriority 128## Port Data Set#logAnnounceInterval -3logSyncInterval -4logMinDelayReqInterval -4logMinPdelayReqInterval -4announceReceiptTimeout 3syncReceiptTimeout 0delayAsymmetry 0fault_reset_interval -4neighborPropDelayThresh 20000000masterOnly 0G.8275.portDS.localPriority 128## Run time options#assume_two_step 0logging_level 6path_trace_enabled 0follow_up_info 0hybrid_e2e 0inhibit_multicast_service 0net_sync_monitor 0tc_spanning_tree 0tx_timestamp_timeout 50unicast_listen 0unicast_master_table 0unicast_req_duration 3600use_syslog 1verbose 0summary_interval 0kernel_leap 1check_fup_sync 0clock_class_threshold 135## Servo Options#pi_proportional_const 0.60pi_integral_const 0.001pi_proportional_scale 0.0pi_proportional_exponent -0.3pi_proportional_norm_max 0.7pi_integral_scale 0.0pi_integral_exponent 0.4pi_integral_norm_max 0.3step_threshold 2.0first_step_threshold 0.00002max_frequency 900000000clock_servo pisanity_freq_limit 200000000ntpshm_segment 0## Transport options#transportSpecific 0x0ptp_dst_mac 01:1B:19:00:00:00p2p_dst_mac 01:80:C2:00:00:0Eudp_ttl 1udp6_scope 0x0Euds_address /var/run/ptp4l## Default interface options#clock_type OCnetwork_transport L2delay_mechanism E2Etime_stamping hardwaretsproc_mode filterdelay_filter moving_mediandelay_filter_length 10egressLatency 0ingressLatency 0boundary_clock_jbod 1## Clock description#productDescription ;;revisionData ;;manufacturerIdentity 00:00:00userDescription ;timeSource 0xA0ptp4lOpts: -2 --summary_interval -4ptpSchedulingPolicy: SCHED_FIFOptpSchedulingPriority: 10ptpSettings:clockType: T-BCinSyncConditionThreshold: "10"inSyncConditionTimes: "12"logReduce: "false"ts2phcConf: |[global]use_syslog 0verbose 1logging_level 7ts2phc.pulsewidth 500000000leapfile /usr/share/zoneinfo/leap-seconds.listdomainNumber 24uds_address /var/run/ptp4l.1.socket[eno8703]ts2phc.extts_correction 0ts2phc.master 0ts2phc.channel 0ts2phc.pin_index 1[enp108s0f0]ts2phc.extts_correction 0ts2phc.master 0ts2phc.channel 0ts2phc.pin_index 1[enp109s0f0]ts2phc.extts_polarity risingts2phc.extts_correction 0ts2phc.master 0ts2phc.channel 0ts2phc.pin_index 1ts2phcOpts: -s generic -a --ts2phc.rh_external_pps 1recommend:- match:- nodeLabel: node-role.kubernetes.io/masterpriority: 4profile: 00-tbc-tt- match:- nodeLabel: node-role.kubernetes.io/masterpriority: 4profile: 01-tbc-tr- The TT profile configures downstream-facing ports.
- The TR profile configures the upstream-facing port,
phc2sys, andts2phc. controllingProfilelinks the TT profile to the TR profile.clockType: T-BCenables telecom boundary clock behavior.
-
Apply the
PtpConfigCR by running the following command:$ oc apply -f t-bc-config.yaml -
Create a
HardwareConfigCR to configure holdover thresholds:apiVersion: ptp.openshift.io/v2alpha1kind: HardwareConfigmetadata:name: t-bcspec:profile:name: GNR-D-T-BCclockType: T-BCclockChain:structure:- name: leaderhardwareSpecificDefinitions: <gnrd_platform>dpll:holdoverParameters:maxInSpecOffset: 40localMaxHoldoverOffset: 1500localHoldoverTimeout: 14400relatedPtpProfileName: 01-tbc-trhardwareSpecificDefinitions: <gnrd_platform>applies hardware-specific behavior of the GNR-D platform. Replace<gnrd_platform>with the GNR-D platform on which you want to configure T-BC holdover. The supported GNR-D platforms aredell/XR8720tandhpe/EL140-Gen12.holdoverParametersconfigure DPLL holdover thresholds.relatedPtpProfileNamelinks the hardware profile to the TR profile.
-
Apply the
HardwareConfigCR by running the following command:$ oc apply -f hardwareconfig.yaml
Verification
-
Verify that the
PtpConfigandHardwareConfigresources are deployed:$ oc get ptpconfig -n openshift-ptp$ oc get hardwareconfig -
Check the
linuxptp-daemonlogs:$ oc logs ds/linuxptp-daemon -n openshift-ptp -c linuxptp-daemon-container --since=1s -f | grep T-BCExample outputT-BC[1760525446]:[ts2phc.1.config] eno8703 offset 1 T-BC-STATUS s2T-BC[1760525447]:[ts2phc.1.config] eno8703 offset 1 T-BC-STATUS s1The status is reported every second:
s2: Locked - synchronized with the upstream clocks1: Holdover - upstream source lost, internal oscillator maintaining timings0: Unlocked - holdover limits exceeded or no valid holdover data
Additional resources
Configuring dynamic leap seconds handling for PTP grandmaster clocks
The PTP Operator container image includes the latest leap-seconds.list file that is available at the time of release.
You can configure the PTP Operator to automatically update the leap second file by using Global Positioning System (GPS) announcements.
Leap second information is stored in an automatically generated ConfigMap resource named leap-configmap in the openshift-ptp namespace. The PTP Operator mounts the leap-configmap resource as a volume in the linuxptp-daemon pod that is accessible by the ts2phc process.
If the GPS satellite broadcasts new leap second data, the PTP Operator updates the leap-configmap resource with the new data. The ts2phc process picks up the changes automatically.
The following procedure is provided as reference. The 4.22 version of the PTP Operator enables automatic leap second management by default.
Prerequisites
- You have installed the OpenShift CLI (
oc). - You have logged in as a user with
cluster-adminprivileges. - You have installed the PTP Operator and configured a PTP grandmaster clock (T-GM) in the cluster.
Procedure
-
Configure automatic leap second handling in the
phc2sysOptssection of thePtpConfigCR. Set the following options:phc2sysOpts: -r -u 0 -m -N 8 -R 16 -S 2 -s ens2f0 -n 24notePreviously, the T-GM required an offset adjustment in the
phc2sysconfiguration (-O -37) to account for historical leap seconds. This is no longer needed. -
Configure the Intel e810 NIC to enable periodical reporting of
NAV-TIMELSmessages by the GPS receiver in thespec.profile.plugins.e810.ublxCmdssection of thePtpConfigCR. For example:- args: #ubxtool -P 29.20 -p CFG-MSG,1,38,248- "-P"- "29.20"- "-p"- "CFG-MSG,1,38,248"
Verification
-
Validate that the configured T-GM is receiving
NAV-TIMELSmessages from the connected GPS. Run the following command:$ oc -n openshift-ptp -c linuxptp-daemon-container exec -it $(oc -n openshift-ptp get pods -o name | grep daemon) -- ubxtool -t -p NAV-TIMELS -P 29.20Example output1722509534.4417UBX-NAV-STATUS:iTOW 384752000 gpsFix 5 flags 0xdd fixStat 0x0 flags2 0x8ttff 18261, msss 13676428641722509534.4419UBX-NAV-TIMELS:iTOW 384752000 version 0 reserved2 0 0 0 srcOfCurrLs 2currLs 18 srcOfLsChange 2 lsChange 0 timeToLsEvent 70376866dateOfLsGpsWn 2441 dateOfLsGpsDn 7 reserved2 0 0 0valid x31722509534.4421UBX-NAV-CLOCK:iTOW 384752000 clkB 784281 clkD 435 tAcc 3 fAcc 2151722509535.4477UBX-NAV-STATUS:iTOW 384753000 gpsFix 5 flags 0xdd fixStat 0x0 flags2 0x8ttff 18261, msss 13676438641722509535.4479UBX-NAV-CLOCK:iTOW 384753000 clkB 784716 clkD 435 tAcc 3 fAcc 218 -
Validate that the
leap-configmapresource has been successfully generated by the PTP Operator and is up to date with the latest version of the leap-seconds.list. Run the following command:$ oc -n openshift-ptp get configmap leap-configmap -o jsonpath='{.data.<node_name>}'Replace
<node_name>with the node where you have installed and configured the PTP T-GM clock with automatic leap second management. Escape special characters in the node name. For example,node-1\.example\.com.Example output# Do not edit# This file is generated automatically by linuxptp-daemon#$ 3913697179#@ 42917472002272060800 10 # 1 Jan 19722287785600 11 # 1 Jul 19722303683200 12 # 1 Jan 19732335219200 13 # 1 Jan 19742366755200 14 # 1 Jan 19752398291200 15 # 1 Jan 19762429913600 16 # 1 Jan 19772461449600 17 # 1 Jan 19782492985600 18 # 1 Jan 19792524521600 19 # 1 Jan 19802571782400 20 # 1 Jul 19812603318400 21 # 1 Jul 19822634854400 22 # 1 Jul 19832698012800 23 # 1 Jul 19852776982400 24 # 1 Jan 19882840140800 25 # 1 Jan 19902871676800 26 # 1 Jan 19912918937600 27 # 1 Jul 19922950473600 28 # 1 Jul 19932982009600 29 # 1 Jul 19943029443200 30 # 1 Jan 19963076704000 31 # 1 Jul 19973124137600 32 # 1 Jan 19993345062400 33 # 1 Jan 20063439756800 34 # 1 Jan 20093550089600 35 # 1 Jul 20123644697600 36 # 1 Jul 20153692217600 37 # 1 Jan 2017#h e65754d4 8f39962b aa854a61 661ef546 d2af0bfa
Configuring linuxptp services as a boundary clock
You can configure the linuxptp services (ptp4l, phc2sys) as boundary clock by creating a PtpConfig custom resource (CR) object.
Use the following example PtpConfig CR as the basis to configure linuxptp services as the boundary clock for your particular hardware and environment. This example CR does not configure PTP fast events. To configure PTP fast events, set appropriate values for ptp4lOpts, ptp4lConf, and ptpClockThreshold. ptpClockThreshold is used only when events are enabled. See "Configuring the PTP fast event notifications publisher" for more information.
Prerequisites
- Install the OpenShift CLI (
oc). - Log in as a user with
cluster-adminprivileges. - Install the PTP Operator.
Procedure
-
Create the following
PtpConfigCR, and then save the YAML in theboundary-clock-ptp-config.yamlfile.Example PTP boundary clock configurationapiVersion: ptp.openshift.io/v1kind: PtpConfigmetadata:name: boundary-clocknamespace: openshift-ptpannotations: {}spec:profile:- name: boundary-clockptp4lOpts: "-2"phc2sysOpts: "-a -r -n 24"ptpSchedulingPolicy: SCHED_FIFOptpSchedulingPriority: 10ptpSettings:logReduce: "true"ptp4lConf: |# The interface name is hardware-specific[$iface_slave]masterOnly 0[$iface_master_1]masterOnly 1[$iface_master_2]masterOnly 1[$iface_master_3]masterOnly 1[global]## Default Data Set#twoStepFlag 1slaveOnly 0priority1 128priority2 128domainNumber 24#utc_offset 37clockClass 248clockAccuracy 0xFEoffsetScaledLogVariance 0xFFFFfree_running 0freq_est_interval 1dscp_event 0dscp_general 0dataset_comparison G.8275.xG.8275.defaultDS.localPriority 128## Port Data Set#logAnnounceInterval -3logSyncInterval -4logMinDelayReqInterval -4logMinPdelayReqInterval -4announceReceiptTimeout 3syncReceiptTimeout 0delayAsymmetry 0fault_reset_interval -4neighborPropDelayThresh 20000000masterOnly 0G.8275.portDS.localPriority 128## Run time options#assume_two_step 0logging_level 6path_trace_enabled 0follow_up_info 0hybrid_e2e 0inhibit_multicast_service 0net_sync_monitor 0tc_spanning_tree 0tx_timestamp_timeout 50unicast_listen 0unicast_master_table 0unicast_req_duration 3600use_syslog 1verbose 0summary_interval 0kernel_leap 1check_fup_sync 0clock_class_threshold 135## Servo Options#pi_proportional_const 0.0pi_integral_const 0.0pi_proportional_scale 0.0pi_proportional_exponent -0.3pi_proportional_norm_max 0.7pi_integral_scale 0.0pi_integral_exponent 0.4pi_integral_norm_max 0.3step_threshold 2.0first_step_threshold 0.00002max_frequency 900000000clock_servo pisanity_freq_limit 200000000ntpshm_segment 0## Transport options#transportSpecific 0x0ptp_dst_mac 01:1B:19:00:00:00p2p_dst_mac 01:80:C2:00:00:0Eudp_ttl 1udp6_scope 0x0Euds_address /var/run/ptp4l## Default interface options#clock_type BCnetwork_transport L2delay_mechanism E2Etime_stamping hardwaretsproc_mode filterdelay_filter moving_mediandelay_filter_length 10egressLatency 0ingressLatency 0boundary_clock_jbod 0## Clock description#productDescription ;;revisionData ;;manufacturerIdentity 00:00:00userDescription ;timeSource 0xA0recommend:- profile: boundary-clockpriority: 4match:- nodeLabel: "node-role.kubernetes.io/$mcp"PTP boundary clock CR configuration options
CR field Description nameThe name of the PtpConfigCR.profileSpecify an array of one or more profileobjects.nameSpecify the name of a profile object which uniquely identifies a profile object. ptp4lOptsSpecify system config options for the ptp4lservice. The options should not include the network interface name-i <interface>and service config file-f /etc/ptp4l.confbecause the network interface name and the service config file are automatically appended.ptp4lConfSpecify the required configuration to start ptp4las boundary clock. For example,ens1f0synchronizes from a grandmaster clock andens1f3synchronizes connected devices.<interface_1>The interface that receives the synchronization clock. <interface_2>The interface that sends the synchronization clock. tx_timestamp_timeoutFor Intel Columbiaville 800 Series NICs, set tx_timestamp_timeoutto50.boundary_clock_jbodFor Intel Columbiaville 800 Series NICs, ensure boundary_clock_jbodis set to0. For Intel Fortville X710 Series NICs, ensureboundary_clock_jbodis set to1.phc2sysOptsSpecify system config options for the phc2sysservice. If this field is empty, the PTP Operator does not start thephc2sysservice.ptpSchedulingPolicyScheduling policy for ptp4l and phc2sys processes. Default value is SCHED_OTHER. UseSCHED_FIFOon systems that support FIFO scheduling.ptpSchedulingPriorityInteger value from 1-65 used to set FIFO priority for ptp4landphc2sysprocesses whenptpSchedulingPolicyis set toSCHED_FIFO. TheptpSchedulingPriorityfield is not used whenptpSchedulingPolicyis set toSCHED_OTHER.ptpClockThresholdOptional. If ptpClockThresholdis not present, default values are used for theptpClockThresholdfields.ptpClockThresholdconfigures how long after the PTP master clock is disconnected before PTP events are triggered.holdOverTimeoutis the time value in seconds before the PTP clock event state changes toFREERUNwhen the PTP master clock is disconnected. ThemaxOffsetThresholdandminOffsetThresholdsettings configure offset values in nanoseconds that compare against the values forCLOCK_REALTIME(phc2sys) or master offset (ptp4l). When theptp4lorphc2sysoffset value is outside this range, the PTP clock state is set toFREERUN. When the offset value is within this range, the PTP clock state is set toLOCKED.recommendSpecify an array of one or more recommendobjects that define rules on how theprofileshould be applied to nodes..recommend.profileSpecify the .recommend.profileobject name defined in theprofilesection..recommend.prioritySpecify the prioritywith an integer value between0and99. A larger number gets lower priority, so a priority of99is lower than a priority of10. If a node can be matched with multiple profiles according to rules defined in thematchfield, the profile with the higher priority is applied to that node..recommend.matchSpecify .recommend.matchrules withnodeLabelornodeNamevalues..recommend.match.nodeLabelSet nodeLabelwith thekeyof thenode.Labelsfield from the node object by using theoc get nodes --show-labelscommand. For example,node-role.kubernetes.io/worker..recommend.match.nodeNameSet nodeNamewith the value of thenode.Namefield from the node object by using theoc get nodescommand. For example,compute-1.example.com. -
Create the CR by running the following command:
$ oc create -f boundary-clock-ptp-config.yaml
Verification
- Check that the
PtpConfigprofile is applied to the node.-
Get the list of pods in the
openshift-ptpnamespace by running the following command:$ oc get pods -n openshift-ptp -o wideExample outputNAME READY STATUS RESTARTS AGE IP NODElinuxptp-daemon-4xkbb 1/1 Running 0 43m 10.1.196.24 compute-0.example.comlinuxptp-daemon-tdspf 1/1 Running 0 43m 10.1.196.25 compute-1.example.comptp-operator-657bbb64c8-2f8sj 1/1 Running 0 43m 10.129.0.61 control-plane-1.example.com -
Check that the profile is correct. Examine the logs of the
linuxptpdaemon that corresponds to the node you specified in thePtpConfigprofile. Run the following command:$ oc logs linuxptp-daemon-4xkbb -n openshift-ptp -c linuxptp-daemon-containerExample outputI1115 09:41:17.117596 4143292 daemon.go:107] in applyNodePTPProfileI1115 09:41:17.117604 4143292 daemon.go:109] updating NodePTPProfile to:I1115 09:41:17.117607 4143292 daemon.go:110] ------------------------------------I1115 09:41:17.117612 4143292 daemon.go:102] Profile Name: profile1I1115 09:41:17.117616 4143292 daemon.go:102] Interface:I1115 09:41:17.117620 4143292 daemon.go:102] Ptp4lOpts: -2I1115 09:41:17.117623 4143292 daemon.go:102] Phc2sysOpts: -a -r -n 24I1115 09:41:17.117626 4143292 daemon.go:116] ------------------------------------
-
Additional resources
- Configuring FIFO priority scheduling for PTP hardware
- Configuring the PTP fast event notifications publisher
Configuring linuxptp services as boundary clocks for dual-NIC hardware
You can configure the linuxptp services (ptp4l, phc2sys) as boundary clocks for dual-NIC hardware by creating a PtpConfig custom resource (CR) object for each NIC.
Dual NIC hardware allows you to connect each NIC to the same upstream leader clock with separate ptp4l instances for each NIC feeding the downstream clocks.
Prerequisites
- Install the OpenShift CLI (
oc). - Log in as a user with
cluster-adminprivileges. - Install the PTP Operator.
Procedure
- Create two separate
PtpConfigCRs, one for each NIC, using the reference CR in "Configuring linuxptp services as a boundary clock" as the basis for each CR. For example:-
Create
boundary-clock-ptp-config-nic1.yaml, specifying values forphc2sysOpts:apiVersion: ptp.openshift.io/v1kind: PtpConfigmetadata:name: boundary-clock-ptp-config-nic1namespace: openshift-ptpspec:profile:- name: "profile1"ptp4lOpts: "-2 --summary_interval -4"ptp4lConf: |[ens5f1]masterOnly 1[ens5f0]masterOnly 0...phc2sysOpts: "-a -r -m -n 24 -N 8 -R 16"where:
ptp4lConf- Specifies the required interfaces to start
ptp4las a boundary clock. For example,ens5f0synchronizes from a grandmaster clock andens5f1synchronizes connected devices. phc2sysOpts: "-a -r -m -n 24 -N 8 -R 16"- Sets the required
phc2sysOptsvalues.-mprints messages tostdout. Thelinuxptp-daemonDaemonSetparses the logs and generates Prometheus metrics.
-
Create
boundary-clock-ptp-config-nic2.yaml, removing thephc2sysOptsfield altogether to disable thephc2sysservice for the second NIC:apiVersion: ptp.openshift.io/v1kind: PtpConfigmetadata:name: boundary-clock-ptp-config-nic2namespace: openshift-ptpspec:profile:- name: "profile2"ptp4lOpts: "-2 --summary_interval -4"ptp4lConf: |[ens7f1]masterOnly 1[ens7f0]masterOnly 0...Specify the required interfaces to start
ptp4las a boundary clock on the second NIC.noteYou must completely remove the
phc2sysOptsfield from the secondPtpConfigCR to disable thephc2sysservice on the second NIC.
-
- Create the dual-NIC
PtpConfigCRs by running the following commands:- Create the CR that configures PTP for the first NIC:
$ oc create -f boundary-clock-ptp-config-nic1.yaml
- Create the CR that configures PTP for the second NIC:
$ oc create -f boundary-clock-ptp-config-nic2.yaml
- Create the CR that configures PTP for the first NIC:
Verification
-
Check that the PTP Operator has applied the
PtpConfigCRs for both NICs. Examine the logs for thelinuxptpdaemon corresponding to the node that has the dual-NIC hardware installed. For example, run the following command:$ oc logs linuxptp-daemon-cvgr6 -n openshift-ptp -c linuxptp-daemon-containerExample outputptp4l[80828.335]: [ptp4l.1.config] master offset 5 s2 freq -5727 path delay 519ptp4l[80828.343]: [ptp4l.0.config] master offset -5 s2 freq -10607 path delay 533phc2sys[80828.390]: [ptp4l.0.config] CLOCK_REALTIME phc offset 1 s2 freq -87239 delay 539
Configuring linuxptp as a highly available system clock for dual-NIC Intel E810 PTP boundary clocks
You can configure the linuxptp services ptp4l and phc2sys as a highly available (HA) system clock for dual PTP boundary clocks (T-BC).
The highly available system clock uses multiple time sources from dual-NIC Intel E810 Salem channel hardware configured as two boundary clocks. Two boundary clocks instances participate in the HA setup, each with its own configuration profile. You connect each NIC to the same upstream leader clock with separate ptp4l instances for each NIC feeding the downstream clocks.
Create two PtpConfig custom resource (CR) objects that configure the NICs as T-BC and a third PtpConfig CR that configures high availability between the two NICs.
You set phc2SysOpts options once in the PtpConfig CR that configures HA. Set the phc2sysOpts field to an empty string in the PtpConfig CRs that configure the two NICs. This prevents individual phc2sys processes from being set up for the two profiles.
The third PtpConfig CR configures a highly available system clock service. The CR sets the ptp4lOpts field to an empty string to prevent the ptp4l process from running. The CR adds profiles for the ptp4l configurations under the spec.profile.ptpSettings.haProfiles key and passes the kernel socket path of those profiles to the phc2sys service. When a ptp4l failure occurs, the phc2sys service switches to the backup ptp4l configuration. When the primary profile becomes active again, the phc2sys service reverts to the original state.
Ensure that you set spec.recommend.priority to the same value for all three PtpConfig CRs that you use to configure HA.
Prerequisites
- Install the OpenShift CLI (
oc). - Log in as a user with
cluster-adminprivileges. - Install the PTP Operator.
- Configure a cluster node with Intel E810 Salem channel dual-NIC.
Procedure
- Create two separate
PtpConfigCRs, one for each NIC, using the CRs in "Configuring linuxptp services as boundary clocks for dual-NIC hardware" as a reference for each CR.-
Create the
ha-ptp-config-nic1.yamlfile, specifying an empty string for thephc2sysOptsfield. For example:apiVersion: ptp.openshift.io/v1kind: PtpConfigmetadata:name: ha-ptp-config-nic1namespace: openshift-ptpspec:profile:- name: "ha-ptp-config-profile1"ptp4lOpts: "-2 --summary_interval -4"ptp4lConf: |[ens5f1]masterOnly 1[ens5f0]masterOnly 0#...phc2sysOpts: ""where:
ptp4lConf- Specifies the required interfaces to start
ptp4las a boundary clock. For example,ens5f0synchronizes from a grandmaster clock andens5f1synchronizes connected devices. phc2sysOpts: ""- Sets
phc2sysOptswith an empty string. These values are populated from thespec.profile.ptpSettings.haProfilesfield of thePtpConfigCR that configures high availability.
-
Apply the
PtpConfigCR for NIC 1 by running the following command:$ oc create -f ha-ptp-config-nic1.yaml -
Create the
ha-ptp-config-nic2.yamlfile, specifying an empty string for thephc2sysOptsfield. For example:apiVersion: ptp.openshift.io/v1kind: PtpConfigmetadata:name: ha-ptp-config-nic2namespace: openshift-ptpspec:profile:- name: "ha-ptp-config-profile2"ptp4lOpts: "-2 --summary_interval -4"ptp4lConf: |[ens7f1]masterOnly 1[ens7f0]masterOnly 0#...phc2sysOpts: "" -
Apply the
PtpConfigCR for NIC 2 by running the following command:$ oc create -f ha-ptp-config-nic2.yaml
-
- Create the
PtpConfigCR that configures the HA system clock. For example:-
Create the
ptp-config-for-ha.yamlfile. SethaProfilesto match themetadata.namefields that are set in thePtpConfigCRs that configure the two NICs. For example:haProfiles: ha-ptp-config-nic1,ha-ptp-config-nic2apiVersion: ptp.openshift.io/v1kind: PtpConfigmetadata:name: boundary-hanamespace: openshift-ptpannotations: {}spec:profile:- name: "boundary-ha"ptp4lOpts: ""phc2sysOpts: "-a -r -n 24"ptpSchedulingPolicy: SCHED_FIFOptpSchedulingPriority: 10ptpSettings:logReduce: "true"haProfiles: "$profile1,$profile2"recommend:- profile: "boundary-ha"priority: 4match:- nodeLabel: "node-role.kubernetes.io/$mcp"Set the
ptp4lOptsfield to an empty string. If it is not empty, thep4ptlprocess starts with a critical error.warningDo not apply the high availability
PtpConfigCR before thePtpConfigCRs that configure the individual NICs. -
Apply the HA
PtpConfigCR by running the following command:$ oc create -f ptp-config-for-ha.yaml
-
Verification
- Verify that the PTP Operator has applied the
PtpConfigCRs correctly. Perform the following steps:-
Get the list of pods in the
openshift-ptpnamespace by running the following command:$ oc get pods -n openshift-ptp -o wideExample outputNAME READY STATUS RESTARTS AGE IP NODElinuxptp-daemon-4xkrb 1/1 Running 0 43m 10.1.196.24 compute-0.example.comptp-operator-657bbq64c8-2f8sj 1/1 Running 0 43m 10.129.0.61 control-plane-1.example.comnoteThere should be only one
linuxptp-daemonpod. -
Check that the profile is correct by running the following command. Examine the logs of the
linuxptpdaemon that corresponds to the node you specified in thePtpConfigprofile.$ oc logs linuxptp-daemon-4xkrb -n openshift-ptp -c linuxptp-daemon-containerExample outputI1115 09:41:17.117596 4143292 daemon.go:107] in applyNodePTPProfileI1115 09:41:17.117604 4143292 daemon.go:109] updating NodePTPProfile to:I1115 09:41:17.117607 4143292 daemon.go:110] ------------------------------------I1115 09:41:17.117612 4143292 daemon.go:102] Profile Name: ha-ptp-config-profile1I1115 09:41:17.117616 4143292 daemon.go:102] Interface:I1115 09:41:17.117620 4143292 daemon.go:102] Ptp4lOpts: -2I1115 09:41:17.117623 4143292 daemon.go:102] Phc2sysOpts: -a -r -n 24I1115 09:41:17.117626 4143292 daemon.go:116] ------------------------------------
-
Boundary clocks without holdover on Intel Granite Rapids-D hardware
Intel Granite Rapids-D (GNR-D) server platforms support Precision Time Protocol (PTP) boundary clock (BC) deployments without holdover for high-density Radio Access Network (RAN) sites that use onboard Network Acceleration Complex (NAC) ports and optional Carter Flat expansion network interface cards (NICs).
In a BC deployment, one time receiver (TR) port synchronizes to an upstream timing source while time transmitter (TT) ports distribute synchronized time to downstream devices. GNR-D platforms use platform-specific PtpConfig plugin configurations and internal timing paths.
Before you configure a BC profile on GNR-D hardware, verify that your qualified hardware layout, interface naming, and plugin configuration align with your deployment requirements.
GNR-D BC deployments use onboard NAC ports as the primary timing controller and can extend timing distribution by using optional Carter Flat expansion NICs.
GNR-D platforms route synchronization internally instead of using external timing cabling.
Your qualified hardware layout determines the available TR and TT port roles across NAC ports and optional Carter Flat expansion cards.
Boundary clock without holdover behavior
GNR-D boundary clock deployments on Carter Flat hardware do not maintain time synchronization if the upstream timing source becomes unavailable. This deployment model operates without monitored holdover because Carter Flat hardware does not expose sufficient follower digital phase-locked loop (DPLL) accuracy information for holdover support.
To maintain synchronization, keep a continuous connection to a qualified upstream PTP source.
Red Hat tools can detect follower DPLL lock state, but they cannot monitor the detailed follower DPLL accuracy that holdover support requires.
When you configure a BC profile on GNR-D hardware that uses Carter Flat NICs, disable holdover.
Configuring linuxptp services as a boundary clock without holdover on Intel Granite Rapids-D hardware
Use this procedure to configure a Precision Time Protocol (PTP) boundary clock (BC) profile without holdover on Intel Granite Rapids-D (GNR-D) hardware that uses onboard Network Acceleration Complex (NAC) ports and optional Carter Flat expansion network interface cards (NICs).
In this deployment, one time receiver (TR) port synchronizes to an upstream timing source and time transmitter (TT) ports distribute synchronized time downstream.
GNR-D BC deployments that use Carter Flat NICs operate without monitored holdover. Disable holdover in your PtpConfig profile.
Prerequisites
- You have installed the OpenShift CLI (
oc). - You are logged in as a user with
cluster-adminprivileges. - You have installed the PTP Operator.
- You have verified your qualified GNR-D hardware layout, including NAC ports, Carter Flat ports, and TR/TT role assignments.
- You have verified interface naming and plugin device alignment for your hardware layout.
Procedure
-
Create a
PtpConfigcustom resource (CR) that matches your qualified GNR-D BC without holdover hardware layout:apiVersion: ptp.openshift.io/v1kind: PtpConfigmetadata:name: gnrd-bcnamespace: openshift-ptpannotations:ran.openshift.io/ztp-deploy-wave: "10"spec:profile:- name: 00-bc-ttptp4lConf: |# All TimeTransmitter ports should be outlined here with 'masterOnly 1'#[eno8303]# ** Host management interface[eno8403]masterOnly 1#[eno8503]# ** TR port (see 01-bc-tr profile)[eno8603]masterOnly 1[eno8703]masterOnly 1[eno8803]masterOnly 1[eno8903]masterOnly 1[eno9003]masterOnly 1[enp108s0f0]masterOnly 1[enp108s0f1]masterOnly 1[enp108s0f2]masterOnly 1[enp108s0f3]masterOnly 1[enp108s0f4]masterOnly 1[enp108s0f5]masterOnly 1[enp108s0f6]masterOnly 1[enp108s0f7]masterOnly 1[enp110s0f0]masterOnly 1[enp110s0f1]masterOnly 1[enp110s0f2]masterOnly 1[enp110s0f3]masterOnly 1[enp110s0f4]masterOnly 1[enp110s0f5]masterOnly 1[enp110s0f6]masterOnly 1[enp110s0f7]masterOnly 1[global]## Default Data Set#twoStepFlag 1slaveOnly 0priority1 128priority2 128domainNumber 24#utc_offset 37clockClass 248clockAccuracy 0xFEoffsetScaledLogVariance 0xFFFFfree_running 0freq_est_interval 1dscp_event 0dscp_general 0dataset_comparison G.8275.xG.8275.defaultDS.localPriority 128## Port Data Set#logAnnounceInterval -3logSyncInterval -4logMinDelayReqInterval -4logMinPdelayReqInterval -4announceReceiptTimeout 3syncReceiptTimeout 0delayAsymmetry 0fault_reset_interval -4neighborPropDelayThresh 20000000masterOnly 0G.8275.portDS.localPriority 128## Run time options#assume_two_step 0logging_level 6path_trace_enabled 0follow_up_info 0hybrid_e2e 0inhibit_multicast_service 0net_sync_monitor 0tc_spanning_tree 0tx_timestamp_timeout 50unicast_listen 0unicast_master_table 0unicast_req_duration 3600use_syslog 1verbose 0summary_interval 0kernel_leap 1check_fup_sync 0clock_class_threshold 135## Servo Options## NGEN TEST MODIFIED# New:# pi_proportional_const 0.60# pi_integral_const 0.0003# Old:# pi_proportional_const 0.0# pi_integral_const 0.0# END TEST MODpi_proportional_const 0.60pi_integral_const 0.001pi_proportional_scale 0.0pi_proportional_exponent -0.3pi_proportional_norm_max 0.7pi_integral_scale 0.0pi_integral_exponent 0.4pi_integral_norm_max 0.3step_threshold 2.0# end T-BC experimentfirst_step_threshold 0.00002max_frequency 900000000clock_servo pisanity_freq_limit 200000000ntpshm_segment 0## Transport options#transportSpecific 0x0ptp_dst_mac 01:1B:19:00:00:00p2p_dst_mac 01:80:C2:00:00:0Eudp_ttl 1udp6_scope 0x0Euds_address /var/run/ptp4l## Default interface options#clock_type BCnetwork_transport L2delay_mechanism E2Etime_stamping hardwaretsproc_mode filterdelay_filter moving_mediandelay_filter_length 10egressLatency 0ingressLatency 0boundary_clock_jbod 1## Clock description#productDescription ;;revisionData ;;manufacturerIdentity 00:00:00userDescription ;timeSource 0xA0ptp4lOpts: -2 --summary_interval -4ptpSchedulingPolicy: SCHED_FIFOptpSchedulingPriority: 10ptpSettings:controllingProfile: 01-bc-trlogReduce: "true"- name: 01-bc-trphc2sysOpts: -r -n 24 -N 8 -R 16 -u 0 -m -s $upstreamInterfaceptp4lConf: |[$upstreamInterface]masterOnly 0[global]## Default Data Set#twoStepFlag 1slaveOnly 0priority1 128priority2 128domainNumber 24#utc_offset 37clockClass 248clockAccuracy 0xFEoffsetScaledLogVariance 0xFFFFfree_running 0freq_est_interval 1dscp_event 0dscp_general 0dataset_comparison G.8275.xG.8275.defaultDS.localPriority 128## Port Data Set#logAnnounceInterval -3logSyncInterval -4logMinDelayReqInterval -4logMinPdelayReqInterval -4announceReceiptTimeout 3syncReceiptTimeout 0delayAsymmetry 0fault_reset_interval -4neighborPropDelayThresh 20000000masterOnly 0G.8275.portDS.localPriority 128## Run time options#assume_two_step 0logging_level 6path_trace_enabled 0follow_up_info 0hybrid_e2e 0inhibit_multicast_service 0net_sync_monitor 0tc_spanning_tree 0tx_timestamp_timeout 50unicast_listen 0unicast_master_table 0unicast_req_duration 3600use_syslog 1verbose 0summary_interval 0kernel_leap 1check_fup_sync 0clock_class_threshold 135## Servo Options## NGEN TEST MODIFIED# New:# pi_proportional_const 0.60# pi_integral_const 0.0003# Old:# pi_proportional_const 0.0# pi_integral_const 0.0# END TEST MODpi_proportional_const 0.60pi_integral_const 0.001pi_proportional_scale 0.0pi_proportional_exponent -0.3pi_proportional_norm_max 0.7pi_integral_scale 0.0pi_integral_exponent 0.4pi_integral_norm_max 0.3step_threshold 2.0# end T-BC experimentfirst_step_threshold 0.00002max_frequency 900000000clock_servo pisanity_freq_limit 200000000ntpshm_segment 0## Transport options#transportSpecific 0x0ptp_dst_mac 01:1B:19:00:00:00p2p_dst_mac 01:80:C2:00:00:0Eudp_ttl 1udp6_scope 0x0Euds_address /var/run/ptp4l## Default interface options#clock_type OCnetwork_transport L2delay_mechanism E2Etime_stamping hardwaretsproc_mode filterdelay_filter moving_mediandelay_filter_length 10egressLatency 0ingressLatency 0boundary_clock_jbod 1## Clock description#productDescription ;;revisionData ;;manufacturerIdentity 00:00:00userDescription ;timeSource 0xA0ptp4lOpts: -2 --summary_interval -4ptpSchedulingPolicy: SCHED_FIFOptpSchedulingPriority: 10ptpSettings:clockType: T-BCinSyncConditionThreshold: "10"inSyncConditionTimes: "12"logReduce: "true"leadingInterface: eno8703upstreamPort: $upstreamInterfaceplugins:e825:devices:- eno8703settings:LocalMaxHoldoverOffSet: 500LocalHoldoverTimeout: 0MaxInSpecOffset: 100e830:devices:- enp108s0f0- enp110s0f0ts2phcConf: |[global]use_syslog 0verbose 1logging_level 7ts2phc.pulsewidth 500000000leapfile /usr/share/zoneinfo/leap-seconds.listdomainNumber 24uds_address /var/run/ptp4l.1.socket[eno8703]ts2phc.extts_correction 0ts2phc.master 0ts2phc.channel 0ts2phc.pin_index 1# This should be one section per Carter Flats (e830) card:[enp108s0f0]ts2phc.extts_polarity risingts2phc.extts_correction 0ts2phc.master 0ts2phc.channel 0ts2phc.pin_index 1[enp110s0f0]ts2phc.extts_polarity risingts2phc.extts_correction 0ts2phc.master 0ts2phc.channel 0ts2phc.pin_index 1ts2phcOpts: -s generic -a --ts2phc.rh_external_pps 1recommend:- match:- nodeLabel: node-role.kubernetes.io/$mcppriority: 4profile: 00-bc-tt- match:- nodeLabel: node-role.kubernetes.io/$mcppriority: 4profile: 01-bc-trwhere:
- TR interface
- Specifies the interface that synchronizes to the upstream timing source. Replace this value with the qualified TR interface from your site bill of materials.
- TT interfaces
- Specify the interfaces that distribute synchronized time downstream. Replace these values with the qualified TT interfaces for your deployment.
plugins.e825.devices- Specifies the qualified NAC interfaces for your hardware layout.
plugins.e830.devices- Specifies the qualified Carter Flat interfaces for your hardware layout, if installed.
ptp4lConf- Defines BC timing behavior, including TR and TT interface roles.
ts2phcConf- Defines timing synchronization behavior for qualified hardware devices.
recommend- Specifies the machine config pool that selects the target DU nodes. Replace placeholder values with the machine config pool label for your deployment.
- Apply the
PtpConfigCR:$ oc apply -f <name_of_the_ptpconfig_yaml_file>
Verification
- Verify that the
PtpConfigprofile is applied:$ oc get ptpconfig -n openshift-ptp - Verify that the
linuxptpdaemon is running on the target node:$ oc get pods -n openshift-ptp -o wide - Review
linuxptpdaemon logs for BC status:$ oc logs <linuxptp_daemon_pod> -n openshift-ptp -c linuxptp-daemon-container - Verify the following:
- The TR port synchronizes successfully to the upstream timing source.
- TT ports distribute timing downstream.
- The deployed BC profile operates without holdover.
Configuring linuxptp services as an ordinary clock
You can configure linuxptp services (ptp4l, phc2sys) as ordinary clock by creating a PtpConfig custom resource (CR) object.
Use the following example PtpConfig CR as the basis to configure linuxptp services as an ordinary clock for your particular hardware and environment. This example CR does not configure PTP fast events. To configure PTP fast events, set appropriate values for ptp4lOpts, ptp4lConf, and ptpClockThreshold. ptpClockThreshold is required only when events are enabled. See "Configuring the PTP fast event notifications publisher" for more information.
Prerequisites
- Install the OpenShift CLI (
oc). - Log in as a user with
cluster-adminprivileges. - Install the PTP Operator.
Procedure
-
Create the following
PtpConfigCR, and then save the YAML in theordinary-clock-ptp-config.yamlfile.Example PTP ordinary clock configurationapiVersion: ptp.openshift.io/v1kind: PtpConfigmetadata:name: ordinary-clocknamespace: openshift-ptpannotations: {}spec:profile:- name: ordinary-clock# The interface name is hardware-specificinterface: $interfaceptp4lOpts: "-2 -s"phc2sysOpts: "-a -r -n 24"ptpSchedulingPolicy: SCHED_FIFOptpSchedulingPriority: 10ptpSettings:logReduce: "true"ptp4lConf: |[global]## Default Data Set#twoStepFlag 1slaveOnly 1priority1 128priority2 128domainNumber 24#utc_offset 37clockClass 255clockAccuracy 0xFEoffsetScaledLogVariance 0xFFFFfree_running 0freq_est_interval 1dscp_event 0dscp_general 0dataset_comparison G.8275.xG.8275.defaultDS.localPriority 128## Port Data Set#logAnnounceInterval -3logSyncInterval -4logMinDelayReqInterval -4logMinPdelayReqInterval -4announceReceiptTimeout 3syncReceiptTimeout 0delayAsymmetry 0fault_reset_interval -4neighborPropDelayThresh 20000000masterOnly 0G.8275.portDS.localPriority 128## Run time options#assume_two_step 0logging_level 6path_trace_enabled 0follow_up_info 0hybrid_e2e 0inhibit_multicast_service 0net_sync_monitor 0tc_spanning_tree 0tx_timestamp_timeout 50unicast_listen 0unicast_master_table 0unicast_req_duration 3600use_syslog 1verbose 0summary_interval 0kernel_leap 1check_fup_sync 0clock_class_threshold 7## Servo Options#pi_proportional_const 0.0pi_integral_const 0.0pi_proportional_scale 0.0pi_proportional_exponent -0.3pi_proportional_norm_max 0.7pi_integral_scale 0.0pi_integral_exponent 0.4pi_integral_norm_max 0.3step_threshold 2.0first_step_threshold 0.00002max_frequency 900000000clock_servo pisanity_freq_limit 200000000ntpshm_segment 0## Transport options#transportSpecific 0x0ptp_dst_mac 01:1B:19:00:00:00p2p_dst_mac 01:80:C2:00:00:0Eudp_ttl 1udp6_scope 0x0Euds_address /var/run/ptp4l## Default interface options#clock_type OCnetwork_transport L2delay_mechanism E2Etime_stamping hardwaretsproc_mode filterdelay_filter moving_mediandelay_filter_length 10egressLatency 0ingressLatency 0boundary_clock_jbod 0## Clock description#productDescription ;;revisionData ;;manufacturerIdentity 00:00:00userDescription ;timeSource 0xA0recommend:- profile: ordinary-clockpriority: 4match:- nodeLabel: "node-role.kubernetes.io/$mcp"PTP ordinary clock CR configuration options
CR field Description nameThe name of the PtpConfigCR.profileSpecify an array of one or more profileobjects. Each profile must be uniquely named.interfaceSpecify the network interface to be used by the ptp4lservice, for exampleens787f1.ptp4lOptsSpecify system config options for the ptp4lservice, for example-2to select the IEEE 802.3 network transport. The options should not include the network interface name-i <interface>and service config file-f /etc/ptp4l.confbecause the network interface name and the service config file are automatically appended. Append--summary_interval -4to use PTP fast events with this interface.phc2sysOptsSpecify system config options for the phc2sysservice. If this field is empty, the PTP Operator does not start thephc2sysservice. For Intel Columbiaville 800 Series NICs, setphc2sysOptsoptions to-a -r -m -n 24 -N 8 -R 16.-mprints messages tostdout. Thelinuxptp-daemonDaemonSetparses the logs and generates Prometheus metrics.ptp4lConfSpecify a string that contains the configuration to replace the default /etc/ptp4l.conffile. To use the default configuration, leave the field empty.tx_timestamp_timeoutFor Intel Columbiaville 800 Series NICs, set tx_timestamp_timeoutto50.boundary_clock_jbodFor Intel Columbiaville 800 Series NICs, set boundary_clock_jbodto0.ptpSchedulingPolicyScheduling policy for ptp4landphc2sysprocesses. Default value isSCHED_OTHER. UseSCHED_FIFOon systems that support FIFO scheduling.ptpSchedulingPriorityInteger value from 1-65 used to set FIFO priority for ptp4landphc2sysprocesses whenptpSchedulingPolicyis set toSCHED_FIFO. TheptpSchedulingPriorityfield is not used whenptpSchedulingPolicyis set toSCHED_OTHER.ptpClockThresholdOptional. If ptpClockThresholdis not present, default values are used for theptpClockThresholdfields.ptpClockThresholdconfigures how long after the PTP master clock is disconnected before PTP events are triggered.holdOverTimeoutis the time value in seconds before the PTP clock event state changes toFREERUNwhen the PTP master clock is disconnected. ThemaxOffsetThresholdandminOffsetThresholdsettings configure offset values in nanoseconds that compare against the values forCLOCK_REALTIME(phc2sys) or master offset (ptp4l). When theptp4lorphc2sysoffset value is outside this range, the PTP clock state is set toFREERUN. When the offset value is within this range, the PTP clock state is set toLOCKED.recommendSpecify an array of one or more recommendobjects that define rules on how theprofileshould be applied to nodes..recommend.profileSpecify the .recommend.profileobject name defined in theprofilesection..recommend.prioritySet .recommend.priorityto0for ordinary clock..recommend.matchSpecify .recommend.matchrules withnodeLabelornodeNamevalues..recommend.match.nodeLabelSet nodeLabelwith thekeyof thenode.Labelsfield from the node object by using theoc get nodes --show-labelscommand. For example,node-role.kubernetes.io/worker..recommend.match.nodeNameSet nodeNamewith the value of thenode.Namefield from the node object by using theoc get nodescommand. For example,compute-1.example.com. -
Create the
PtpConfigCR by running the following command:$ oc create -f ordinary-clock-ptp-config.yaml
Verification
- Check that the
PtpConfigprofile is applied to the node.-
Get the list of pods in the
openshift-ptpnamespace by running the following command:$ oc get pods -n openshift-ptp -o wideExample outputNAME READY STATUS RESTARTS AGE IP NODElinuxptp-daemon-4xkbb 1/1 Running 0 43m 10.1.196.24 compute-0.example.comlinuxptp-daemon-tdspf 1/1 Running 0 43m 10.1.196.25 compute-1.example.comptp-operator-657bbb64c8-2f8sj 1/1 Running 0 43m 10.129.0.61 control-plane-1.example.com -
Check that the profile is correct. Examine the logs of the
linuxptpdaemon that corresponds to the node you specified in thePtpConfigprofile. Run the following command:$ oc logs linuxptp-daemon-4xkbb -n openshift-ptp -c linuxptp-daemon-containerExample outputI1115 09:41:17.117596 4143292 daemon.go:107] in applyNodePTPProfileI1115 09:41:17.117604 4143292 daemon.go:109] updating NodePTPProfile to:I1115 09:41:17.117607 4143292 daemon.go:110] ------------------------------------I1115 09:41:17.117612 4143292 daemon.go:102] Profile Name: profile1I1115 09:41:17.117616 4143292 daemon.go:102] Interface: ens787f1I1115 09:41:17.117620 4143292 daemon.go:102] Ptp4lOpts: -2 -sI1115 09:41:17.117623 4143292 daemon.go:102] Phc2sysOpts: -a -r -n 24I1115 09:41:17.117626 4143292 daemon.go:116] ------------------------------------
-
Additional resources
- Configuring FIFO priority scheduling for PTP hardware
- Configuring the PTP fast event notifications publisher
Intel Columbiaville E800 series NIC as PTP ordinary clock reference
The following table describes the changes that you must make to the reference PTP configuration to use Intel Columbiaville E800 series NICs as ordinary clocks. Make the changes in a PtpConfig custom resource (CR) that you apply to the cluster.
Recommended PTP settings for Intel Columbiaville NIC
| PTP configuration | Recommended setting |
|---|---|
phc2sysOpts | -a -r -m -n 24 -N 8 -R 16 |
tx_timestamp_timeout | 50 |
boundary_clock_jbod | 0 |
For phc2sysOpts, -m prints messages to stdout. The linuxptp-daemon DaemonSet parses the logs and generates Prometheus metrics.
Configuring linuxptp services as an ordinary clock with dual-port NIC redundancy
You can configure linuxptp services (ptp4l, phc2sys) as an ordinary clock with dual-port NIC redundancy by creating a PtpConfig custom resource (CR) object.
In a dual-port NIC configuration for an ordinary clock, if one port fails, the standby port takes over, maintaining PTP timing synchronization.
Configuring linuxptp services as an ordinary clock with dual-port NIC redundancy is a Technology Preview feature only. Technology Preview features are not supported with Red Hat production service level agreements (SLAs) and might not be functionally complete. Red Hat does not recommend using them in production. These features provide early access to upcoming product features, enabling customers to test functionality and provide feedback during the development process.
For more information about the support scope of Red Hat Technology Preview features, see Technology Preview Features Support Scope.
Prerequisites
- Install the OpenShift CLI (
oc). - Log in as a user with
cluster-adminprivileges. - Install the PTP Operator.
- Check the hardware requirements for using your dual-port NIC as an ordinary clock with added redundancy. For further information, see "Using dual-port NICs to improve redundancy for PTP ordinary clocks".
Procedure
-
Create the following
PtpConfigCR, and then save the YAML in theoc-dual-port-ptp-config.yamlfile.Example PTP ordinary clock dual-port configurationapiVersion: ptp.openshift.io/v1kind: PtpConfigmetadata:name: ordinary-clock-1namespace: openshift-ptpspec:profile:- name: oc-dual-portphc2sysOpts: -a -r -n 24 -N 8 -R 16 -u 0ptp4lConf: |-[ens3f2]masterOnly 0[ens3f3]masterOnly 0[global]## Default Data Set#slaveOnly 1#...where:
phc2sysOpts: -a -r -n 24 -N 8 -R 16 -u 0- Specifies the system config options for the
phc2sysservice. ptp4lConf- Specifies the interface configuration for the
ptp4lservice. In this example, settingmasterOnly 0for theens3f2andens3f3interfaces enables both ports on theens3interface to run as leader or follower clocks. In combination with theslaveOnly 1specification, this configuration ensures one port operates as the active ordinary clock, and the other port operates as a standby ordinary clock in theListeningport state. slaveOnly 1- Configures
ptp4lto run as an ordinary clock only.
-
Create the
PtpConfigCR by running the following command:$ oc create -f oc-dual-port-ptp-config.yaml
Verification
- Check that the
PtpConfigprofile is applied to the node.-
Get the list of pods in the
openshift-ptpnamespace by running the following command:$ oc get pods -n openshift-ptp -o wideExample outputNAME READY STATUS RESTARTS AGE IP NODElinuxptp-daemon-4xkbb 1/1 Running 0 43m 10.1.196.24 compute-0.example.comlinuxptp-daemon-tdspf 1/1 Running 0 43m 10.1.196.25 compute-1.example.comptp-operator-657bbb64c8-2f8sj 1/1 Running 0 43m 10.129.0.61 control-plane-1.example.com -
Check that the profile is correct. Examine the logs of the
linuxptpdaemon that corresponds to the node you specified in thePtpConfigprofile. Run the following command:$ oc logs linuxptp-daemon-4xkbb -n openshift-ptp -c linuxptp-daemon-containerExample outputI1115 09:41:17.117596 4143292 daemon.go:107] in applyNodePTPProfileI1115 09:41:17.117604 4143292 daemon.go:109] updating NodePTPProfile to:I1115 09:41:17.117607 4143292 daemon.go:110] ------------------------------------I1115 09:41:17.117612 4143292 daemon.go:102] Profile Name: oc-dual-portI1115 09:41:17.117616 4143292 daemon.go:102] Interface: ens787f1I1115 09:41:17.117620 4143292 daemon.go:102] Ptp4lOpts: -2 --summary_interval -4I1115 09:41:17.117623 4143292 daemon.go:102] Phc2sysOpts: -a -r -n 24 -N 8 -R 16 -u 0I1115 09:41:17.117626 4143292 daemon.go:116] ------------------------------------
-
Additional resources
- Configuring linuxptp services as ordinary clock
- Using dual-port NICs to improve redundancy for PTP ordinary clocks
Configuring FIFO priority scheduling for PTP hardware
In telco or other deployment types that require low latency performance, PTP daemon threads run in a constrained CPU footprint alongside the rest of the infrastructure components. By default, PTP threads run with the SCHED_OTHER policy. Under high load, these threads might not get the scheduling latency they require for error-free operation.
To mitigate against potential scheduling latency errors, you can configure the PTP Operator linuxptp services to allow threads to run with a SCHED_FIFO policy. If SCHED_FIFO is set for a PtpConfig CR, then ptp4l and phc2sys will run in the parent container under chrt with a priority set by the ptpSchedulingPriority field of the PtpConfig CR.
Setting ptpSchedulingPolicy is optional, and is only required if you are experiencing latency errors.
Procedure
-
Edit the
PtpConfigCR profile:$ oc edit PtpConfig -n openshift-ptp -
Change the
ptpSchedulingPolicyandptpSchedulingPriorityfields:apiVersion: ptp.openshift.io/v1kind: PtpConfigmetadata:name: <ptp_config_name>namespace: openshift-ptp...spec:profile:- name: "profile1"...ptpSchedulingPolicy: SCHED_FIFOptpSchedulingPriority: 10where:
ptpSchedulingPolicy: SCHED_FIFO- Sets the scheduling policy for
ptp4landphc2sysprocesses. UseSCHED_FIFOon systems that support FIFO scheduling. ptpSchedulingPriority: 10- Sets the integer value 1-65 used to configure FIFO priority for
ptp4landphc2sysprocesses.
-
Save and exit to apply the changes to the
PtpConfigCR.
Verification
-
Get the name of the
linuxptp-daemonpod and corresponding node where thePtpConfigCR has been applied:$ oc get pods -n openshift-ptp -o wideExample outputNAME READY STATUS RESTARTS AGE IP NODElinuxptp-daemon-gmv2n 3/3 Running 0 1d17h 10.1.196.24 compute-0.example.comlinuxptp-daemon-lgm55 3/3 Running 0 1d17h 10.1.196.25 compute-1.example.comptp-operator-3r4dcvf7f4-zndk7 1/1 Running 0 1d7h 10.129.0.61 control-plane-1.example.com -
Check that the
ptp4lprocess is running with the updatedchrtFIFO priority:$ oc -n openshift-ptp logs linuxptp-daemon-lgm55 -c linuxptp-daemon-container|grep chrtExample outputI1216 19:24:57.091872 1600715 daemon.go:285] /bin/chrt -f 65 /usr/sbin/ptp4l -f /var/run/ptp4l.0.config -2 --summary_interval -4 -m
Configuring PTP log reduction
The linuxptp-daemon generates logs that you can use for debugging purposes. In telco or other deployment types that feature a limited storage capacity, these logs can add to the storage demand. Currently, the default logging rate is high, causing logs to rotate out in under 24 hours, which makes it difficult to track changes and identify problems.
You can achieve basic log reduction by configuring the PtpConfig custom resource (CR) to exclude log messages that report the master offset value. The master offset log message reports the difference between the clock of the current node and the master clock in nanoseconds. However, with this method, there is no summary status of filtered logs. The enhanced log reduction feature allows you to configure the logging rate of PTP logs. You can set a specific logging rate, which can help reduce the volume of logs generated by the linuxptp-daemon while still retaining essential information for troubleshooting. With the enhanced log reduction feature, you can also specify a threshold that still displays the offset logs if the offset is higher than that threshold.
Configuring log filtering for PTP
Modify the PtpConfig custom resource (CR) to configure basic log filtering and exclude log messages that report the master offset value.
Prerequisites
- Install the OpenShift CLI (
oc). - Log in as a user with
cluster-adminprivileges. - Install the PTP Operator.
Procedure
-
Edit the
PtpConfigCR:$ oc edit PtpConfig -n openshift-ptp -
In
spec.profile, add theptpSettings.logReducespecification and set the value totrue:apiVersion: ptp.openshift.io/v1kind: PtpConfigmetadata:name: <ptp_config_name>namespace: openshift-ptp...spec:profile:- name: "profile1"...ptpSettings:logReduce: "true"noteFor debugging purposes, you can revert this specification to
Falseto include the master offset messages. -
Save and exit to apply the changes to the
PtpConfigCR.
Verification
-
Get the name of the
linuxptp-daemonpod and corresponding node where thePtpConfigCR has been applied:$ oc get pods -n openshift-ptp -o wideExample outputNAME READY STATUS RESTARTS AGE IP NODElinuxptp-daemon-gmv2n 3/3 Running 0 1d17h 10.1.196.24 compute-0.example.comlinuxptp-daemon-lgm55 3/3 Running 0 1d17h 10.1.196.25 compute-1.example.comptp-operator-3r4dcvf7f4-zndk7 1/1 Running 0 1d7h 10.129.0.61 control-plane-1.example.com -
Verify that master offset messages are excluded from the logs by running the following command:
$ oc -n openshift-ptp logs <linux_daemon_container> -c linuxptp-daemon-container | grep "master offset"<linux_daemon_container>is the name of thelinuxptp-daemonpod, for examplelinuxptp-daemon-gmv2n. When you configure thelogReducespecification, this command does not report any instances ofmaster offsetin the logs of thelinuxptpdaemon.
Configuring enhanced PTP log reduction
Basic log reduction effectively filters out frequent logs. However, if you want a periodic summary of the filtered logs, use the enhanced log reduction feature.
Prerequisites
- Install the OpenShift CLI (
oc). - Log in as a user with
cluster-adminprivileges. - Install the PTP Operator.
Procedure
-
Edit the
PtpConfigcustom resource (CR):$ oc edit PtpConfig -n openshift-ptp -
Add the
ptpSettings.logReducespecification in thespec.profilesection, and set the value toenhanced:apiVersion: ptp.openshift.io/v1kind: PtpConfigmetadata:name: <ptp_config_name>namespace: openshift-ptp...spec:profile:- name: "profile1"...ptpSettings:logReduce: "enhanced" -
Optional: Configure the interval for summary logs and a threshold in nanoseconds for the master offset logs. For example, to set the interval to 60 seconds and the threshold to 100 nanoseconds, add the
ptpSettings.logReducespecification in thespec.profilesection and set the value toenhanced 60s 100.apiVersion: ptp.openshift.io/v1kind: PtpConfigmetadata:name: <ptp_config_name>namespace: openshift-ptpspec:profile:- name: "profile1"ptpSettings:logReduce: "enhanced 60s 100"- By default, the
linuxptp-daemonis configured to generate summary logs every 30 seconds if no value is specified. In the example configuration, the daemon generates summary logs every 60 seconds and a threshold of 100 nanoseconds for the master offset logs is set. This means the daemon only produces summary logs at the specified interval. However, if your clock’s offset from the master exceeds plus or minus 100 nanoseconds, that specific log entry is recorded.
- By default, the
-
Optional: To set the interval without a master offset threshold, configure the
logReducefield toenhanced 60sin the YAML.apiVersion: ptp.openshift.io/v1kind: PtpConfigmetadata:name: <ptp_config_name>namespace: openshift-ptpspec:profile:- name: "profile1"ptpSettings:logReduce: "enhanced 60s" -
Save and exit to apply the changes to the
PtpConfigCR.
Verification
-
Get the name of the
linuxptp-daemonpod and the corresponding node where thePtpConfigCR is applied by running the following command$ oc get pods -n openshift-ptp -o wideExample outputNAME READY STATUS RESTARTS AGE IP NODElinuxptp-daemon-gmv2n 3/3 Running 0 1d17h 10.1.196.24 compute-0.example.comlinuxptp-daemon-lgm55 3/3 Running 0 1d17h 10.1.196.25 compute-1.example.comptp-operator-3r4dcvf7f4-zndk7 1/1 Running 0 1d7h 10.129.0.61 control-plane-1.example.com -
Verify that master offset messages are excluded from the logs by running the following command:
$ oc -n openshift-ptp logs <linux_daemon_container> -c linuxptp-daemon-container | grep "master offset"<linux_daemon_container>is the name of thelinuxptp-daemonpod, for example,linuxptp-daemon-gmv2n.
Configuring GNSS failover to NTP for time synchronization continuity
Automatic failover from global navigation satellite system (GNSS) to Network Time Protocol (NTP) maintains time synchronization continuity when the primary signal is lost, ensuring system stability for telco operations.
Telco operators require time source redundancy to ensure time synchronization continuity and system stability.
OpenShift Container Platform provides automatic failover capabilities to maintain synchronization. The system utilizes GNSS (delivered by phc2sys) as the primary time source. To protect against primary signal loss, such as jamming or antenna failure, the system automatically transitions to the secondary time source, NTP delivered by chronyd. Upon signal recovery, the system automatically switches back to and resumes synchronization with phc2sys.
You can control the resilience of the time synchronization by setting the ts2phc.holdover parameter in seconds. This value dictates the maximum time the internal control algorithm can continue synchronizing the PHC after the main time of day (ToD) source such as a GNSS receiver is lost. The algorithm can only continue if it remains in a stable state (SERVO_LOCKED_STABLE). When the process exits this configured holdover period, it signifies an unrecoverable primary signal loss. The system then allows failover to a secondary source such as NTP.
Creating a PTP Grandmaster configuration with GNSS failover
Configure a Precision Time Protocol (PTP) Telecom Grandmaster clock with automatic failover from global navigation satellite system (GNSS) to Network Time Protocol (NTP) when satellite signals are unavailable.
This procedure configures a T-GM (Telecom Grandmaster) clock that uses an Intel E810 Westport Channel NIC as the PTP grandmaster clock with GNSS to NTP failover capabilities.
Prerequisites
- For T-GM clocks in production environments, install an Intel E810 Westport Channel NIC in the bare-metal cluster host.
- Install the OpenShift CLI (
oc). - Log in as a user with
cluster-adminprivileges. - Install the PTP Operator.
Procedure
-
Verify the PTP Operator installation by running the following command:
$ oc get pods -n openshift-ptp -o wideThe output is similar to the following listing the PTP Operator pod and the
linuxptp-daemonpods:NAME READY STATUS RESTARTS AGE IP NODE NOMINATED NODE READINESS GATESlinuxptp-daemon-4xk9m 2/2 Running 0 15m 192.168.1.101 worker-0.cluster.local <none> <none>linuxptp-daemon-7bv2n 2/2 Running 0 15m 192.168.1.102 worker-1.cluster.local <none> <none>linuxptp-daemon-9cp4r 2/2 Running 0 15m 192.168.1.103 worker-2.cluster.local <none> <none>linuxptp-daemon-kw8h5 2/2 Running 0 15m 192.168.1.104 worker-3.cluster.local <none> <none>linuxptp-daemon-m3j7t 2/2 Running 0 15m 192.168.1.105 worker-4.cluster.local <none> <none>ptp-operator-75c77dbf86-xm9kl 1/1 Running 0 20m 10.129.0.45 master-1.cluster.local <none> <none>-
ptp-operator-*: The PTP Operator pod (one instance in the cluster) -
linuxptp-daemon-*: The linuxptp daemon pods. A daemon pod runs on each node that matches the PtpConfig profile. Each daemon pod should show2/2in the READY column, indicating both containers (linuxptp-daemon-containerandkube-rbac-proxy) are running.noteThe number of
linuxptp-daemonpods is determined by the node labels defined in thePtpOperatorConfigwhich controls the DaemonSet deployment. The PtpConfig profile matching, as shown in Step 4, only determines which specific PTP settings are applied on the running daemons. In this example, the operator configuration targets all 5 worker nodes. For single-node OpenShift clusters, you will see only onelinuxptp-daemonpod, as the configuration targets only the control plane node which acts as the worker.
-
-
Check which network interfaces support hardware timestamping by running the following command:
$ oc get NodePtpDevice -n openshift-ptp -o yamlThe output is similar to the following showing NodePtpDevice resources for nodes with PTP-capable network interfaces:
apiVersion: v1items:- apiVersion: ptp.openshift.io/v1kind: NodePtpDevicemetadata:name: worker-0.cluster.localnamespace: openshift-ptpspec: {}status:devices:- name: ens7f0hwConfig:phcIndex: 0- name: ens7f1hwConfig:phcIndex: 1- apiVersion: ptp.openshift.io/v1kind: NodePtpDevicemetadata:name: worker-1.cluster.localnamespace: openshift-ptpspec: {}status:devices:- name: ens7f0hwConfig:phcIndex: 0- name: ens7f1hwConfig:phcIndex: 1kind: Listmetadata:resourceVersion: ""In this example output:
-
ens7f0andens7f1are PTP-capable interfaces (Intel E810 NIC ports). -
phcIndexindicates the PTP Hardware Clock number (maps to/dev/ptp0,/dev/ptp1, and so on).noteThe output shows one NodePtpDevice resource for each node with PTP-capable interfaces. In this example, five worker nodes have Intel E810 NICs. For single-node OpenShift clusters, you would see only one NodePtpDevice resource.
-
-
The PTP profile uses node labels for matching. Check your machine config pool (MCP) to find the node labels by running the following command:
$ oc get mcpThe output is similar to the following:
NAME CONFIG UPDATED UPDATING DEGRADED MACHINECOUNT READYMACHINECOUNT UPDATEDMACHINECOUNT DEGRADEDMACHINECOUNT AGEmaster rendered-master-a1b1** True False False 3 3 3 0 45dworker rendered-worker-f6e5** True False False 5 5 5 0 45dnoteThe CONFIG column shows a truncated hash of the rendered MachineConfig. In actual output, this will be a full 64-character hash such as
rendered-master-a1b2c3d4e5f6a7b8c9d0e1f2a3b4c5d6.- In this example, the
<MCP-name>isworkerfor worker nodes andmasterfor control plane nodes. Most T-GM deployments use worker nodes, so you would useworkeras the<MCP-name>. - For single-node OpenShift clusters, the
<MCP-name>ismaster(the worker MCP will showMACHINECOUNTof 0).
- In this example, the
-
Create a
PtpConfigcustom resource (CR) that configures the T-GM clock with GNSS to NTP failover. Save the following YAML configuration to a file namedptp-config-gnss-ntp-failover.yaml, replacing<MCP-name>with the name of your machine config pool from the previous step.# The grandmaster profile is provided for testing only# It is not installed on production clustersapiVersion: ptp.openshift.io/v1kind: PtpConfigmetadata:name: grandmasternamespace: openshift-ptpannotations:ran.openshift.io/ztp-deploy-wave: "10"spec:profile:- name: "grandmaster"ptp4lOpts: "-2 --summary_interval -4"phc2sysOpts: -r -u 0 -m -N 8 -R 16 -s ens7f0 -n 24ptpSchedulingPolicy: SCHED_FIFOptpSchedulingPriority: 10ptpSettings:logReduce: "true"# --- FAILOVER CONFIGURATION ---# Holdover time: 14400 seconds (4 hours) before switching to NTPts2phcOpts: "--ts2phc.holdover 14400"# Configure Chronyd (Secondary Time Source)chronydOpts: "-d"chronydConf: |server time.nist.gov iburstmakestep 1.0 -1pidfile /var/run/chronyd.pidplugins:# E810 Hardware-Specific Configuratione810:enableDefaultConfig: falsesettings:LocalHoldoverTimeout: 14400LocalMaxHoldoverOffSet: 1500MaxInSpecOffset: 1500pins:# Syntax guide:# - The 1st number in each pair must be one of:# 0 - Disabled# 1 - RX# 2 - TX# - The 2nd number in each pair must match the channel numberens7f0:SMA1: 0 1SMA2: 0 2U.FL1: 0 1U.FL2: 0 2ublxCmds:- args: #ubxtool -P 29.20 -z CFG-HW-ANT_CFG_VOLTCTRL,1- "-P"- "29.20"- "-z"- "CFG-HW-ANT_CFG_VOLTCTRL,1"reportOutput: false- args: #ubxtool -P 29.20 -e GPS- "-P"- "29.20"- "-e"- "GPS"reportOutput: false- args: #ubxtool -P 29.20 -d Galileo- "-P"- "29.20"- "-d"- "Galileo"reportOutput: false- args: #ubxtool -P 29.20 -d GLONASS- "-P"- "29.20"- "-d"- "GLONASS"reportOutput: false- args: #ubxtool -P 29.20 -d BeiDou- "-P"- "29.20"- "-d"- "BeiDou"reportOutput: false- args: #ubxtool -P 29.20 -d SBAS- "-P"- "29.20"- "-d"- "SBAS"reportOutput: false- args: #ubxtool -P 29.20 -t -w 5 -v 1 -e SURVEYIN,600,50000- "-P"- "29.20"- "-t"- "-w"- "5"- "-v"- "1"- "-e"- "SURVEYIN,600,50000"reportOutput: true- args: #ubxtool -P 29.20 -p MON-HW- "-P"- "29.20"- "-p"- "MON-HW"reportOutput: true- args: #ubxtool -P 29.20 -p CFG-MSG,1,38,248- "-P"- "29.20"- "-p"- "CFG-MSG,1,38,248"reportOutput: true# NTP Failover Pluginntpfailover:gnssFailover: true# --- GNSS (ts2phc) CONFIGURATION (Primary Source) ---ts2phcConf: |[nmea]ts2phc.master 1[global]use_syslog 0verbose 1logging_level 7ts2phc.pulsewidth 100000000ts2phc.nmea_serialport /dev/ttyGNSS_1700_0leapfile /usr/share/zoneinfo/leap-seconds.list[ens7f0]ts2phc.extts_polarity risingts2phc.extts_correction 0# --- PTP4L CONFIGURATION (Grandmaster Role) ---ptp4lConf: |[ens7f0]masterOnly 1[ens7f1]masterOnly 1[global]## Default Data Set#twoStepFlag 1priority1 128priority2 128domainNumber 24#utc_offset 37clockClass 6clockAccuracy 0x27offsetScaledLogVariance 0xFFFFfree_running 0freq_est_interval 1dscp_event 0dscp_general 0dataset_comparison G.8275.xG.8275.defaultDS.localPriority 128## Port Data Set#logAnnounceInterval -3logSyncInterval -4logMinDelayReqInterval -4logMinPdelayReqInterval 0announceReceiptTimeout 3syncReceiptTimeout 0delayAsymmetry 0fault_reset_interval -4neighborPropDelayThresh 20000000masterOnly 0G.8275.portDS.localPriority 128## Run time options#assume_two_step 0logging_level 6path_trace_enabled 0follow_up_info 0hybrid_e2e 0inhibit_multicast_service 0net_sync_monitor 0tc_spanning_tree 0tx_timestamp_timeout 50unicast_listen 0unicast_master_table 0unicast_req_duration 3600use_syslog 1verbose 0summary_interval -4kernel_leap 1check_fup_sync 0clock_class_threshold 7## Servo Options#pi_proportional_const 0.0pi_integral_const 0.0pi_proportional_scale 0.0pi_proportional_exponent -0.3pi_proportional_norm_max 0.7pi_integral_scale 0.0pi_integral_exponent 0.4pi_integral_norm_max 0.3step_threshold 2.0first_step_threshold 0.00002clock_servo pisanity_freq_limit 200000000ntpshm_segment 0## Transport options#transportSpecific 0x0ptp_dst_mac 01:1B:19:00:00:00p2p_dst_mac 01:80:C2:00:00:0Eudp_ttl 1udp6_scope 0x0Euds_address /var/run/ptp4l## Default interface options#clock_type BCnetwork_transport L2delay_mechanism E2Etime_stamping hardwaretsproc_mode filterdelay_filter moving_mediandelay_filter_length 10egressLatency 0ingressLatency 0boundary_clock_jbod 0## Clock description#productDescription ;;revisionData ;;manufacturerIdentity 00:00:00userDescription ;timeSource 0x20ptpClockThreshold:holdOverTimeout: 5maxOffsetThreshold: 100minOffsetThreshold: -100recommend:- profile: "grandmaster"priority: 4match:- nodeLabel: node-role.kubernetes.io/<MCP-name>warningReplace the example interface names (
ens7f0,ens7f1) with your actual E810 NIC interface names found in step 2. Common E810 interface naming patterns includeens7f0,ens8f0,eth0,enp2s0f0, and so on. The exact name depends on your system firmware settings and Linux network device naming conventions. Also replace/dev/ttyGNSS_1700_0with your actual GNSS serial port device path. For single-node OpenShift clusters, replace<MCP-name>withmasterin the nodeLabel match. For multi-node clusters using worker nodes as T-GM, useworker.The configuration includes the following components:
- PTP4L options:
-2: Use PTP version 2--summary_interval -4: Log summary every 2^(-4) = 0.0625 seconds
- PHC2SYS options:
-r: Synchronize system clock from PTP hardware clock-u 0: Update rate multiplier-m: Print messages to stdout-N 8: Domain number for ptp4l-R 16: Update rate-s ens7f0: Source interface (replace with your E810 interface name)-n 24: Domain number
- Failover configuration:
ts2phcOpts --ts2phc.holdover 14400: 4-hour holdover before switching to NTPchronydConf: NTP server configuration for failover replacetime.nist.govwith your preferred NTP serverntpfailover plugin: Enables automatic GNSS-to-NTP switching withgnssFailover: true
- E810 plugin configuration:
LocalHoldoverTimeout: 14400: E810 hardware holdover timeout (4 hours)pins: Configuration for 1PPS input on E810 physical pins (U.FL2, SMA1, SMA2, U.FL1)ublxCmds: Commands to configure u-blox GNSS receiver (enable GPS, disable other constellations, set survey-in mode)
- GNSS (ts2phc) configuration:
ts2phc.nmea_serialport /dev/ttyGNSS_1700_0: GNSS serial port device path (replace with your actual GNSS device)ts2phc.extts_polarity rising: 1PPS signal on rising edgets2phc.pulsewidth 100000000: 1PPS pulse width in nanoseconds
- PTP4L configuration:
masterOnly 1: Interface acts only as PTP masterclockClass 6: GPS-synchronized quality leveldomainNumber 24: PTP domainclock_type BC: Boundary Clock modetime_stamping hardware: Use hardware timestamps from E810 NIC
- PTP4L options:
-
Apply the
PtpConfigCR by running the following command:$ oc apply -f ptp-config-gnss-ntp-failover.yamlThe output is similar to the following:
ptpconfig.ptp.openshift.io/grandmaster created
Verification
-
The PTP daemon checks for profile updates every 30 seconds. Wait approximately 30 seconds, then verify by running the following command:
$ oc get ptpconfig -n openshift-ptpThe output is similar to the following:
NAME AGEgrandmaster 2m -
Check the NodePtpDevice to see if the profile is applied by running the following command, replacing
<node_name>with your node hostname:$ oc describe nodeptpdevice <node_name> -n openshift-ptpFor example, on a multi-node cluster with worker nodes:
worker-0.cluster.localFor single-node OpenShift clusters, use the control plane node name, which you can find by running:
$ oc get nodes -
Check if the profile is being loaded by monitoring the daemon logs:
$ oc get pods -n openshift-ptp | grep linuxptp-daemonThen check the logs, replacing
<linuxptp-daemon-pod>with the actual pod name from the previous command:$ oc logs -n openshift-ptp <linuxptp-daemon-pod> -c linuxptp-daemon-container --tail=100Success indicators in the logs are:
load profiles- Profile is being loadedin applyNodePTPProfiles- Profile is being applied- No
ptp profile doesn't exist for nodeerrors
-
Check
chronydstatus to verify NTP is running as the secondary time source by running the following command:$ oc logs -n openshift-ptp <linuxptp-daemon-pod> -c linuxptp-daemon-container | grep chronydThe output is similar to the following:
chronyd version 4.5 startingAdded source ID#0000000001 (time.nist.gov) -
Check GNSS/gpsd by running the following command:
$ oc logs -n openshift-ptp <linuxptp-daemon-pod> -c linuxptp-daemon-container | grep gpsdThe output shows the following when GNSS is functioning correctly:
gpsdstarting successfully- No
No such file or directoryerrors exist
-
Check
ts2phc(GNSS synchronization) status by running the following command:$ oc logs -n openshift-ptp <linuxptp-daemon-pod> -c linuxptp-daemon-container | grep ts2phc -
Check
phc2sys(system clock sync) status by running the following command:$ oc logs -n openshift-ptp <linuxptp-daemon-pod> -c linuxptp-daemon-container | grep phc2sysThe output shows synchronization status messages for
phc2sys.phc2sys[xxx]: CLOCK_REALTIME phc offset -17 s2 freq -13865 delay 2305
Creating a PTP Grandmaster configuration with GNSS failover on Single Node OpenShift
This procedure configures a T-GM (Telecom Grandmaster) clock on single-node OpenShift that uses an Intel E810 Westport Channel NIC as the PTP grandmaster clock with GNSS to NTP failover capabilities.
Prerequisites
- For T-GM clocks in production environments, install an Intel E810 Westport Channel NIC in the bare metal single-node OpenShift host.
- Install the OpenShift CLI (
oc). - Log in as a user with
cluster-adminprivileges. - Install the PTP Operator.
Procedure
-
Verify the PTP Operator installation by running the following command:
$ oc get pods -n openshift-ptp -o wideThe output is similar to the following listing the PTP Operator pod and the single
linuxptp-daemonpod:NAME READY STATUS RESTARTS AGE IP NODE NOMINATED NODE READINESS GATESlinuxptp-daemon-xz8km 2/2 Running 0 15m 192.168.1.50 mysno-sno.demo.lab <none> <none>ptp-operator-75c77dbf86-xm9kl 1/1 Running 0 20m 10.129.0.45 mysno-sno.demo.lab <none> <none>ptp-operator-*: The PTP Operator pod (one instance in the cluster).linuxptp-daemon-*: The linuxptp daemon pod. On single-node OpenShift, there is only one daemon pod running on the master node. The daemon pod should show2/2in the READY column, indicating both containers (linuxptp-daemon-containerandkube-rbac-proxy) are running.
-
Check which network interfaces support hardware timestamping by running the following command:
$ oc get NodePtpDevice -n openshift-ptp -o yamlThe output is similar to the following one, showing the NodePtpDevice resource for the single-node OpenShift node with PTP-capable network interfaces:
apiVersion: v1items:- apiVersion: ptp.openshift.io/v1kind: NodePtpDevicemetadata:name: mysno-sno.demo.labnamespace: openshift-ptpspec: {}status:devices:- name: ens7f0hwConfig:phcIndex: 0- name: ens7f1hwConfig:phcIndex: 1kind: Listmetadata:resourceVersion: ""In this example output:
-
ens7f0andens7f1are PTP-capable interfaces (Intel E810 NIC ports). -
phcIndexindicates the PTP Hardware Clock number (maps to/dev/ptp0,/dev/ptp1, etc.)noteOn single-node OpenShift clusters, you will see only one NodePtpDevice resource for the single master node.
-
-
The PTP profile uses node labels for matching. Check your machine config pool (MCP) to verify the master MCP by running the following command:
$ oc get mcpThe output is similar to the following:
NAME CONFIG UPDATED UPDATING DEGRADED MACHINECOUNT READYMACHINECOUNT UPDATEDMACHINECOUNT DEGRADEDMACHINECOUNT AGEmaster rendered-master-a1b1* True False False 1 1 1 0 45dworker rendered-worker-f6e5* True False False 0 0 0 0 45dnoteThe CONFIG column shows a truncated hash of the rendered MachineConfig. In actual output, this will be a full 64-character hash like
rendered-master-a1b2c3d4e5f6a7b8c9d0e1f2a3b4c5d6.On single-node OpenShift clusters, the master MCP shows
MACHINECOUNTof 1 (the single node), and the worker MCP showsMACHINECOUNTof 0. The PTP profile must target themasternode label. -
Create a
PtpConfigcustom resource (CR) that configures the T-GM clock with GNSS to NTP failover. Save the following YAML configuration to a file namedptp-config-gnss-ntp-failover-sno.yaml.# The grandmaster profile is provided for testing only# It is not installed on production clustersapiVersion: ptp.openshift.io/v1kind: PtpConfigmetadata:name: grandmasternamespace: openshift-ptpannotations:ran.openshift.io/ztp-deploy-wave: "10"spec:profile:- name: "grandmaster"ptp4lOpts: "-2 --summary_interval -4"phc2sysOpts: -r -u 0 -m -N 8 -R 16 -s ens7f0 -n 24ptpSchedulingPolicy: SCHED_FIFOptpSchedulingPriority: 10ptpSettings:logReduce: "true"# --- FAILOVER CONFIGURATION ---# Holdover time: 14400 seconds (4 hours) before switching to NTPts2phcOpts: "--ts2phc.holdover 14400"# Configure Chronyd (Secondary Time Source)chronydOpts: "-d"chronydConf: |server time.nist.gov iburstmakestep 1.0 -1pidfile /var/run/chronyd.pidplugins:# E810 Hardware-Specific Configuratione810:enableDefaultConfig: falsesettings:LocalHoldoverTimeout: 14400LocalMaxHoldoverOffSet: 1500MaxInSpecOffset: 1500pins:# Syntax guide:# - The 1st number in each pair must be one of:# 0 - Disabled# 1 - RX# 2 - TX# - The 2nd number in each pair must match the channel numberens7f0:SMA1: 0 1SMA2: 0 2U.FL1: 0 1U.FL2: 0 2ublxCmds:- args: #ubxtool -P 29.20 -z CFG-HW-ANT_CFG_VOLTCTRL,1- "-P"- "29.20"- "-z"- "CFG-HW-ANT_CFG_VOLTCTRL,1"reportOutput: false- args: #ubxtool -P 29.20 -e GPS- "-P"- "29.20"- "-e"- "GPS"reportOutput: false- args: #ubxtool -P 29.20 -d Galileo- "-P"- "29.20"- "-d"- "Galileo"reportOutput: false- args: #ubxtool -P 29.20 -d GLONASS- "-P"- "29.20"- "-d"- "GLONASS"reportOutput: false- args: #ubxtool -P 29.20 -d BeiDou- "-P"- "29.20"- "-d"- "BeiDou"reportOutput: false- args: #ubxtool -P 29.20 -d SBAS- "-P"- "29.20"- "-d"- "SBAS"reportOutput: false- args: #ubxtool -P 29.20 -t -w 5 -v 1 -e SURVEYIN,600,50000- "-P"- "29.20"- "-t"- "-w"- "5"- "-v"- "1"- "-e"- "SURVEYIN,600,50000"reportOutput: true- args: #ubxtool -P 29.20 -p MON-HW- "-P"- "29.20"- "-p"- "MON-HW"reportOutput: true- args: #ubxtool -P 29.20 -p CFG-MSG,1,38,248- "-P"- "29.20"- "-p"- "CFG-MSG,1,38,248"reportOutput: true# NTP Failover Pluginntpfailover:gnssFailover: true# --- GNSS (ts2phc) CONFIGURATION (Primary Source) ---ts2phcConf: |[nmea]ts2phc.master 1[global]use_syslog 0verbose 1logging_level 7ts2phc.pulsewidth 100000000ts2phc.nmea_serialport /dev/ttyGNSS_1700_0leapfile /usr/share/zoneinfo/leap-seconds.list[ens7f0]ts2phc.extts_polarity risingts2phc.extts_correction 0# --- PTP4L CONFIGURATION (Grandmaster Role) ---ptp4lConf: |[ens7f0]masterOnly 1[ens7f1]masterOnly 1[global]## Default Data Set#twoStepFlag 1priority1 128priority2 128domainNumber 24#utc_offset 37clockClass 6clockAccuracy 0x27offsetScaledLogVariance 0xFFFFfree_running 0freq_est_interval 1dscp_event 0dscp_general 0dataset_comparison G.8275.xG.8275.defaultDS.localPriority 128## Port Data Set#logAnnounceInterval -3logSyncInterval -4logMinDelayReqInterval -4logMinPdelayReqInterval 0announceReceiptTimeout 3syncReceiptTimeout 0delayAsymmetry 0fault_reset_interval -4neighborPropDelayThresh 20000000masterOnly 0G.8275.portDS.localPriority 128## Run time options#assume_two_step 0logging_level 6path_trace_enabled 0follow_up_info 0hybrid_e2e 0inhibit_multicast_service 0net_sync_monitor 0tc_spanning_tree 0tx_timestamp_timeout 50unicast_listen 0unicast_master_table 0unicast_req_duration 3600use_syslog 1verbose 0summary_interval -4kernel_leap 1check_fup_sync 0clock_class_threshold 7## Servo Options#pi_proportional_const 0.0pi_integral_const 0.0pi_proportional_scale 0.0pi_proportional_exponent -0.3pi_proportional_norm_max 0.7pi_integral_scale 0.0pi_integral_exponent 0.4pi_integral_norm_max 0.3step_threshold 2.0first_step_threshold 0.00002clock_servo pisanity_freq_limit 200000000ntpshm_segment 0## Transport options#transportSpecific 0x0ptp_dst_mac 01:1B:19:00:00:00p2p_dst_mac 01:80:C2:00:00:0Eudp_ttl 1udp6_scope 0x0Euds_address /var/run/ptp4l## Default interface options#clock_type BCnetwork_transport L2delay_mechanism E2Etime_stamping hardwaretsproc_mode filterdelay_filter moving_mediandelay_filter_length 10egressLatency 0ingressLatency 0boundary_clock_jbod 0## Clock description#productDescription ;;revisionData ;;manufacturerIdentity 00:00:00userDescription ;timeSource 0x20ptpClockThreshold:holdOverTimeout: 5maxOffsetThreshold: 100minOffsetThreshold: -100recommend:- profile: "grandmaster"priority: 4match:- nodeLabel: node-role.kubernetes.io/masterwarningReplace the example interface names (
ens7f0,ens7f1) with your actual E810 NIC interface names found in step 2. Common E810 interface naming patterns includeens7f0,ens8f0,eth0,enp2s0f0, and so on. The exact name depends on your system BIOS settings and Linux network device naming conventions. Also, replace/dev/ttyGNSS_1700_0with your actual GNSS serial port device path. ThenodeLabelis set tonode-role.kubernetes.io/masterto target the single-node OpenShift master node which serves all roles.The configuration includes the following components:
- PTP4L options:
-2: Use PTP version 2--summary_interval -4: Log summary every 2^(-4) = 0.0625 seconds
- PHC2SYS options:
-r: Synchronize system clock from PTP hardware clock-u 0: Update rate multiplier-m: Print messages to stdout-N 8: Domain number for ptp4l-R 16: Update rate-s ens7f0: Source interface (replace with your E810 interface name)-n 24: Domain number
- Failover configuration:
ts2phcOpts --ts2phc.holdover 14400: 4-hour holdover before switching to NTPchronydConf: NTP server configuration for failover replacetime.nist.govwith your preferred NTP serverntpfailover plugin: Enables automatic GNSS-to-NTP switching withgnssFailover: true.
- E810 plugin configuration:
LocalHoldoverTimeout: 14400: E810 hardware holdover timeout (4 hours)pins: Configuration for 1PPS input on E810 physical pins (U.FL2, SMA1, SMA2, U.FL1)ublxCmds: Commands to configure u-blox GNSS receiver (enable GPS, disable other constellations, set survey-in mode)
- GNSS (ts2phc) configuration:
ts2phc.nmea_serialport /dev/ttyGNSS_1700_0: GNSS serial port device path (replace with your actual GNSS device)ts2phc.extts_polarity rising: 1PPS signal on rising edgets2phc.pulsewidth 100000000: 1PPS pulse width in nanoseconds
- PTP4L configuration:
masterOnly 1: Interface acts only as PTP masterclockClass 6: GPS-synchronized quality leveldomainNumber 24: PTP domainclock_type BC: Boundary Clock modetime_stamping hardware: Use hardware timestamps from E810 NIC
- PTP4L options:
-
Apply the
PtpConfigCR by running the following command:$ oc apply -f ptp-config-gnss-ntp-failover-sno.yamlThe output is similar to the following:
ptpconfig.ptp.openshift.io/grandmaster created
Verification
-
The PTP daemon checks for profile updates every 30 seconds. Wait approximately 30 seconds, then verify by running the following command:
$ oc get ptpconfig -n openshift-ptpThe output is similar to the following:
NAME AGEgrandmaster 2m -
Check the NodePtpDevice to see if the profile is applied. First, get your single-node OpenShift node name:
$ oc get nodesThe output is similar to the following:
NAME STATUS ROLES AGE VERSIONmysno-sno.demo.lab Ready control-plane,master,worker 4h19m v1.35.4Then describe the NodePtpDevice using your node name:
$ oc describe nodeptpdevice mysno-sno.demo.lab -n openshift-ptp -
Check if the profile is being loaded by monitoring the daemon logs. First, get the daemon pod name:
$ oc get pods -n openshift-ptp | grep linuxptp-daemonThe output shows the single linuxptp-daemon pod:
linuxptp-daemon-xz8km 2/2 Running 0 15mThen check the logs using the pod name:
$ oc logs -n openshift-ptp linuxptp-daemon-xz8km -c linuxptp-daemon-container --tail=100Success indicators in the logs are:
load profiles- Profile is being loadedin applyNodePTPProfiles- Profile is being applied- No
ptp profile doesn't exist for nodeerrors
-
Check
chronydstatus to verify NTP is running as the secondary time source by running the following command:$ oc logs -n openshift-ptp linuxptp-daemon-xz8km -c linuxptp-daemon-container | grep chronydThe output is similar to the following:
chronyd version 4.5 startingAdded source ID#0000000001 (time.nist.gov) -
Check GNSS/gpsd by running the following command:
$ oc logs -n openshift-ptp linuxptp-daemon-xz8km -c linuxptp-daemon-container | grep gpsdThe output shows the following when GNSS is functioning correctly:
gpsdstarting successfully- No
No such file or directoryerrors exist
-
Check
ts2phc(GNSS synchronization) status by running the following command:$ oc logs -n openshift-ptp linuxptp-daemon-xz8km -c linuxptp-daemon-container | grep ts2phc -
Check
phc2sys(system clock sync) status by running the following command:$ oc logs -n openshift-ptp linuxptp-daemon-xz8km -c linuxptp-daemon-container | grep phc2sysThe output shows synchronization status messages for
phc2sys.phc2sys[xxx]: CLOCK_REALTIME phc offset -17 s2 freq -13865 delay 2305
Troubleshooting common PTP Operator issues
Troubleshoot common problems with the PTP Operator by performing the following steps.
Prerequisites
- Install the OpenShift Container Platform CLI (
oc). - Log in as a user with
cluster-adminprivileges. - Install the PTP Operator on a bare-metal cluster with hosts that support PTP.
Procedure
-
Check the Operator and operands are successfully deployed in the cluster for the configured nodes.
$ oc get pods -n openshift-ptp -o wideExample outputNAME READY STATUS RESTARTS AGE IP NODElinuxptp-daemon-lmvgn 3/3 Running 0 4d17h 10.1.196.24 compute-0.example.comlinuxptp-daemon-qhfg7 3/3 Running 0 4d17h 10.1.196.25 compute-1.example.comptp-operator-6b8dcbf7f4-zndk7 1/1 Running 0 5d7h 10.129.0.61 control-plane-1.example.comnoteWhen the PTP fast event bus is enabled, the number of ready
linuxptp-daemonpods is3/3. If the PTP fast event bus is not enabled,2/2is displayed. -
Check that supported hardware is found in the cluster.
$ oc -n openshift-ptp get nodeptpdevices.ptp.openshift.ioExample outputNAME AGEcontrol-plane-0.example.com 10dcontrol-plane-1.example.com 10dcompute-0.example.com 10dcompute-1.example.com 10dcompute-2.example.com 10d -
Check the available PTP network interfaces for a node:
$ oc -n openshift-ptp get nodeptpdevices.ptp.openshift.io <node_name> -o yamlwhere:
- <node_name>
- Specifies the node you want to query, for example,
compute-0.example.com.
Example outputapiVersion: ptp.openshift.io/v1kind: NodePtpDevicemetadata:creationTimestamp: "2021-09-14T16:52:33Z"generation: 1name: compute-0.example.comnamespace: openshift-ptpresourceVersion: "177400"uid: 30413db0-4d8d-46da-9bef-737bacd548fdspec: {}status:devices:- name: eno1- name: eno2- name: eno3- name: eno4- name: enp5s0f0- name: enp5s0f1 -
Check that the PTP interface is successfully synchronized to the primary clock by accessing the
linuxptp-daemonpod for the corresponding node.-
Get the name of the
linuxptp-daemonpod and corresponding node you want to troubleshoot by running the following command:$ oc get pods -n openshift-ptp -o wideExample outputNAME READY STATUS RESTARTS AGE IP NODElinuxptp-daemon-lmvgn 3/3 Running 0 4d17h 10.1.196.24 compute-0.example.comlinuxptp-daemon-qhfg7 3/3 Running 0 4d17h 10.1.196.25 compute-1.example.comptp-operator-6b8dcbf7f4-zndk7 1/1 Running 0 5d7h 10.129.0.61 control-plane-1.example.com -
Remote shell into the required
linuxptp-daemoncontainer:$ oc rsh -n openshift-ptp -c linuxptp-daemon-container <linux_daemon_container>where:
- <linux_daemon_container>
- is the container you want to diagnose, for example
linuxptp-daemon-lmvgn.
-
In the remote shell connection to the
linuxptp-daemoncontainer, use the PTP Management Client (pmc) tool to diagnose the network interface. Run the followingpmccommand to check the sync status of the PTP device, for exampleptp4l.# pmc -u -f /var/run/ptp4l.0.config -b 0 'GET PORT_DATA_SET'Example output when the node is successfully synced to the primary clocksending: GET PORT_DATA_SET40a6b7.fffe.166ef0-1 seq 0 RESPONSE MANAGEMENT PORT_DATA_SETportIdentity 40a6b7.fffe.166ef0-1portState SLAVElogMinDelayReqInterval -4peerMeanPathDelay 0logAnnounceInterval -3announceReceiptTimeout 3logSyncInterval -4delayMechanism 1logMinPdelayReqInterval -4versionNumber 2
-
-
For GNSS-sourced grandmaster clocks, verify that the in-tree NIC ice driver is correct by running the following command, for example:
$ oc rsh -n openshift-ptp -c linuxptp-daemon-container linuxptp-daemon-74m2g ethtool -i ens7f0Example outputdriver: iceversion: 5.14.0-356.bz2232515.el9.x86_64firmware-version: 4.22 0x8001778b 1.3346.0 -
For GNSS-sourced grandmaster clocks, verify that the
linuxptp-daemoncontainer is receiving signal from the GNSS antenna. If the container is not receiving the GNSS signal, the/dev/gnss0file is not populated. To verify, run the following command:$ oc rsh -n openshift-ptp -c linuxptp-daemon-container linuxptp-daemon-jnz6r cat /dev/gnss0Example output$GNRMC,125223.00,A,4233.24463,N,07126.64561,W,0.000,,300823,,,A,V*0A$GNVTG,,T,,M,0.000,N,0.000,K,A*3D$GNGGA,125223.00,4233.24463,N,07126.64561,W,1,12,99.99,98.6,M,-33.1,M,,*7E$GNGSA,A,3,25,17,19,11,12,06,05,04,09,20,,,99.99,99.99,99.99,1*37$GPGSV,3,1,10,04,12,039,41,05,31,222,46,06,50,064,48,09,28,064,42,1*62
Getting the DPLL firmware version for the CGU in an Intel 800 series NIC
You can get the digital phase-locked loop (DPLL) firmware version for the Clock Generation Unit (CGU) in an Intel 800 series NIC by opening a debug shell to the cluster node and querying the NIC hardware.
Prerequisites
- You have installed the OpenShift CLI (
oc). - You have logged in as a user with
cluster-adminprivileges. - You have installed an Intel 800 series NIC in the cluster host.
- You have installed the PTP Operator on a bare-metal cluster with hosts that support PTP.
Procedure
-
Start a debug pod by running the following command:
$ oc debug node/<node_name>where:
- <node_name>
- Is the node where you have installed the Intel 800 series NIC.
-
Check the CGU firmware version in the NIC by using the
devlinktool and the bus and device name where the NIC is installed. For example, run the following command:sh-4.4# devlink dev info <bus_name>/<device_name> | grep cguwhere:
- <bus_name>
- Is the bus where the NIC is installed. For example,
pci. - <device_name>
- Is the NIC device name. For example,
0000:51:00.0.
Example outputcgu.id 36fw.cgu 8032.16973825.6021where:
cgu.id 36- CGU hardware revision number.
fw.cgu 8032.16973825.6021- DPLL firmware version running in the CGU, where the DPLL firmware version is
6201, and the DPLL model is8032. The string16973825is a shorthand representation of the binary version of the DPLL firmware version (1.3.0.1).
noteThe firmware version has a leading nibble and 3 octets for each part of the version number. The number
16973825in binary is0001 0000 0011 0000 0000 0000 0001. Use the binary value to decode the firmware version. For example:DPLL firmware version
Binary part Decimal value 00011 0000 00113 0000 00000 0000 00011
Collecting PTP Operator data
You can use the oc adm must-gather command to collect information about your cluster, including features and objects associated with PTP Operator.
Prerequisites
- You have access to the cluster as a user with the
cluster-adminrole. - You have installed the OpenShift CLI (
oc). - You have installed the PTP Operator.
Procedure
- To collect PTP Operator data with
must-gather, you must specify the PTP Operatormust-gatherimage.$ oc adm must-gather --image=registry.redhat.io/openshift4/ptp-must-gather-rhel9:v4.22