Configuring the master interface in the container network namespace
You can create and manage a MAC-VLAN, IP-VLAN, and VLAN subinterface based on a master interface.
About configuring the master interface in the container network namespace
You can create a MAC-VLAN, an IP-VLAN, or a VLAN subinterface that is based on a master interface that exists in a container namespace. You can also create a master interface as part of the pod network configuration in a separate network attachment definition CRD.
To use a container namespace master interface, you must specify true for the linkInContainer parameter that exists in the subinterface configuration of the NetworkAttachmentDefinition CRD.
Creating multiple VLANs on SR-IOV VFs
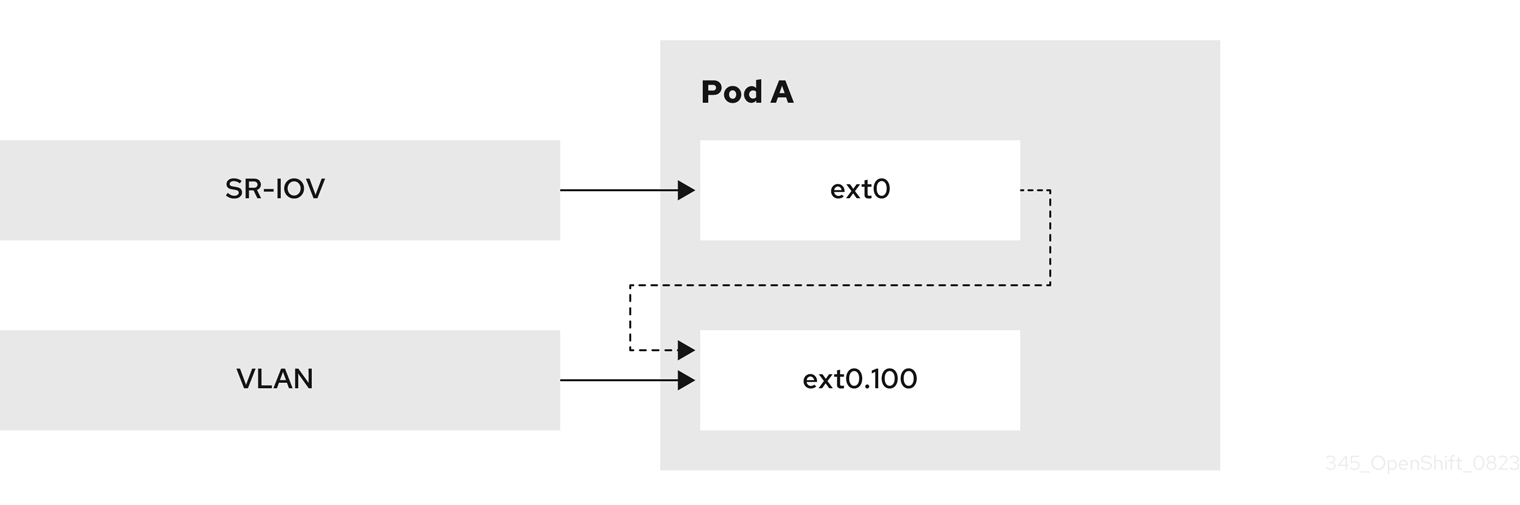
You can create multiple VLANs based on SR-IOV VFs. For this configuration, create an SR-IOV network and then define the network attachments for the VLAN interfaces.
The following diagram shows the setup process for creating multiple VLANs on SR-IOV VFs.
Prerequisites
- You installed the OpenShift CLI (
oc). - You have access to the cluster as a user with the
cluster-adminrole. - You have installed the SR-IOV Network Operator.
Procedure
-
Create a dedicated container namespace where you want to deploy your pod by using the following command:
$ oc new-project test-namespace -
Create an SR-IOV node policy.
-
Create an
SriovNetworkNodePolicyobject, and then save the YAML in thesriov-node-network-policy.yamlfile:apiVersion: sriovnetwork.openshift.io/v1kind: SriovNetworkNodePolicymetadata:name: sriovnicnamespace: openshift-sriov-network-operatorspec:deviceType: netdeviceisRdma: falseneedVhostNet: truenicSelector:vendor: "15b3"deviceID: "101b"rootDevices: ["00:05.0"]numVfs: 10priority: 99resourceName: sriovnicnodeSelector:feature.node.kubernetes.io/network-sriov.capable: "true"where:
vendor- The vendor hexadecimal code of the SR-IOV network device. The value
15b3associates with a Mellanox NIC. deviceID- The device hexadecimal code of the SR-IOV network device.
noteThe SR-IOV network node policy configuration example, with the setting
deviceType: netdevice, is tailored specifically for Mellanox Network Interface Cards (NICs). -
Apply the YAML configuration by running the following command:
$ oc apply -f sriov-node-network-policy.yamlnoteApplying the YAML configuration might take time because of a node reboot operation.
-
-
Create an SR-IOV network:
- Create the
SriovNetworkcustom resource (CR) for the additional secondary SR-IOV network attachment as demonstrated in the following example CR. Save the YAML as asriov-network-attachment.yamlfile:apiVersion: sriovnetwork.openshift.io/v1kind: SriovNetworkmetadata:name: sriov-networknamespace: openshift-sriov-network-operatorspec:networkNamespace: test-namespaceresourceName: sriovnicspoofChk: "off"trust: "on" - Apply the YAML by running the following command:
$ oc apply -f sriov-network-attachment.yaml
- Create the
-
Create the VLAN secondary network.
-
Using the following YAML example, create a file named
vlan100-additional-network-configuration.yaml:apiVersion: k8s.cni.cncf.io/v1kind: NetworkAttachmentDefinitionmetadata:name: vlan-100namespace: test-namespacespec:config: |{"cniVersion": "0.4.0","name": "vlan-100","plugins": [{"type": "vlan","master": "ext0","mtu": 1500,"vlanId": 100,"linkInContainer": true,"ipam": {"type": "whereabouts", "ipRanges": [{"range": "1.1.1.0/24"}]}}]}where:
master- The VLAN configuration needs to specify the
mastername. You can specify the name in the networks annotation of a pod. linkInContainer- The
linkInContainerparameter must be specified.
-
Apply the YAML file by running the following command:
$ oc apply -f vlan100-additional-network-configuration.yaml
-
-
Create a pod definition by using the earlier specified networks.
-
Using the following YAML configuration example, create a file named
pod-a.yamlfile:noteThe manifest example includes the following resources:
- Namespace with security labels
- Pod definition with appropriate network annotation
apiVersion: v1kind: Namespacemetadata:name: test-namespacelabels:pod-security.kubernetes.io/enforce: privilegedpod-security.kubernetes.io/audit: privilegedpod-security.kubernetes.io/warn: privilegedsecurity.openshift.io/scc.podSecurityLabelSync: "false"---apiVersion: v1kind: Podmetadata:name: nginx-podnamespace: test-namespaceannotations:k8s.v1.cni.cncf.io/networks: '[{"name": "sriov-network","namespace": "test-namespace","interface": "ext0"},{"name": "vlan-100","namespace": "test-namespace","interface": "ext0.100"}]'spec:securityContext:runAsNonRoot: truecontainers:- name: nginx-containerimage: nginxinc/nginx-unprivileged:latestsecurityContext:allowPrivilegeEscalation: falsecapabilities:drop: ["ALL"]ports:- containerPort: 80seccompProfile:type: "RuntimeDefault"where:
interface- The name to be used as the
masterinterface for the VLAN interface.
-
Apply the YAML file by running the following command:
$ oc apply -f pod-a.yaml
-
-
Get detailed information about the
nginx-podwithin thetest-namespaceby running the following command:$ oc describe pods nginx-pod -n test-namespaceName: nginx-podNamespace: test-namespacePriority: 0Node: worker-1/10.46.186.105Start Time: Mon, 14 Aug 2023 16:23:13 -0400Labels: <none>Annotations: k8s.ovn.org/pod-networks:{"default":{"ip_addresses":["10.131.0.26/23"],"mac_address":"0a:58:0a:83:00:1a","gateway_ips":["10.131.0.1"],"routes":[{"dest":"10.128.0.0...k8s.v1.cni.cncf.io/network-status:[{"name": "ovn-kubernetes","interface": "eth0","ips": ["10.131.0.26"],"mac": "0a:58:0a:83:00:1a","default": true,"dns": {}},{"name": "test-namespace/sriov-network","interface": "ext0","mac": "6e:a7:5e:3f:49:1b","dns": {},"device-info": {"type": "pci","version": "1.0.0","pci": {"pci-address": "0000:d8:00.2"}}},{"name": "test-namespace/vlan-100","interface": "ext0.100","ips": ["1.1.1.1"],"mac": "6e:a7:5e:3f:49:1b","dns": {}}]k8s.v1.cni.cncf.io/networks:[ { "name": "sriov-network", "namespace": "test-namespace", "interface": "ext0" }, { "name": "vlan-100", "namespace": "test-namespace", "i...openshift.io/scc: privilegedStatus: RunningIP: 10.131.0.26IPs:IP: 10.131.0.26
Creating a subinterface based on a bridge master interface in a container namespace
You can create a subinterface based on a bridge master interface that exists in a container namespace. Creating a subinterface can be applied to other types of interfaces.
Prerequisites
- You have installed the OpenShift CLI (
oc). - You are logged in to the OpenShift Container Platform cluster as a user with
cluster-adminprivileges.
Procedure
-
Create a dedicated container namespace where you want to deploy your pod by entering the following command:
$ oc new-project test-namespace -
Using the following YAML configuration example, create a bridge
NetworkAttachmentDefinitioncustom resource definition (CRD) file namedbridge-nad.yaml:apiVersion: "k8s.cni.cncf.io/v1"kind: NetworkAttachmentDefinitionmetadata:name: bridge-networkspec:config: '{"cniVersion": "0.4.0","name": "bridge-network","type": "bridge","bridge": "br-001","isGateway": true,"ipMasq": true,"hairpinMode": true,"ipam": {"type": "host-local","subnet": "10.0.0.0/24","routes": [{"dst": "0.0.0.0/0"}]}}' -
Run the following command to apply the
NetworkAttachmentDefinitionCRD to your OpenShift Container Platform cluster:$ oc apply -f bridge-nad.yaml -
Verify that you successfully created a
NetworkAttachmentDefinitionCRD by entering the following command. The expected output shows the name of the NAD CRD and the creation age in minutes.$ oc get network-attachment-definitions -
Using the following YAML example, create a file named
ipvlan-additional-network-configuration.yamlfor the IPVLAN secondary network configuration:apiVersion: k8s.cni.cncf.io/v1kind: NetworkAttachmentDefinitionmetadata:name: ipvlan-netnamespace: test-namespacespec:config: '{"cniVersion": "0.3.1","name": "ipvlan-net","type": "ipvlan","master": "net1","mode": "l3","linkInContainer": true,"ipam": {"type": "whereabouts", "ipRanges": [{"range": "10.0.0.0/24"}]}}'where:
master- Specifies the ethernet interface to associate with the network attachment. The ethernet interface is subsequently configured in the pod networks annotation.
linkInContainer- Specifies that the
masterinterface exists in the container network namespace.
-
Apply the YAML file by running the following command:
$ oc apply -f ipvlan-additional-network-configuration.yaml -
Verify that the
NetworkAttachmentDefinitionCRD has been created successfully by running the following command. The expected output shows the name of the NAD CRD and the creation age in minutes.$ oc get network-attachment-definitions -
Using the following YAML configuration example, create a file named
pod-a.yamlfor the pod definition:apiVersion: v1kind: Podmetadata:name: pod-anamespace: test-namespaceannotations:k8s.v1.cni.cncf.io/networks: '[{"name": "bridge-network","interface": "net1" (1)},{"name": "ipvlan-net","interface": "net2"}]'spec:securityContext:runAsNonRoot: trueseccompProfile:type: RuntimeDefaultcontainers:- name: test-podimage: quay.io/openshifttest/hello-sdn@sha256:c89445416459e7adea9a5a416b3365ed3d74f2491beb904d61dc8d1eb89a72a4securityContext:allowPrivilegeEscalation: falsecapabilities:drop: [ALL]where:
k8s.v1.cni.cncf.io/networks,interface- Specifies the name to be used as the
masterfor the IPVLAN interface.
-
Apply the YAML file by running the following command:
$ oc apply -f pod-a.yaml
Verification
-
Verify that the pod is running by using the following command:
$ oc get pod -n test-namespaceNAME READY STATUS RESTARTS AGEpod-a 1/1 Running 0 2m36s -
Show network interface information about the
pod-aresource within thetest-namespaceby running the following command:$ oc exec -n test-namespace pod-a -- ip a1: lo: <LOOPBACK,UP,LOWER_UP> mtu 65536 qdisc noqueue state UNKNOWN group default qlen 1000link/loopback 00:00:00:00:00:00 brd 00:00:00:00:00:00inet 127.0.0.1/8 scope host lovalid_lft forever preferred_lft foreverinet6 ::1/128 scope hostvalid_lft forever preferred_lft forever3: eth0@if105: <BROADCAST,MULTICAST,UP,LOWER_UP> mtu 1400 qdisc noqueue state UP group defaultlink/ether 0a:58:0a:d9:00:5d brd ff:ff:ff:ff:ff:ff link-netnsid 0inet 10.217.0.93/23 brd 10.217.1.255 scope global eth0valid_lft forever preferred_lft foreverinet6 fe80::488b:91ff:fe84:a94b/64 scope linkvalid_lft forever preferred_lft forever4: net1@if107: <BROADCAST,MULTICAST,UP,LOWER_UP> mtu 1500 qdisc noqueue state UP group defaultlink/ether be:da:bd:7e:f4:37 brd ff:ff:ff:ff:ff:ff link-netnsid 0inet 10.0.0.2/24 brd 10.0.0.255 scope global net1valid_lft forever preferred_lft foreverinet6 fe80::bcda:bdff:fe7e:f437/64 scope linkvalid_lft forever preferred_lft forever5: net2@net1: <BROADCAST,MULTICAST,NOARP,UP,LOWER_UP> mtu 1500 qdisc noqueue state UNKNOWN group defaultlink/ether be:da:bd:7e:f4:37 brd ff:ff:ff:ff:ff:ffinet 10.0.0.1/24 brd 10.0.0.255 scope global net2valid_lft forever preferred_lft foreverinet6 fe80::beda:bd00:17e:f437/64 scope linkvalid_lft forever preferred_lft foreverThis output shows that the network interface
net2associates with the physical interfacenet1.