Configuring multi-network policy
As an administrator, you can use the MultiNetworkPolicy API to create multiple network policies that manage traffic for pods that are attached to secondary networks. For example, you can create policies that allow or deny traffic based on specific ports, IPs and ranges, or labels.
Multi-network policies can be used to manage traffic on secondary networks in the cluster. These policies cannot manage the default cluster network or primary network of user-defined networks.
As a cluster administrator, you can configure a multi-network policy for any of the following network types:
- Single-Root I/O Virtualization (SR-IOV)
- MAC Virtual Local Area Network (MacVLAN)
- IP Virtual Local Area Network (IPVLAN)
- Bond Container Network Interface (CNI) over SR-IOV
- OVN-Kubernetes secondary networks
Support for configuring multi-network policies for SR-IOV secondary networks is only supported with kernel network interface controllers (NICs). SR-IOV is not supported for Data Plane Development Kit (DPDK) applications.
In OpenShift Container Platform 4.22 and later, the multi-network policy backend uses nftables. The iptables backend has been removed and there is no option to revert to it. The MultiNetworkPolicy API and user-facing configuration are unchanged.
Differences between multi-network policy and network policy
Although the MultiNetworkPolicy API implements the NetworkPolicy API, ensure that you understand the following key differences between the two policies:
-
You must use the
MultiNetworkPolicyAPI, as demonstrated in the following example configuration:apiVersion: k8s.cni.cncf.io/v1beta1kind: MultiNetworkPolicy# ... -
You must use the
multi-networkpolicyresource name when using the CLI to interact with multi-network policies. For example, you can view a multi-network policy object with theoc get multi-networkpolicy <name>command where<name>is the name of a multi-network policy. -
You can use the
k8s.v1.cni.cncf.io/policy-forannotation on aMultiNetworkPolicyobject to point to aNetworkAttachmentDefinition(NAD) custom resource (CR). The NAD CR defines the network to which the policy applies. The following example multi-network policy includes thek8s.v1.cni.cncf.io/policy-forannotation:apiVersion: k8s.cni.cncf.io/v1beta1kind: MultiNetworkPolicymetadata:annotations:k8s.v1.cni.cncf.io/policy-for:<namespace_name>/<network_name># ...where:
<namespace_name>- Specifies the namespace name.
<network_name>- Specifies the name of a network attachment definition.
Enable multi-network policy for the cluster
As a cluster administrator, you can enable multi-network policy support on your cluster.
Prerequisites
- Install the OpenShift CLI (
oc). - Log in to the cluster with a user with
cluster-adminprivileges.
Procedure
- Create the
multinetwork-enable-patch.yamlfile with the following YAML:apiVersion: operator.openshift.io/v1kind: Networkmetadata:name: clusterspec:useMultiNetworkPolicy: true# ... - Configure the cluster to enable multi-network policy. Successful output lists the name of the policy object and the
patchedstatus.$ oc patch network.operator.openshift.io cluster --type=merge --patch-file=multinetwork-enable-patch.yaml
Support multi-network policies in IPv6 networks
The ICMPv6 Neighbor Discovery Protocol (NDP) is a set of messages and processes that enable devices to discover and maintain information about neighboring nodes. NDP is essential in IPv6 networks, facilitating the interaction between devices on the same link.
The Cluster Network Operator (CNO) deploys the nftables implementation of multi-network policy when the useMultiNetworkPolicy parameter is set to true.
To support multi-network policies in IPv6 networks, the Cluster Network Operator deploys the following predefined nftables rules in every pod affected by a multi-network policy. The CNO automatically creates and manages the following ConfigMap. You do not need to create this resource.
kind: ConfigMap
apiVersion: v1
metadata:
  name: multi-networkpolicy-custom-rules
  namespace: openshift-multus
data:
  custom-v6-rules.txt: |
    # accept NDP
    icmpv6 type nd-neighbor-solicit accept
    icmpv6 type nd-neighbor-advert accept
    # accept RA/RS
    icmpv6 type nd-router-advert accept
    icmpv6 type nd-router-solicit accept
where:
icmpv6 type nd-neighbor-solicit- This rule allows incoming ICMPv6 neighbor solicitation messages, which are part of the Neighbor Discovery Protocol (NDP). These messages help determine the link-layer addresses of neighboring nodes. In a multi-network setup, this allows other pods or the secondary interface gateway to resolve the pod’s MAC address. Without this, the pod becomes 'invisible' to its neighbors on the secondary network.
icmpv6 type nd-neighbor-advert- This rule allows incoming ICMPv6 neighbor advertisement messages, which are part of NDP and provide information about the link-layer address of the sender. This ensures the pod can receive MAC address updates from other nodes.
icmpv6 type nd-router-advert- This rule allows incoming ICMPv6 router advertisement messages, which provide configuration information to hosts. This allows the pod to receive its default gateway and routing prefix dynamically from the network infrastructure.
icmpv6 type nd-router-solicit- This rule allows incoming ICMPv6 router solicitation messages. Hosts use these messages to request router configuration information. This ensures that when a pod’s interface comes online, it can immediately request network parameters rather than waiting for the next scheduled broadcast, reducing container startup latency.
You cannot edit the predefined rules.
The rules collectively enable essential ICMPv6 traffic for correct network functioning, including address resolution and router communication in an IPv6 environment. With these rules in place and a multi-network policy denying traffic, applications are not expected to experience connectivity issues.
Work with multi-network policy
To manage network traffic isolation and security for pods on secondary networks, you can create, edit, view, and delete multi-network policies. Before you work with multi-network policies, you must enable multi-network policy support for your cluster.
Create a multi-network policy using the CLI
To define granular rules describing ingress or egress network traffic allowed for namespaces in your cluster, you can create a multi-network policy.
Prerequisites
- Your cluster uses a network plugin that supports
NetworkPolicyobjects, such as the OVN-Kubernetes network plugin, withmode: NetworkPolicyset. - You installed the OpenShift CLI (
oc). - You logged in to the cluster with a user with
cluster-adminprivileges. - You are working in the namespace that the multi-network policy applies to.
Procedure
-
Create a policy rule.
-
Create a
<policy_name>.yamlfile:$ touch <policy_name>.yamlwhere:
<policy_name>- Specifies the multi-network policy file name.
-
Define a multi-network policy in the created file. The following example denies ingress traffic from all pods in all namespaces. This is a fundamental policy, blocking all cross-pod networking other than cross-pod traffic allowed by the configuration of other Network Policies.
apiVersion: k8s.cni.cncf.io/v1beta1kind: MultiNetworkPolicymetadata:name: deny-by-defaultannotations:k8s.v1.cni.cncf.io/policy-for:<namespace_name>/<network_name>spec:podSelector: {}policyTypes:- Ingressingress: []where:
<network_name>- Specifies the name of a network attachment definition.
The following example configuration allows ingress traffic from all pods in the same namespace:
apiVersion: k8s.cni.cncf.io/v1beta1kind: MultiNetworkPolicymetadata:name: allow-same-namespaceannotations:k8s.v1.cni.cncf.io/policy-for:<namespace_name>/<network_name>spec:podSelector:ingress:- from:- podSelector: {}# ...where:
<network_name>- Specifies the name of a network attachment definition.
The following example allows ingress traffic to one pod from a particular namespace. This policy allows traffic to pods that have the
pod-alabel from pods running innamespace-y.apiVersion: k8s.cni.cncf.io/v1beta1kind: MultiNetworkPolicymetadata:name: allow-traffic-podannotations:k8s.v1.cni.cncf.io/policy-for:<namespace_name>/<network_name>spec:podSelector:matchLabels:pod: pod-apolicyTypes:- Ingressingress:- from:- namespaceSelector:matchLabels:kubernetes.io/metadata.name: namespace-y# ...where:
<network_name>- Specifies the name of a network attachment definition.
The following example configuration restricts traffic to a service. This policy when applied ensures every pod with both labels
app=bookstoreandrole=apican only be accessed by pods with labelapp=bookstore. In this example the application could be a REST API server, marked with labelsapp=bookstoreandrole=api.This example configuration addresses the following use cases:
-
Restricting the traffic to a service to only the other microservices that need to use it.
-
Restricting the connections to a database to only permit the application using it.
apiVersion: k8s.cni.cncf.io/v1beta1kind: MultiNetworkPolicymetadata:name: api-allowannotations:k8s.v1.cni.cncf.io/policy-for:<namespace_name>/<network_name>spec:podSelector:matchLabels:app: bookstorerole: apiingress:- from:- podSelector:matchLabels:app: bookstore# ...where:
<network_name>- Specifies the name of a network attachment definition.
-
-
To create the multi-network policy object, enter the following command. Successful output lists the name of the policy object and the
createdstatus.$ oc apply -f <policy_name>.yaml -n <namespace>where:
<policy_name>- Specifies the multi-network policy file name.
<namespace>- Optional parameter. If you defined the object in a different namespace than the current namespace, the parameter specifices the namespace.
Successful output lists the name of the policy object and the
createdstatus.noteIf you log in to the web console with
cluster-adminprivileges, you have a choice of creating a network policy in any namespace in the cluster directly in YAML or from a form in the web console.
Edit a multi-network policy
To modify existing policy configurations, you can edit a multi-network policy in a namespace. Edit policies by modifying the policy file and applying it with oc apply, or by using the oc edit command directly.
If you log in with cluster-admin privileges, you can edit network policies in any namespace in the cluster. In the web console, you can edit policies directly in YAML or by using the Actions menu.
Prerequisites
- Your cluster uses a network plugin that supports
NetworkPolicyobjects, such as the OVN-Kubernetes network plugin, withmode: NetworkPolicyset. - You installed the OpenShift CLI (
oc). - You are logged in to the cluster with a user with
cluster-adminprivileges. - You are working in the namespace where the multi-network policy exists.
Procedure
-
Optional: To list the multi-network policy objects in a namespace, enter the following command:
$ oc get multi-network policy -n <namespace>where:
<namespace>- Optional: Specifies the namespace if the object is defined in a different namespace than the current namespace.
-
Edit the multi-network policy object.
-
If you saved the multi-network policy definition in a file, edit the file and make any necessary changes, and then enter the following command.
$ oc apply -n <namespace> -f <policy_file>.yamlwhere:
<namespace>- Optional: Specifies the namespace if the object is defined in a different namespace than the current namespace.
<policy_file>- Specifies the name of the file containing the network policy.
-
If you need to update the multi-network policy object directly, enter the following command:
$ oc edit multi-network policy <policy_name> -n <namespace>where:
<policy_name>- Specifies the name of the network policy.
<namespace>- Optional: Specifies the namespace if the object is defined in a different namespace than the current namespace.
-
-
Confirm that the multi-network policy object is updated.
$ oc describe multi-networkpolicy <policy_name> -n <namespace>where:
<policy_name>- Specifies the name of the multi-network policy.
<namespace>- Optional: Specifies the namespace if the object is defined in a different namespace than the current namespace.
View multi-network policies using the CLI
You can examine the multi-network policies in a namespace.
If you log in with cluster-admin privileges, you can edit network policies in any namespace in the cluster. In the web console, you can edit policies directly in YAML or by using the Actions menu.
Prerequisites
- You installed the OpenShift CLI (
oc). - You are logged in to the cluster with a user with
cluster-adminprivileges. - You are working in the namespace where the multi-network policy exists.
Procedure
- List multi-network policies in a namespace.
-
To view multi-network policy objects defined in a namespace enter the following command:
$ oc get multi-networkpolicy -
Optional: To examine a specific multi-network policy enter the following command:
$ oc describe multi-networkpolicy <policy_name> -n <namespace>where:
<policy_name>- Specifies the name of the multi-network policy to inspect.
<namespace>- Optional: Specifies the namespace if the object is defined in a different namespace than the current namespace.
-
Delete a multi-network policy using the CLI
You can delete a multi-network policy in a namespace by using the CLI.
If you log in with cluster-admin privileges, you can delete network policies in any namespace in the cluster. In the web console, you can delete policies directly in YAML or by using the Actions menu.
Prerequisites
- Your cluster uses a network plugin that supports
NetworkPolicyobjects, such as the OVN-Kubernetes network plugin, withmode: NetworkPolicyset. - You installed the OpenShift CLI (
oc). - You logged in to the cluster with a user with
cluster-adminprivileges. - You are working in the namespace where the multi-network policy exists.
Procedure
-
To delete a multi-network policy object, enter the following command. Successful output lists the name of the policy object and the
deletedstatus.$ oc delete multi-networkpolicy <policy_name> -n <namespace>where:
<policy_name>- Specifies the name of the multi-network policy.
<namespace>- Optional parameter. If you defined the object in a different namespace than the current namespace, the parameter specifices the namespace.
Create a default deny all multi-network policy
The default deny all multi-network policy blocks all cross-pod networking other than network traffic allowed by the configuration of other deployed network policies and traffic between host-networked pods.
The steps in the procedure enforces a strong deny policy by applying a deny-by-default policy in the my-project namespace.
Without configuring a NetworkPolicy custom resource (CR) that allows traffic communication, the following policy might cause communication problems across your cluster.
Prerequisites
- Your cluster uses a network plugin that supports
NetworkPolicyobjects, such as the OVN-Kubernetes network plugin, withmode: NetworkPolicyset. - You installed the OpenShift CLI (
oc). - You logged in to the cluster with a user with
cluster-adminprivileges. - You are working in the namespace that the multi-network policy applies to.
Procedure
-
Create the following YAML that defines a
deny-by-defaultpolicy to deny ingress from all pods in all namespaces. Save the YAML in thedeny-by-default.yamlfile:apiVersion: k8s.cni.cncf.io/v1beta1kind: MultiNetworkPolicymetadata:name: deny-by-defaultnamespace: my-projectannotations:k8s.v1.cni.cncf.io/policy-for:<namespace_name>/<network_name>spec:podSelector: {}policyTypes:- Ingressingress: []where:
namespace- Specifies the namespace in which to deploy the policy. For example, the
my-projectnamespace. annotations- Specifies the name of namespace project followed by the network attachment definition name.
podSelector- If this field is empty, the configuration matches all the pods. Therefore, the policy applies to all pods in the
my-projectnamespace. policyTypes- Specifies a list of rule types that the
NetworkPolicyrelates to. - Ingress- Specifies
IngressonlypolicyTypes. ingress- Specifies ingress rules. If not specified, all incoming traffic is dropped to all pods.
-
Apply the policy by entering the following command. Successful output lists the name of the policy object and the
createdstatus.$ oc apply -f deny-by-default.yaml
Create a multi-network policy to allow traffic from external clients
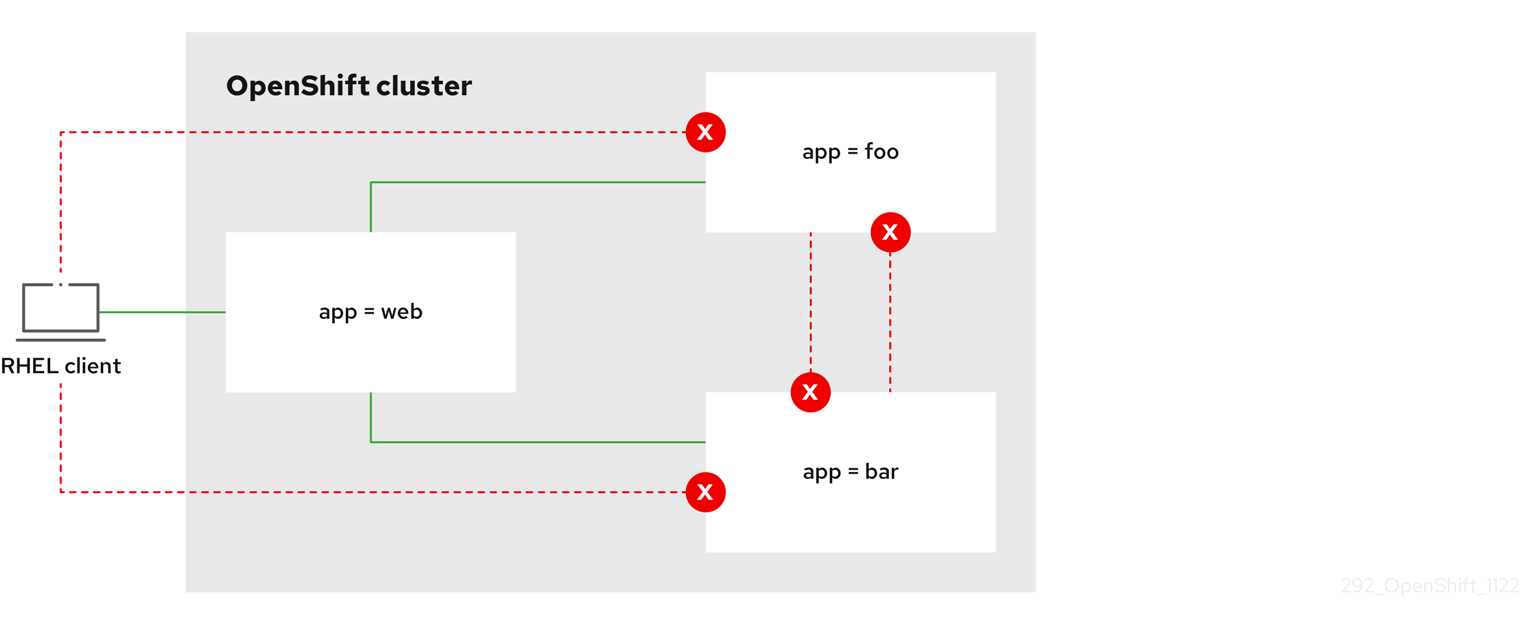
With the deny-by-default policy in place you can proceed to configure a policy that allows traffic from external clients to a pod with the label app=web.
If you log in with a user with the cluster-admin role, then you can create a network policy in any namespace in the cluster.
Follow this procedure to configure a policy that allows external service from the public Internet directly or by using a Load Balancer to access the pod. Traffic is only allowed to a pod with the label app=web.
Prerequisites
- Your cluster uses a network plugin that supports
NetworkPolicyobjects, such as the OVN-Kubernetes network plugin, withmode: NetworkPolicyset. - You installed the OpenShift CLI (
oc). - You logged in to the cluster with a user with
cluster-adminprivileges. - You are working in the namespace that the multi-network policy applies to.
Procedure
-
Create a policy that allows traffic from the public Internet directly or by using a load balancer to access the pod. Save the YAML in the
web-allow-external.yamlfile:apiVersion: k8s.cni.cncf.io/v1beta1kind: MultiNetworkPolicymetadata:name: web-allow-externalnamespace: defaultannotations:k8s.v1.cni.cncf.io/policy-for:<namespace_name>/<network_name>spec:policyTypes:- IngresspodSelector:matchLabels:app: webingress:- {} -
Apply the policy by entering the following command. Successful output lists the name of the policy object and the
createdstatus.$ oc apply -f web-allow-external.yamlThis policy allows traffic from all resources, including external traffic as illustrated in the following diagram:
Create a multi-network policy allowing traffic to an application from all namespaces
You can configure a policy that allows traffic from all pods in all namespaces to a particular application.
If you log in with a user with the cluster-admin role, then you can create a network policy in any namespace in the cluster.
Prerequisites
- Your cluster uses a network plugin that supports
NetworkPolicyobjects, such as the OVN-Kubernetes network plugin, withmode: NetworkPolicyset. - You installed the OpenShift CLI (
oc). - You logged in to the cluster with a user with
cluster-adminprivileges. - You are working in the namespace that the multi-network policy applies to.
Procedure
-
Create a policy that allows traffic from all pods in all namespaces to a particular application. Save the YAML in the
web-allow-all-namespaces.yamlfile:apiVersion: k8s.cni.cncf.io/v1beta1kind: MultiNetworkPolicymetadata:name: web-allow-all-namespacesnamespace: defaultannotations:k8s.v1.cni.cncf.io/policy-for:<namespace_name>/<network_name>spec:podSelector:matchLabels:app: webpolicyTypes:- Ingressingress:- from:- namespaceSelector: {}where:
app- Applies the policy only to
app:webpods in default namespace. namespaceSelector- Selects all pods in all namespaces.
noteBy default, if you do not specify a
namespaceSelectorparameter in the policy object, no namespaces get selected. This means the policy allows traffic only from the namespace where the network policy deployes. -
Apply the policy by entering the following command. Successful output lists the name of the policy object and the
createdstatus.$ oc apply -f web-allow-all-namespaces.yaml
Verification
-
Start a web service in the
defaultnamespace by entering the following command:$ oc run web --namespace=default --image=nginx --labels="app=web" --expose --port=80 -
Run the following command to deploy an
alpineimage in thesecondarynamespace and to start a shell:$ oc run test-$RANDOM --namespace=secondary --rm -i -t --image=alpine -- sh -
Run the following command in the shell and observe that the service allows the request:
# wget -qO- --timeout=2 http://web.default<!DOCTYPE html><html><head><title>Welcome to nginx!</title><style>html { color-scheme: light dark; }body { width: 35em; margin: 0 auto;font-family: Tahoma, Verdana, Arial, sans-serif; }</style></head><body><h1>Welcome to nginx!</h1><p>If you see this page, the nginx web server is successfully installed andworking. Further configuration is required.</p><p>For online documentation and support please refer to<a href="http://nginx.org/">nginx.org</a>.<br/>Commercial support is available at<a href="http://nginx.com/">nginx.com</a>.</p><p><em>Thank you for using nginx.</em></p></body></html>
Create a multi-network policy allowing traffic to an application from a namespace
You can configure a policy that allows traffic to a pod with the label app=web from a particular namespace.
This configuration is useful in the following use cases:
- Restrict traffic to a production database only to namespaces that have production workloads deployed.
- Enable monitoring tools deployed to a particular namespace to scrape metrics from the current namespace.
If you log in with a user with the cluster-admin role, then you can create a network policy in any namespace in the cluster.
Prerequisites
- Your cluster uses a network plugin that supports
NetworkPolicyobjects, such as the OVN-Kubernetes network plugin, withmode: NetworkPolicyset. - You installed the OpenShift CLI (
oc). - You logged in to the cluster with a user with
cluster-adminprivileges. - You are working in the namespace that the multi-network policy applies to.
Do not apply the network.openshift.io/policy-group: ingress label to custom namespace or projects. This label is Operator-managed and reserved for OpenShift Container Platform networking functions. It should not be altered on system-created namespaces.
Using this label can result in intermittent network connectivity drops, unintended application of system NetworkPolicies resource, or configuration drift as the operator attempts to reconcile the state. For custom traffic grouping, always use unique, user-defined labels as shown in the following procedure.
Procedure
-
Create a policy that allows traffic from all pods in a particular namespaces with a label
purpose=production. Save the YAML in theweb-allow-prod.yamlfile:apiVersion: k8s.cni.cncf.io/v1beta1kind: MultiNetworkPolicymetadata:name: web-allow-prodnamespace: defaultannotations:k8s.v1.cni.cncf.io/policy-for:<namespace_name>/<network_name>spec:podSelector:matchLabels:app: webpolicyTypes:- Ingressingress:- from:- namespaceSelector:matchLabels:purpose: productionwhere:
app- Applies the policy only to
app:webpods in the default namespace. purpose- Restricts traffic to only pods in namespaces that have the label
purpose=production.
-
Apply the policy by entering the following command. Successful output lists the name of the policy object and the
createdstatus.$ oc apply -f web-allow-prod.yaml
Verification
-
Start a web service in the
defaultnamespace by entering the following command:$ oc run web --namespace=default --image=nginx --labels="app=web" --expose --port=80 -
Run the following command to create the
prodnamespace:$ oc create namespace prod -
Run the following command to label the
prodnamespace:$ oc label namespace/prod purpose=production -
Run the following command to create the
devnamespace:$ oc create namespace dev -
Run the following command to label the
devnamespace:$ oc label namespace/dev purpose=testing -
Run the following command to deploy an
alpineimage in thedevnamespace and to start a shell:$ oc run test-$RANDOM --namespace=dev --rm -i -t --image=alpine -- sh -
Run the following command in the shell and observe the reason for the blocked request. For example, expected output states
wget: download timed out.# wget -qO- --timeout=2 http://web.default -
Run the following command to deploy an
alpineimage in theprodnamespace and start a shell:$ oc run test-$RANDOM --namespace=prod --rm -i -t --image=alpine -- sh -
Run the following command in the shell and observe that the request is allowed:
# wget -qO- --timeout=2 http://web.default<!DOCTYPE html><html><head><title>Welcome to nginx!</title><style>html { color-scheme: light dark; }body { width: 35em; margin: 0 auto;font-family: Tahoma, Verdana, Arial, sans-serif; }</style></head><body><h1>Welcome to nginx!</h1><p>If you see this page, the nginx web server is successfully installed andworking. Further configuration is required.</p><p>For online documentation and support please refer to<a href="http://nginx.org/">nginx.org</a>.<br/>Commercial support is available at<a href="http://nginx.com/">nginx.com</a>.</p><p><em>Thank you for using nginx.</em></p></body></html>
Additional resources