Installing a cluster
You can install a basic OpenShift Container Platform cluster using the Agent-based Installer.
The following procedures deploy a single-node OpenShift Container Platform in a disconnected environment. You can use these procedures as a basis and modify according to your requirements.
For procedures that include optional customizations you can make while using the Agent-based Installer, see "Installing a cluster with customizations".
Prerequisites for installing a cluster with the Agent-based Installer
Before beginning your cluster installation, you must complete prerequisite tasks that prepare your environment.
- You reviewed details about the OpenShift Container Platform installation and update processes. For more information, see "Installation and update".
- You read "Selecting a cluster installation method and preparing it for users".
- If you use a firewall or proxy, you configured it to allow the sites that your cluster requires access to. For more information, see "Configuring your firewall".
- You configured your firewall to allow TCP traffic on port
8090from all hosts to the rendezvous host so that hosts can reach the Assisted Service API during discovery and bootstrap. For more information, see "Port requirements for the rendezvous host".
Additional resources
- OpenShift Container Platform installation and update
- Selecting a cluster installation method and preparing it for users
- Configuring your firewall
- Port requirements for the rendezvous host
Download the Agent-based Installer
Begin the installation process by downloading the Agent-based Installer and the CLI needed for your installation.
Procedure
- Log in to the Red Hat Hybrid Cloud Console using your login credentials.
- Navigate to Datacenter.
- Click Run Agent-based Installer locally.
- Select the operating system and architecture for the OpenShift Installer and Command line interface.
- Click Download Installer to download and extract the install program.
- Download or copy the pull secret by clicking on Download pull secret or Copy pull secret.
- Click Download command-line tools and place the
openshift-installbinary in a directory that is on yourPATH.
Creating the configuration inputs
Create the configuration files that are used by the installation program to generate the agent image.
Procedure
-
Place the
openshift-installbinary in a directory that is on your PATH. -
Create a directory to store the install configuration by running the following command:
-
Create the
install-config.yamlfile by running the following command:$ cat << EOF > ./my-cluster/install-config.yaml apiVersion: v1 baseDomain: test.example.com compute: - architecture: amd64 hyperthreading: Enabled name: worker replicas: 0 controlPlane: architecture: amd64 hyperthreading: Enabled name: master replicas: 1 metadata: name: sno-cluster networking: clusterNetwork: - cidr: fd01::/48 hostPrefix: 64 machineNetwork: - cidr: fd2e:6f44:5dd8:c956::/120 networkType: OVNKubernetes serviceNetwork: - fd02::/112 platform: none: {} pullSecret: '<pull_secret>' sshKey: '<ssh_pub_key>' additionalTrustBundle: | -----BEGIN CERTIFICATE----- ZZZZZZZZZZZZZZZZZZZZZZZZZZZZZZZZZZZZZZZZZZZZZZZZZZZZZZZZZZZZZZZZ -----END CERTIFICATE----- imageContentSources: - mirrors: - <local_registry>/<local_repository_name>/release source: quay.io/openshift-release-dev/ocp-release - mirrors: - <local_registry>/<local_repository_name>/release source: quay.io/openshift-release-dev/ocp-v4.0-art-dev EOFwhere:
compute.architecture- Specifies the system architecture. Valid values are
amd64,arm64,ppc64le, ands390x.
If you are using the release image with the `multi` payload, you can install the cluster on different architectures such as `arm64`, `amd64`, `s390x`, and `ppc64le`. Otherwise, you can install the cluster only on the `release architecture` displayed in the output of the `openshift-install version` command. For more information, see "Verifying the supported architecture for installing an Agent-based Installer cluster".metadata.name- Specifies your cluster name. This value is required.
networking.networkingType- Specifies the cluster network plugin to install. The default value
OVNKubernetesis the only supported value. platform- Specifies your platform.
!!! note For bare metal platforms, host settings made in the platform section of the `install-config.yaml` file are used by default, unless they are overridden by configurations made in the `agent-config.yaml` file.pullSecret- Specifies your pull secret.
sshKey- Specifies your SSH public key.
additionalTrustBundle- Specifies the contents of the certificate file that you used for your mirror registry. The certificate file can be an existing, trusted certificate authority or the self-signed certificate that you generated for the mirror registry. You must specify this parameter if you are using a disconnected mirror registry.
imageContentSources- Specifies the
imageContentSourcessection according to the output of the command that you used to mirror the repository. You must specify this parameter if you are using a disconnected mirror registry.
!!! warning - When using the `oc adm release mirror` command, use the output from the `imageContentSources` section. - When using the `oc mirror` command, use the `repositoryDigestMirrors` section of the `ImageContentSourcePolicy` file that results from running the command. - The `ImageContentSourcePolicy` resource is deprecated. -
Create the
agent-config.yamlfile by running the following command:$ cat > agent-config.yaml << EOF apiVersion: v1beta1 kind: AgentConfig metadata: name: sno-cluster rendezvousIP: fd2e:6f44:5dd8:c956::50 EOFwhere:
rendezvousIP- Specifies the IP address used to determine which node performs the bootstrapping process as well as running the
assisted-servicecomponent. You must provide the rendezvous IP address when you do not specify at least one host IP address in thenetworkConfigparameter. If this address is not provided, one IP address is selected from the provided hostnetworkConfigparameter.
Create and boot the agent image
After you have prepared the configuration inputs for your installation, create the ISO image and boot it on your machines.
Prerequisites
- If you plan to boot the agent image from a USB drive, you have installed the
syslinuxpackage.
Procedure
-
Create the agent image by running the following command:
Note
Red Hat Enterprise Linux CoreOS (RHCOS) supports multipathing on the primary disk, allowing stronger resilience to hardware failure to achieve higher host availability. Multipathing is enabled by default in the agent ISO image, with a default
/etc/multipath.confconfiguration. -
If you plan to boot the ISO image from a USB drive, add a master boot record to the image by running the following command:
-
Boot the
agent.x86_64.iso,agent.aarch64.iso, oragent.s390x.isoimage on the bare-metal machines.
Verifying that the current installation host can pull release images
After you boot the agent image and network services are made available to the host, the agent console application performs a pull check to verify that the current host can retrieve release images.
If the primary pull check passes, you can quit the application to continue with the installation. If the pull check fails, the application performs additional checks, as seen in the Additional checks section of the TUI, to help you troubleshoot the problem. A failure for any of the additional checks is not necessarily critical as long as the primary pull check succeeds.
If there are host network configuration issues that might cause an installation to fail, you can use the console application to make adjustments to your network configurations.
Warning
If the agent console application detects host network configuration issues, the installation workflow will be halted until the user manually stops the console application and signals the intention to proceed.
Procedure
-
Wait for the agent console application to check whether or not the configured release image can be pulled from a registry.
-
If the agent console application states that the installer connectivity checks have passed, wait for the prompt to time out to continue with the installation.
Note
You can still choose to view or change network configuration settings even if the connectivity checks have passed.
However, if you choose to interact with the agent console application rather than letting it time out, you must manually quit the TUI to proceed with the installation.
-
If the agent console application checks have failed, which is indicated by a red icon beside the
Release image URLpull check, use the following steps to reconfigure the host’s network settings:- Read the
Check Errorssection of the TUI. This section displays error messages specific to the failed checks.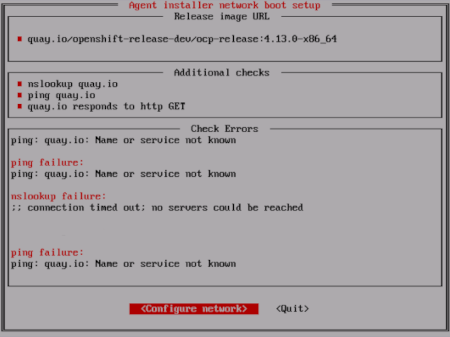
- Select Configure network to launch the NetworkManager TUI.
- Select Edit a connection and select the connection you want to reconfigure.
- Edit the configuration and select OK to save your changes.
- Select Back to return to the main screen of the NetworkManager TUI.
- Select Activate a Connection.
- Select the reconfigured network to deactivate it.
- Select the reconfigured network again to reactivate it.
- Select Back and then select Quit to return to the agent console application.
- Wait at least five seconds for the continuous network checks to restart using the new network configuration.
- If the
Release image URLpull check succeeds and displays a green icon beside the URL, select Quit to exit the agent console application and continue with the installation.
- Read the
Track and verify installation progress
After the installation has started, you can track installation progress and verify a successful installation.
Prerequisites
- You have configured a DNS record for the Kubernetes API server.
Procedure
-
Optional: To know when the bootstrap host (rendezvous host) reboots, run the following command:
$ ./openshift-install --dir <install_directory> agent wait-for bootstrap-complete \
    --log-level=info
where:
--dir- specifies the path to the directory where the agent ISO was generated.
--log-level- Specifies the level of installation details. Valid values are
info,warn,debug, anderror.
Example output................................................................... ................................................................... INFO Bootstrap configMap status is complete INFO cluster bootstrap is completeThe command succeeds when the Kubernetes API server signals that it has been bootstrapped on the control plane machines.
-
Track the progress and verify successful installation by running the following command:
Replace
<install_directory>with the path to the directory where the agent ISO was generated.Example output................................................................... ................................................................... INFO Cluster is installed INFO Install complete! INFO To access the cluster as the system:admin user when using 'oc', run INFO export KUBECONFIG=/home/core/installer/auth/kubeconfig INFO Access the OpenShift web-console here: https://console-openshift-console.apps.sno-cluster.test.example.com
Gather log data from a failed Agent-based installation
If you encounter a failed Agent-based installation, you can gather log data to provide for a support case.
Prerequisites
- You have configured a DNS record for the Kubernetes API server.
Procedure
-
Run the following command and collect the output:
-
If the output from the previous command indicates a failure, or if the bootstrap is not progressing, run the following command to connect to the rendezvous host and collect the output:
Note
Red Hat Support can diagnose most issues using the data gathered from the rendezvous host, but if some hosts are not able to register, gathering this data from every host might be helpful.
-
If the bootstrap completes and the cluster nodes reboot, run the following command and collect the output:
-
If the output from the previous command indicates a failure, perform the following steps:
-
Export the
kubeconfigfile to your environment by running the following command: -
Gather information for debugging by running the following command:
-
Create a compressed file from the
must-gatherdirectory that was just created in your working directory by running the following command:
-
-
Excluding the
/authsubdirectory, attach the installation directory used during the deployment to your support case on the Red Hat Customer Portal. -
Attach all other data gathered from this procedure to your support case.
Additional resources